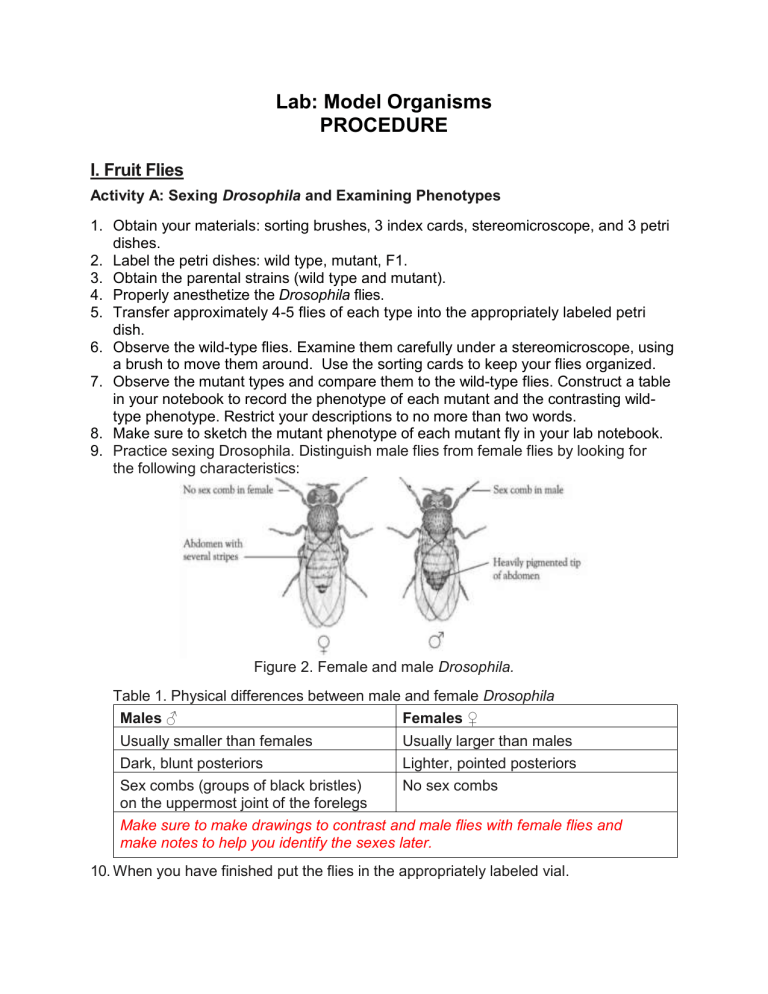
Lab: Model Organisms PROCEDURE I. Fruit Flies Activity A: Sexing Drosophila and Examining Phenotypes 1. Obtain your materials: sorting brushes, 3 index cards, stereomicroscope, and 3 petri dishes. 2. Label the petri dishes: wild type, mutant, F1. 3. Obtain the parental strains (wild type and mutant). 4. Properly anesthetize the Drosophila flies. 5. Transfer approximately 4-5 flies of each type into the appropriately labeled petri dish. 6. Observe the wild-type flies. Examine them carefully under a stereomicroscope, using a brush to move them around. Use the sorting cards to keep your flies organized. 7. Observe the mutant types and compare them to the wild-type flies. Construct a table in your notebook to record the phenotype of each mutant and the contrasting wildtype phenotype. Restrict your descriptions to no more than two words. 8. Make sure to sketch the mutant phenotype of each mutant fly in your lab notebook. 9. Practice sexing Drosophila. Distinguish male flies from female flies by looking for the following characteristics: Figure 2. Female and male Drosophila. Table 1. Physical differences between male and female Drosophila Males ♂ Females ♀ Usually smaller than females Usually larger than males Dark, blunt posteriors Lighter, pointed posteriors Sex combs (groups of black bristles) No sex combs on the uppermost joint of the forelegs Make sure to make drawings to contrast and male flies with female flies and make notes to help you identify the sexes later. 10. When you have finished put the flies in the appropriately labeled vial. Activity B: Scoring F1 Phenotypes and Setting up F1 Crosses Possible Parental Strain crosses: Mutant female X Wild type male Wild type female X Mutant male 1. These strains observed in Activity A are the parents of the F1 generation you are about to observe. 2. Set up 1 F2 vial per group. 3. For your group, obtain a culture vial, foam plug and culture media 4-24. 4. Properly anesthetize the F1 Drosophila flies. 5. Your group will need to examine at least 25 flies; have each individual place 4-12 flies on a sorting card. 6. Examine the F1 flies that are the progeny (children) of your parental cross in the petri dish under the dissecting scope. Make sure each member of your groups looks at some of the flies. 7. Record the sex and phenotype of each fly. This data collection is called “scoring” the flies for phenotype. You should record the data for at least 25 flies total. # Females # Males Total Date Phenotype with with (Females + Males) phenotype phenotype 8. You will now set up an F1 cross in order to create an F2 progeny for your group. Set up a culture vial for the F1 cross: o Place one cap of Instant Drosophila Medium 4-24, and one cap of water in the vial. o When it solidifies, sprinkle 4–7 grains of yeast on top of the media. NO MORE, this is critical!! Set the vial on its side and carefully place five or six male/female pairs of the anesthetized F1 flies in the fresh culture vial avoiding the media. This is important so that they do not get stuck in the media. Gently plug the top of the vial with the foam plug. Label the new vial “F1 cross.” Also include the date and your group name. Keep the vial on its side and place it in the designated bin. 9. After you have scored all the F1 flies, recorded the data, and set up the F1 cross, put the rest of the F1 flies in designated vial in the hood. II. The Worm – C. elegans In this lab you will learn a basic protocol for transferring C. elegans to new plates so they can grow. There are several methods for culturing C. elegans, we will use the swab technique. Procedure 1. Work in groups of 2-4. 2. Obtain: Wild type strain of C. elegans Fresh agar plate containing OP50 E. coli (food for C. elegans) Sterile swab 3. Use the dissecting microscope to observe the worms. 4. To transfer the worms, gently touch the swab to the surface of the plate several times. (This will pick up a lot of C. elegans.) 5. Next, gently touch the tip to the surface of the plate containing OP50 E. coli. (This will transfer several worms to the plate.) 6. Discard the swab in the biohazard bin. 7. Label your plate with C. elegans and your group name and date. 8. Place in the Room Temperature incubation bin. III. Monohybrid Cross of Yeast Spores (a x α strains) Four haploid strains of S. cerevisiae will be used in the following experiment to demonstrate basic genetic principles. The four haploid strains represent the gametes of the traditional Mendelian F1 generation. A monohybrid cross will be performed among these gametes to produce the F2 generation. This monohybrid cross will follow two forms of one trait: red vs. white color. Mendel used a simple, short-hand method, using capital and lower-case letters, to identify the alleles in his monohybrid crosses with peas. In a similar manner, the allele for the dominant, white color of yeast will be represented by R. The recessive red color is then represented by r. These haploid genotypes, R and r, can be determined by testing the yeast on a particular kind of growth medium. The color trait in yeast is visible when it is grown on a nutritionally complete medium called YED. 1. Obtain the following materials: Subculture of yeast strain a 1 1 YED plate Subculture of yeast strain a 2 Mating grid Subculture of yeast strain alpha 1 Beaker of sterile toothpicks Subculture of yeast strain alpha 2 2. Record your names and the date on the back of your grid. Tape the grid to bottom of your YED plate so the grid can be seen through the agar. 3. Next, inoculate the mating grid following these instructions: IMPORTANT: To ensure sterile conditions, handle each toothpick by one end, and be careful not to touch the opposite end to anything except the yeast or sterile agar. a. Lift the lid from the alpha 1 culture plate. Using the flat end of a clean toothpick, gently touch the haploid alpha colony and gather a small sample. Replace the lid. b. Lift the lid of your YED agar plate and, using a circular motion, carefully spot your alpha 1 sample DIRECTLY IN the square labeled “alpha 1”. c. Be very gentle when spotting. Do not puncture or tear up the agar with your toothpick. d. Replace the lid and discard your toothpick. e. Using a new toothpick for each strain, repeat the steps for yeast strains alpha 2, a1 and a2. Use your mating grid as a guideline. 4. When finished, place your plate in the “To Be Incubated” bin. IV. Yeast – Saccharomyces cerevisiae Today you will test the effects of chemical exposure on yeast. Procedure 1. Obtain 2 PDA plates, culture of Baker’s yeast, and 2 swabs. 2. Label one PDA plate “CONTROL” and the other “TEST”; include your group name and date on both plates. 3. Follow the directions provided by your instructor in class. 4. Possible test substances: Tetrazolium chloride, Ethidium Bromide, pesticides. V. Observations – Mammalian Cells Obtain your cell culture flasks from last week. Observe the color of your flasks. Record results from the class. Discard your flasks in the biohazard bins when you are finished. Temperature Media Appearance Interpretation Control - 37⁰C Test – 4⁰C Test – 25⁰C Test – 30⁰C Test – 41⁰C What was the effect of temperature on growth? VI. Observations – Bacteria and Fungi Obtain your NA and PDA plates from last week. Record your results below. Discard your plates in the biohazard bins when you are finished.
