Material Science Homework: Stress, Fracture, and Properties
advertisement
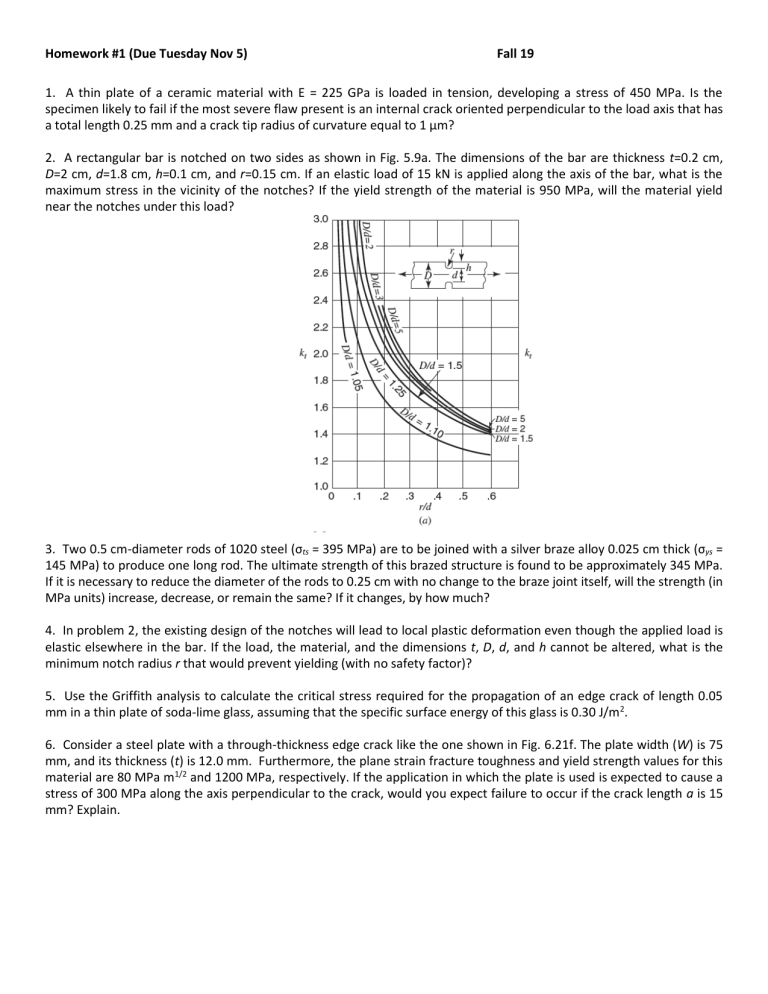
Homework #1 (Due Tuesday Nov 5) Fall 19 1. A thin plate of a ceramic material with E = 225 GPa is loaded in tension, developing a stress of 450 MPa. Is the specimen likely to fail if the most severe flaw present is an internal crack oriented perpendicular to the load axis that has a total length 0.25 mm and a crack tip radius of curvature equal to 1 µm? 2. A rectangular bar is notched on two sides as shown in Fig. 5.9a. The dimensions of the bar are thickness t=0.2 cm, D=2 cm, d=1.8 cm, h=0.1 cm, and r=0.15 cm. If an elastic load of 15 kN is applied along the axis of the bar, what is the maximum stress in the vicinity of the notches? If the yield strength of the material is 950 MPa, will the material yield near the notches under this load? 3. Two 0.5 cm-diameter rods of 1020 steel (σts = 395 MPa) are to be joined with a silver braze alloy 0.025 cm thick (σys = 145 MPa) to produce one long rod. The ultimate strength of this brazed structure is found to be approximately 345 MPa. If it is necessary to reduce the diameter of the rods to 0.25 cm with no change to the braze joint itself, will the strength (in MPa units) increase, decrease, or remain the same? If it changes, by how much? 4. In problem 2, the existing design of the notches will lead to local plastic deformation even though the applied load is elastic elsewhere in the bar. If the load, the material, and the dimensions t, D, d, and h cannot be altered, what is the minimum notch radius r that would prevent yielding (with no safety factor)? 5. Use the Griffith analysis to calculate the critical stress required for the propagation of an edge crack of length 0.05 mm in a thin plate of soda-lime glass, assuming that the specific surface energy of this glass is 0.30 J/m2. 6. Consider a steel plate with a through-thickness edge crack like the one shown in Fig. 6.21f. The plate width (W) is 75 mm, and its thickness (t) is 12.0 mm. Furthermore, the plane strain fracture toughness and yield strength values for this material are 80 MPa m1/2 and 1200 MPa, respectively. If the application in which the plate is used is expected to cause a stress of 300 MPa along the axis perpendicular to the crack, would you expect failure to occur if the crack length a is 15 mm? Explain. 7. A compact tension test specimen (H/W = 0.6) (Fig. 6.21g), is designed and tested according to the ASTM E399-90 procedure. Accordingly, a Type I load versus displacement (P vs. δ) test record was obtained and a measure of the maximum load Pmax and a critical load measurement point PQ were determined. The specimen dimensions were determined as W = 10-cm, t = 5-cm, a = 5-cm, the critical load-point measurement point PQ = 100 kN and Pmax = 105 kN. Assuming that all other E399 requirements regarding the establishment and sharpness of the fatigue starter crack are met, determine the critical value of stress intensity. Does it meet conditions for a valid KIC test if the material yield stress is 700 MPa? If it is 350 MPa? 8. Two square steel rods were brazed end-to-end to produce a rod with dimensions 6.25 × 6.25 × 30-cm. The silver braze is 0.063-cm thick and was produced with material possessing an ultimate strength of 140 MPa in bulk form. The steel rod sections have yield and tensile strengths of 690 and 825 MPa, respectively, and a plane-strain fracturetoughness value of 83 MPa m . (a) If the rod/braze assembly is loaded in tension perpendicular to the joint plane, will failure occur in the braze joint or in the steel? Assume that the steel rod contains an elliptical surface flaw 1.25-cm deep and 3.75-cm wide that is oriented normal to the stress axis. Determine the stress necessary for failure. (b) If the same rod had instead contained a through-thickness crack of depth 2.5-cm at the same crack location and orientation, determine where failure will occur and at what stress level.
