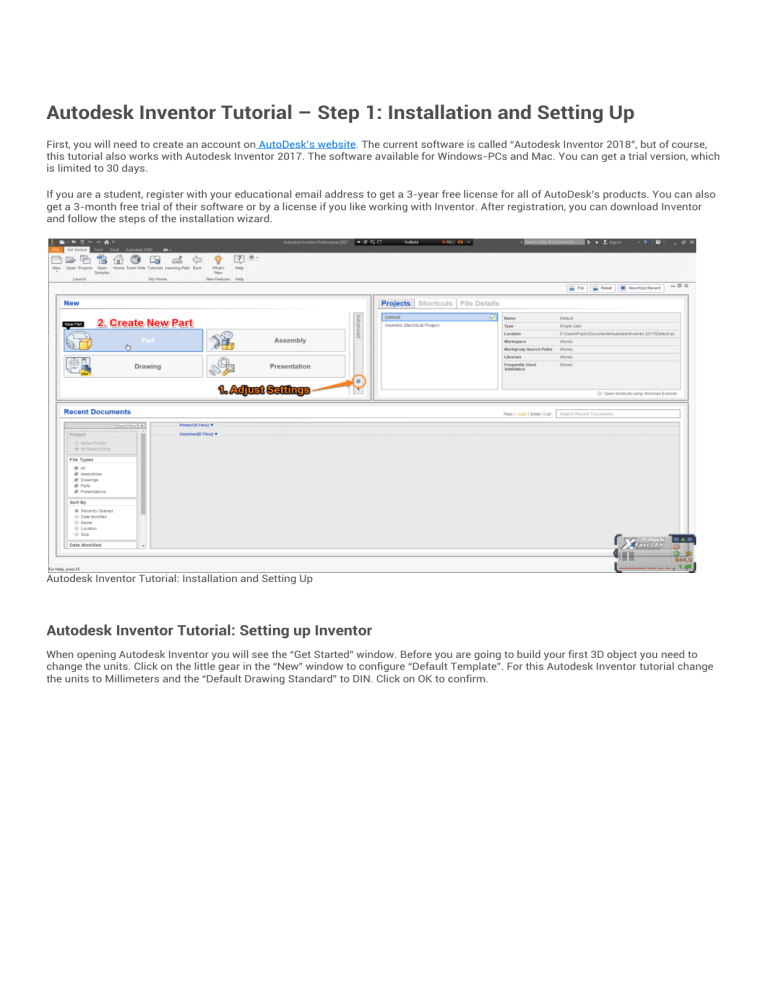
Autodesk Inventor Tutorial – Step 1: Installation and Setting Up First, you will need to create an account on AutoDesk’s website. The current software is called “Autodesk Inventor 2018”, but of course, this tutorial also works with Autodesk Inventor 2017. The software available for Windows-PCs and Mac. You can get a trial version, which is limited to 30 days. If you are a student, register with your educational email address to get a 3-year free license for all of AutoDesk’s products. You can also get a 3-month free trial of their software or by a license if you like working with Inventor. After registration, you can download Inventor and follow the steps of the installation wizard. Autodesk Inventor Tutorial: Installation and Setting Up Autodesk Inventor Tutorial: Setting up Inventor When opening Autodesk Inventor you will see the “Get Started” window. Before you are going to build your first 3D object you need to change the units. Click on the little gear in the “New” window to configure “Default Template”. For this Autodesk Inventor tutorial change the units to Millimeters and the “Default Drawing Standard” to DIN. Click on OK to confirm. Autodesk Inventor Tutorial – Step 2: Basic Orientation Autodesk Inventor Tutorial: Basic Orientation Autodesk Inventor Tutorial: Basic Explanation of the Workspace Autodesk Inventor Tutorial: Change Home View Click on Part in the “New” window to create a new Part. You can now see the “Model” window on the left. This lists all the Sketches, Features and Properties of your Part. Click on the arrow next to the Origin folder to expand. Now right click on YZ-, XZ- and XY-Plane and check Visibility to display the planes. In the top you can find the Toolbox with all the features to create your first 3D object. The most important window is your DrawSpace. Here you can find a Cartsian Coordinate System in the left-hand corner and a cube in the right-hand corner. Both will help you to orient yourself, whereas you can click on the faces, edges and corners of the cube to enter the desired view. If you hover over the cube, you can see a little house which will center on the DrawSpace on isometric view. You can change the home view by first switching to the point of view you want to set as home. Then right clicking the home symbol > Set Current View as Home > Fixed to View. Autodesk Inventor Tutorial: Movement in Autodesk Inventor To move planar, click and hold the mouse wheel. Hold Shift and the mouse wheel to rotate. Scrolling with the mouse wheel will zoom in or out of the cursor’s position. If you are working on your laptop and do not have a mouse, you can enable the Full Navigation Wheel in the Navigation Bar. Here you can access all movement tools in a fly. You can access all the movement tools over the Navigation bar as well. Autodesk Inventor Tutorial: Basic Sketch Conventions In this Autodesk Inventor Tutorial, Cartesian Coordinates for s are going to be displayed like this: X/Y, polar coordinates by length/angle. The center of the coordinate system is called centerpoint. You can select objects by clicking on them and unselect by holding Shift and clicking them again. Select multiple by either marking them with a rectangular mark or clicking objects while pressing Ctrl. Undo previous command with Ctrl+Z. Autodesk Inventor Tutorial: The Line Command Click on “Start 2D Sketch” and select XY-Plane in the DrawSpace. Your Toolbox will change to “Sketch”, where you have access to all sketching commands and the view will change to Top view. Toggle Visibility of all three planes off in the Model window. Now click on the line command or press the “L” key. Hover over the CenterPoint and click when the dot of your cursor turns green. This signalizes that the point snapped. After you set the starting point of the line the input coordinates for the second point will change to polar. Follow the positive X-Axis type in 10 and confirm with Enter. As you can see the line constrained itself parallel to the X-Axis and with a length of 10mm. You will also notice that the line command has not ended yet. Draw the second line in a roughly 145° Angle and slightly of the Y-Axis. Click and press ESC to exit the line command. Autodesk Inventor Tutorial: Constrain your Sketch The line will be colored green, which symbolizes that the line is unconstrained. You can click and drag the endpoint of the line and move it around freely. To constrain your sketch, click on “Dimension” and then on the line to set the length. Right-click to change the orientation of the Dimension to Vertical and set the length to 10. As you can see the line is not fully constrained yet. Click on Perpendicular Constraint and then select both lines. Your second line is now dark blue which means fully constrained and if you try to drag it, it will not move. You can position Dimensions by dragging them. Autodesk Inventor Tutorial: Circle Command Click on the “Circle” command, set the center point of the circle at 5/10 with a radius of 10. When you click on the arrow under the circle command you can see the “Tangent Circle” and the “Ellipse”. Draw a line from the CenterPoint in a 45° angle until it snaps with the circle. Autodesk Inventor Tutorial: Trim Command Click on the “Trim” command and then on the circle line facing outwards of the entire sketch. Also trim the line inside the semicircle by clicking it. The sketch is not fully constrained, so mark the entire sketch and click “Automatic Dimensions and Constrains” a window will pop up showing the number of missing dimensions and constrains. Check Dimensions and Constrains, press “Apply” followed by “Done”. Autodesk Inventor Tutorial: Mirror Command First, you will need to set the right vertical line for construction. Click on it followed by a right click. Then select “Construction” This will make the line help you with setting up constraints for further drawings while not affecting features. Autodesk Inventor Tutorial: Mirror Sketch This handy command is great for symmetrical sketches and will save you from unnecessary repetition. Click on the “Mirror” command and select the entire sketch except for the construction line you just defined. Then click on “Mirror Line” in the command window and select the construction line. Exit the Sketch by clicking “Finish Sketch”. Before you start with the next step start a new Part. Autodesk Inventor Tutorial: Offset Planes Start a new sketch on the XY-Plane. Draw a “Center Rectangle” 50/50 from the CenterPoint. Exit the sketch. Do a slow double-click on it in the Model window or highlight it and press F2 to rename it into ‘Base’. Click on the arrow under “Plane” to show all options and select “Offset from Plane”. Now select the XY-Plane in the Model window from the Origin folder and offset it by 5mm. The new Plane will be listed in the Model window as ‘Work Plane’. Select the new Work Plane and draw a circle from the CenterPoint with the Radius 50. Exit the Sketch and you can see the offset between the two sketches. You can create new Work Planes in different angles and positions which is very useful when sketching in 3D. Autodesk Inventor Tutorial – Step 3: 3D Modeling Let’s go a step further: Now we’re starting to actually 3D model in Autodesk Inventor. This process should take roughly one hour of your time. Autodesk Inventor Tutorial: Loft Feature Click on “Loft” and select both sketches you drew in the previous step. Select “Rails” for an easy loft. With “Centerline” you can make the loft follow a certain path. Start a new sketch on the XZ-Plane. Draw a line starting at the middle and on the same height as the circle plane Stop at the radius of the circle. Draw an arc starting at the endpoint of the line. Set the length to 100 with an angle of 95°. Set the Radius to 120. Draw a second arc with 25/75°/20. Now draw a line starting at the endpoint of the second arc, going parallel to the X-Axis. Continue the line parallel to the Z-Axis and ending in the middle of the circle from where you have started this sketch. Exit the Sketch. Autodesk Inventor Tutorial: Revolve Feature Autodesk Inventor Tutorial: Revolve Feature Click on “Revolve” and it will most likely highlight the area surrounded by the recent sketch. If not you can select any area fully enclosed by a sketch by simply clicking on one line which is part of the sketch you want to revolve. Select the Z-Axis for rotation axis followed by Full or 360° to do a complete rotation. Autodesk Inventor Tutorial: Shell Feature Autodesk Inventor Tutorial: Shell Feature If you want to hollow a 3D object you can do so with the shell feature. Click on “Shell” and the vase you created with the rotation feature to hollow it. Select the top face of the vase to create an opening and set thickness to 3mm. Autodesk Inventor Tutorial: Sweep Feature At first you need to offset the XZ-Plane by 15 and create a new Sketch on the offset plane. Draw a line starting from the bottom and center of the object. Follow the Z-Axis and end at a length of 90mm. Exit the sketch and start a new one on the same work plane. Draw another line from the same starting point, follow the Z-Axis and end at 35mm. Label the line for construction and draw a circle with the end of the line as center point with a radius of 10. Exit the sketch and start a new one on the YZ-Plane. Highlight the endpoint of the 90mm line and the center point of the circle. Now click on “Project Geometry” to reference those points in this sketch. Draw an arc between these points with a radius of 30mm facing outwards. To create the Sweep Feature click on “Sweep” and select the circle as Profile and the arc as path. Set “Taper” to 1 to make the Sweep thicker on one end. You can also twist the Sweep to add some extra detail by entering n*360 with n representing how many times you want to twist the sweep. Remove the spare sweep model inside of the vase with the “Delete Face” command. Enable the command, check ‘Heal’, highlight the extra parts and confirm by clicking OK. Run the command again, also with ‘Heal’ enabled to remove the last extra. Autodesk Inventor Tutorial: Fillet Feature To round the edges and smoothen the transitions you can use “Fillet”. Run the command and highlight the intersecting parts of the handle. Set the radius to 2mm and confirm. Autodesk Inventor Tutorial: Mirror Objects Autodesk Inventor Tutorial: Mirror Objects Like the 3D mirror, this can save you a lot of work. Highlight the Features you want to mirror. Select Sweep, Delete Face1, Delete Face2 and Fillet in the Model window and then run the Mirror Pattern. Select the XZ-Plane to mirror across.
