Testing and centering of lenses by means of a
Hartmann test with four holes
Daniel Malacara, FELLOW SPIE
Zacarias Malacara
Centro de Investigaciones en Optica
Apartado Postal 948
LeOn, Mexico
Abstract. The Hartmann test is frequently performed with a screen with
many holes to test the quality of a mirror or the aberrations of a lens. An
application of the simplest form of this test with only four holes is described. This test cannot detect spherical aberration, but it may be useful
to align optical systems, to detect and measure focus errors, or to detect
lens decenterings and coma.
Subject terms: optical testing; geometrical optics; Hartmann test.
Optical Engineering 3 1(7), 1551-1555 (July 1992).
1 Introduction
In this paper we describe a modified and simplified version
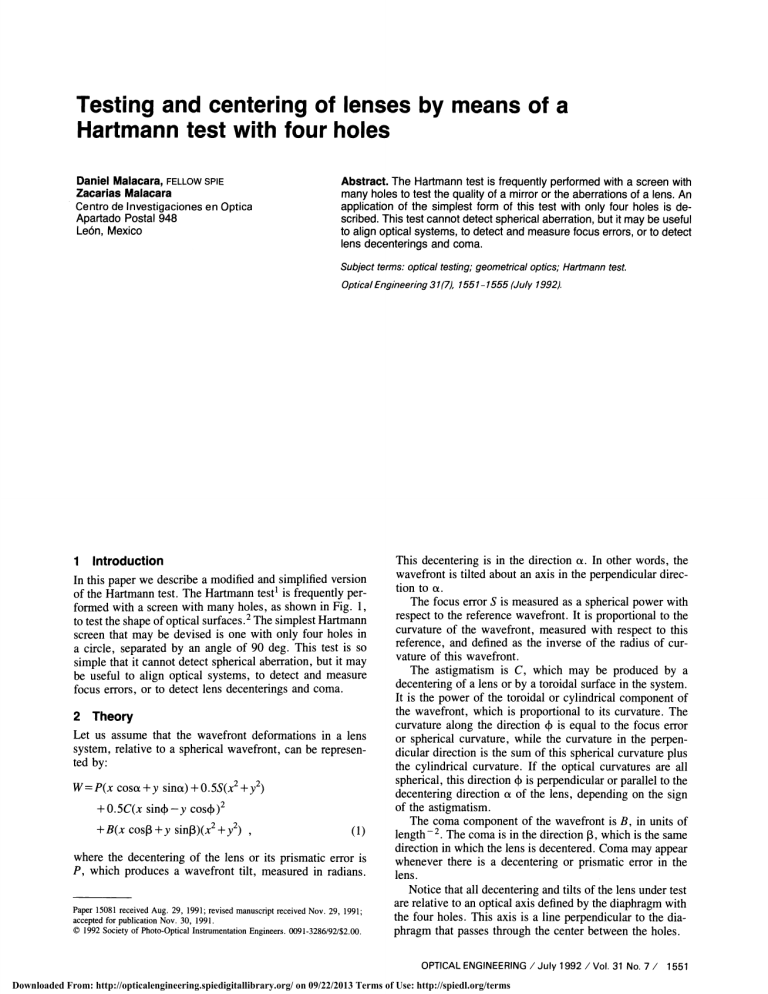
of the Hartmann test. The Hartmann test1 is frequently performed with a screen with many holes, as shown in Fig. 1,
to test the shape of optical surfaces.2 The simplest Hartmann
screen that may be devised is one with only four holes in
a circle, separated by an angle of 90 deg. This test is so
simple that it cannot detect spherical aberration, but it may
be useful to align optical systems, to detect and measure
focus errors, or to detect lens decenterings and coma.
2 Theory
Let us assume that the wavefront deformations in a lens
system, relative to a spherical wavefront, can be represented by:
W=P(x cosa+y sina)+0.5S(x2+y2)
+0.5C(x sin—y cos)2
+B(x cosl3 +y sinl3)(x2 +y2)
(1)
where the decentering of the lens or its prismatic error is
P, which produces a wavefront tilt, measured in radians.
Paper 15081 received Aug. 29, 1991; revised manuscript received Nov. 29, 1991;
accepted for publication Nov. 30, 1991.
1992 Society of Photo-Optical Instrumentation Engineers. 0091-3286/92/$2.00.
This decentering is in the direction a. In other words, the
wavefront is tilted about an axis in the perpendicular direction to a.
The focus error S is measured as a spherical power with
respect to the reference wavefront. It is proportional to the
curvature of the wavefront, measured with respect to this
reference, and defined as the inverse of the radius of curvature of this wavefront.
The astigmatism is C, which may be produced by a
decentering of a lens or by a toroidal surface in the system.
It is the power of the toroidal or cylindrical component of
the wavefront, which is proportional to its curvature. The
curvature along the direction is equal to the focus error
or spherical curvature, while the curvature in the perpendicular direction is the sum of this spherical curvature plus
the cylindrical curvature. If the optical curvatures are all
spherical, this direction is perpendicular or parallel to the
decentering direction a of the lens, depending on the sign
of the astigmatism.
The coma component of the wavefront is B, in units of
length — 2 The coma is in the direction 3 , which is the same
direction in which the lens is decentered. Coma may appear
whenever there is a decentering or prismatic error in the
lens.
Notice that all decentering and tilts of the lens under test
are relative to an optical axis defined by the diaphragm with
the four holes. This axis is a line perpendicular to the diaphragm that passes through the center between the holes.
OPTICAL ENGINEERING / July 1 992 / Vol. 31 No. 7 / 1551
Downloaded From: http://opticalengineering.spiedigitallibrary.org/ on 09/22/2013 Terms of Use: http://spiedl.org/terms
MALACARA and MALACARA
DIAPHRAGM
b
C
LENS
UNDER TEST
Fig. 1 Hartmann test layout.
Fig. 2 Four holes to make Hartmann test.
The wavefront deformations W and the transverse abrelated by the following well-
errations TA and TA are
known expressions:
TA =
-f
()
TA
(2)
and
S = 0.1
=
TA=_f()
TA
TA
= 0°
(3)
.
Thus , using these relations , the x components of the trans-
TA
verse aberrations are given by:
+2Bx(x cos3+y sin3)+B(x2+y2) cos3 ,
P sina + Sy — C(x sin —y
__7__
0 = 45'
= 45U
(4)
Fig. 3 Images for a combination offocusing error (S = 0.1 and S = 1.0)
45 deg).
and astigmatism (C = 1 with 4 = 0 deg
and =
and the y components by
— TA =
S=1
S = 0.1
— = P cosa + Sx + C(x sin — y cos4) sin
cos) cos
+ 2By(x cos3 + y sin3) + B(x2 + y2) sin3 ,
(5)
where f is the distance from the wavefront to the measuring
plane for the transverse aberrations . If the four holes on the
Hartmann screen are represented by a, b, c, and d, as shown
in Fig. 2, we may find:
p=
0
TAxa/fP cosa + p(S + C sin2) + 3Bp2 cos3
—
TAbIf= P cosa — pC sin cos + Bp2 cos3
—
—
TA/f= P cosa — p(S + C sin2) + 3Bp2 cos3
—
TAdIf= P cosc + pC sin cos + Bp2 cos3
—
TAya/f P sina — pG
0°
= 0°
TA
(6)
sin cos + Bp2 sin3
TAyb/fP sina+p(S+C cos2)+3Bp2 sin3
—
TA/f= P sina + pC sin cos + Bp2 sin3
TAyd/fP sina—p(S+C cos2)+3Bp2 sin3
..
p = 0'
0 = 45°
45'
45'
Examples of these transverse aberrations for a mixture of
focusing errors and astigmatism are given in Fig . 3 , for a
mixture of coma and astigmatism in Fig. 4 and for a mixture
Fig. 4 Images for a combination of coma (B = 0.5 with 3 — 0 deg and
of focusing error and coma in Fig. 5.
1=45 deg) and astigmatism (C=1 with =0 deg and =45 deg).
1
552 / OPTICAL ENGINEERING / July 1 992 / Vol. 31 No. 7
Downloaded From: http://opticalengineering.spiedigitallibrary.org/ on 09/22/2013 Terms of Use: http://spiedl.org/terms
TESTING AND CENTERING OF LENSES
and from these, we obtain:
TA
TA
C = [(ixa iyb) + (ixb +
ie
Sya)21112
.
(9)
TA
This is the astigmatism power, or cylinder, which has an
axis orientation 4 given by:
I.
S =
0.1
P = 0'
0'
TA
TA
i.
S =
tan24=
•TA
xb+ya
(10)
°xa — Oyb
The focus error, also called sometimes spherical power, is
given by:
s= 1
0.1
p = 45'
p = 45'
5Sxa+yb+C .
Fig. 5 Images for a combination of focusing error (S=0.1 and S= 1.0)
and coma (B=0.5 with 13=0 deg and 3=45 deg).
(11)
The lens decentering, wavefront tilt or prismatic error, is
given by:
= p[(3a-
—
a-yb) + (a-xa — 3a-xb)2]112
If the differences of these aberrations divided by 2pf are
represented by S, and the sums divided by 2pf are represented by a-, we find:
xa =
TAxa —
TA = — — C sin2
tana=
2pf
TAya —
TA = C sin cos
yb = TAb—TAd —s—c cos24
a-xa=
crxb=
a-yb=
(7)
TAxa + TAxc = — P cos —
p
2pf
TAxb+TAxd
P Cosa
2pf
p
P Sifla
p
tan3=
xb +
yb2SC
ya = 2C
xb
ya
—
(
.
a-yb) + (a-xa
a-xb)2]112
(14)
a-ya
a-yb
a-xb
a-xa
.
(15)
following term T has to be zero, unless the original
assumption that the wavefront can be represented by Eq.
(1) is not valid, thus indicating the presence of higher order
aberrations or a bad measurement:
3Bp sinl3
T6xbya
.
(16)
From
If all the surfaces are spherical and centered along a
common axis, the angles a and 3 should be the same and
sin cos4 = C sin2
yb =
crxa
The
0
—
C(cos24 sin2) = C cos24
=
—
2Bp
a-xb
COSI3
—
2(P/p) CO5
3a-xb =
— a-yb = 2Bp sinl3
a-ya
3a-ya a-yb= —2(P/p) sina
xa —
3crxb
B cos3
where all these quantities have the units of length
these expressions we now easily find:
axa+
a-yb
which has an orientation given by:
3Bp cosl3
TAya +TA =
B sinl3
2pf
TAN,, + TAd = — P sina —
2pf
3a-ya
B = [(a-ya
2pf
2pf
has an orientation given by:
The coma aberration is:
xb TAxb_TAxdC sin cos
ya =
which
(12)
(8)
should also be the same, or mutually perpendicular to the
first two. If all the surfaces are spherical and the angles a
and 3 are not equal and/or the angle is not perpendicular
to them, this is because all the surfaces are not centered
along a common axis. Obviously the two spherical surfaces
in a single lens are always centered along a common axis.
If we may assume that there are no higher order aberrations or bad measurements that make T different from
zero, we may write:
OPTICAL ENGINEERING / July 1 992 / Vol. 31 No. 7 / 1553
Downloaded From: http://opticalengineering.spiedigitallibrary.org/ on 09/22/2013 Terms of Use: http://spiedl.org/terms
MALACARA and MALACARA
DIAPHRAGM
I
PtJtT1DN SENSDIG
D(TECTOP
LENS
UNDER TEST
(a)
PosrnoN SEPGING
JIETECTDR
LD
(a)
UNDER TEST
LIGHT
SOURCE
DIAPHRAGM
4 POSITION SENSING
DETECTORS
POSITION SENSING
DETECTOR
(b)
(b)
LENS
MIRROR
UNDER TEST
UNDER TEST
Fig. 6 Measurement of a lens or a mirror with large focal length.
Fig. 7 Optical configurations to measure the transverse aberrations:
(a) at the focus, with a small position sensing detector and (b) out
of focus, with four small position sensor detectors with a television
camera or with a photographic plate.
xb ya
The optical arrangement to take the measurements may
be implemented as in Fig. 6(a) or as in Fig. 6(b), with an
autocollimation arrangement, to measure concave optical
surfaces. In this manner, the radius of curvature may be
measured. If the coma and astigmatism are determined, the
optical center of an aspheric surface may be located. The
and
0yaffyb0xaffxbO
then, the astigmatism would have a magnitude:
C = {(xa iyb) +
1/2
(17)
with an orientation:
2ab
tan2= xa yb
(18)
second lens is introduced to keep the length of the instrument
small, even if the focal length of the element under test is
large.
If a single-point light source is used, as in the classical
Hartmann test, a large defocusing has to be introduced to
separate the four images. Then, their positions may be measured using a photographic plate, a television camera, or
four-position sensing detectors, as in Fig. 7(b).
A single small position sensing detector may be used at
the focus, as shown in Fig. 7(a), if the four holes are illuminated one at a time to take the four measurements . This
and the focusing error or spherical power would be:
can also be performed in many ways. Just to give a few
2
''19I
Note that the transverse aberration measurements may
be absolute as well as relative. For example, considering
Fig. 6(a), the lens after the diaphragm with the four holes
may have large aberrations, but then a second lens is inserted
in front of the diaphragm. If the lens under test is the one
in front, the transverse aberrations to be measured are those
representing the difference between those without and with
the lens. Then, two measurements are made, one before
and one after the lens to be tested is inserted.
examples, let us consider the four methods in Fig. 8. Figure
8(a) shows the use of a rotating slotted shutter in front of
the diaphragm with four holes. In Fig. 8(b), a laser scanning
device is used. It could be made with galvanometers, acoustooptic deflectors, or any other kind of deflector. Four independent light sources with a small circular diaphragm at the
focus of a collimating lens are shown in Fig. 8(c). Finally,
four independent light sources with four small lenses are
shown in Fig. 8(d).
3 Conclusions
This simple test is quite useful for examining the alignment
accuracy of many systems, or for measuring the coma and
1554 / OPTICAL ENGINEERING / July 1992 / Vol. 31 No. 7
Downloaded From: http://opticalengineering.spiedigitallibrary.org/ on 09/22/2013 Terms of Use: http://spiedl.org/terms
TESTING AND CENTERING OF LENSES
Hi
ROTATING
HUTTER
UGHT
SOURCE
(a)
m
-
(c)
(b)
FOUR LIGHT
SOURCES
(d)
Fig. 8 Four manners to measure the transverse aberrations when a small position
sensing detector
is used: (a) with a rotating shutter, (b) with a laser beam scanner, (c) with four light sources and a
small circular diaphragm at the focus of a lens, and (d) with four independent light sources and a small
lens in front of each.
the spherical as well as the cylindrical power of lenses. For
example, using this method, a spherometer, a lens measuring instrument, a lens centering machine, or an instrument to locate the vertex of an aspheric surface may be
constructed. This test is especially well adapted for use with
microprocessors, to make it automatic.
References
1. J. Hartmann, "Bemerkungen uber der Bau und die Justirung von Spectrographen," Zf. Instrumentenk. 20, 4 (1900).
2. I. Gosheil, "Hartmann Test," in Optical Shop Testing, Chap. 10, John
Wiley, New York (1978). Many other references are included in this
chapter.
Daniel Malacara obtained his BSc in physics in 1961 from the National University of
Mexico and his PhD in optics in 1965 from
the University of Rochester, New York. Then,
he joined the Institute of Astronomy of the
National University of Mexico and in 1972
the Instituto Nacional de Astrofisica, Optica
y ElectrOnica. In 1980 the Centro de Investigaciones en Optica was created, and
he became its first general director, a po-
——--— —
- sition he held from 1 980 to 1 989. He has
been the author or editor of several books on optics. The best known
is the book Optical Shop Testing. His scientific production includes
more than 100 papers published in well-known optics journals. He
is a fellow, both of the OSA and SPIE. He is a topical editor for
Applied Optics and has been on many international scientific committees. In 1986 he received the National Prize for Technology in
Mexico.
Zacarlas Malacara obtained a degree in
physicsat National University of Mexico
in 1 976. He then attended the Institute
of Optics at the University of Rochester
from 1976 to 1978. After two years at
the National Observatory of Mexico, he
became an associate researcher at the
Center for Research in Optics, where he
has been involved in ophthalmic and
astronomical optics and optical instrumentation.
OPTICAL ENGINEERING / July 1 992 / Vol. 31 No. 7 / 1555
Downloaded From: http://opticalengineering.spiedigitallibrary.org/ on 09/22/2013 Terms of Use: http://spiedl.org/terms


