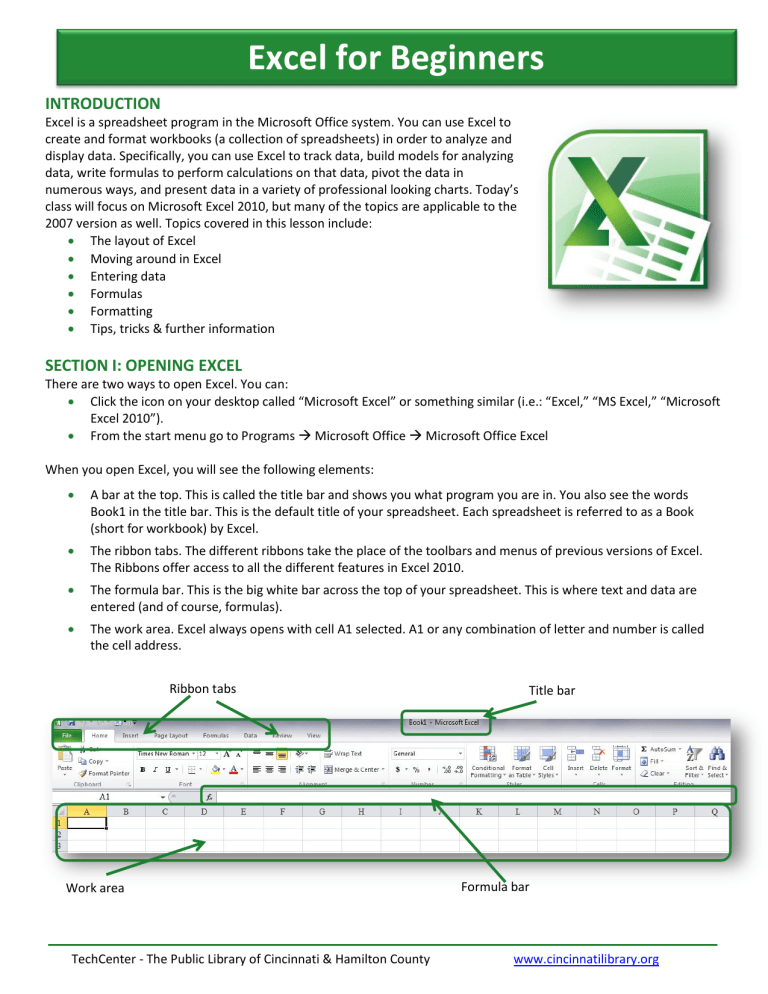
Excel for Beginners INTRODUCTION Excel is a spreadsheet program in the Microsoft Office system. You can use Excel to create and format workbooks (a collection of spreadsheets) in order to analyze and display data. Specifically, you can use Excel to track data, build models for analyzing data, write formulas to perform calculations on that data, pivot the data in numerous ways, and present data in a variety of professional looking charts. Today’s class will focus on Microsoft Excel 2010, but many of the topics are applicable to the 2007 version as well. Topics covered in this lesson include: The layout of Excel Moving around in Excel Entering data Formulas Formatting Tips, tricks & further information SECTION I: OPENING EXCEL There are two ways to open Excel. You can: Click the icon on your desktop called “Microsoft Excel” or something similar (i.e.: “Excel,” “MS Excel,” “Microsoft Excel 2010”). From the start menu go to Programs Microsoft Office Microsoft Office Excel When you open Excel, you will see the following elements: A bar at the top. This is called the title bar and shows you what program you are in. You also see the words Book1 in the title bar. This is the default title of your spreadsheet. Each spreadsheet is referred to as a Book (short for workbook) by Excel. The ribbon tabs. The different ribbons take the place of the toolbars and menus of previous versions of Excel. The Ribbons offer access to all the different features in Excel 2010. The formula bar. This is the big white bar across the top of your spreadsheet. This is where text and data are entered (and of course, formulas). The work area. Excel always opens with cell A1 selected. A1 or any combination of letter and number is called the cell address. Ribbon tabs Work area TechCenter - The Public Library of Cincinnati & Hamilton County Title bar Formula bar www.cincinnatilibrary.org Excel for Beginners The work area is divided into rows and columns. The rows are designated by a number (1, 2, 3, etc.) while the columns are designated by letters (A, B, C, and so on). Rows Columns SECTION II: MOVING AROUND IN EXCEL There are several ways to move around in Excel: Arrow buttons Tab button Enter button While each action will move you from cell to cell, they all do so in their own unique ways. Practice Exercise Let’s start in cell A1 (you should be there by default). Press the TAB button three times. What cell did you end up with? (Answer: D1) Starting back on cell A1, use the arrow keys on the keyboard. Go down, down, right, right. What cell did you end up with this time? (Answer: C3) Click on cell D4 - type the number 1 (using the numeric keypad – this is good practice because most good Excel users use the keypad rather than the numbers directly above the letters on the keyboard) and hit Enter. Now what cell are you in? (Answer: D5) By doing this exercise you should see the differences in the ways you can move around in Excel. The Tab key moves you cell by cell from left to right, the Enter key drops you down a row, and the arrow keys move you in the direction of the arrow. Pretty simple, right? Tip: Click on cell G45. To go back to the beginning of the spreadsheet immediately, hold down the Control (ctrl) key and press the Home key. You will be back at A1! TechCenter - The Public Library of Cincinnati & Hamilton County www.cincinnatilibrary.org Excel for Beginners The Ribbon Tabs Now that you are comfortable moving around, let’s take a tour of the ribbon along the top of the screen. The File Menu works the same as in any other program. This is where saving, opening, and printing is handled. The file menu also contains hundreds of pre-made templates for budgets, invoices, calendars, and more; select “new” from the file menu and browse through the templates. While we are here, let’s choose Save As... and call our spreadsheet (Your Name) Excel. The Home tab is where you will spend most of your time. Font settings, alignment, how numbers are displayed, cell formatting, and editing are all found on the Home tab. The insert tab is where you will go to add content such as charts, tables, and pictures to your Excel spreadsheet. The Page Layout is where you set page margins, page orientation, and document scale. The Formulas tab is where you will find a listing of all the most common formulas used in Excel. These formulas, or functions, are broken down by category (financial, logical, date & time, etc.). This is a good place to go if you can’t remember exact formulas when working on your spreadsheet. The Data tab is most commonly used to import information from other Office programs, such as Word or Access. Beginners typically don’t use this tab much, so we won’t discuss it in detail during this lesson. The Review tab has a few useful features, most importantly being the spell check option. Finally, the View tab gives you options on how you want your spreadsheet to be displayed. Again, most beginners don’t need this function, but it is important to understand what it does. One important thing to keep in mind when using Excel (or any other content creation software): having accurate content is always more important than appearance. Work on getting the right information in the right spots first; you can always go back at the end and make the document look pretty by adding color, changing fonts, adding images, etc. TechCenter - The Public Library of Cincinnati & Hamilton County www.cincinnatilibrary.org Excel for Beginners SECTION III: ENTERING DATA INTO EXCEL When you work with Excel, you are usually working with either plain text (words), data (numbers), or a combination of the two. The way words and numbers are displayed in Excel is different, however, as our next exercise will show. Practice Exercise Click on cell B1 and type in Rent (this would of course be just plain text). Click the Enter button to cell B2 and type 500 (this would be data, since 500 is a number). Use the left arrow key to move to cell A2 and input the word January. Notice the differences in what you typed. Text is automatically lined up to the left of the cell while data is automatically lined up to the right of the cell. Your spreadsheet should now look like the image to the right. If you are familiar with Microsoft Word or any other word processing program, most of the options on the Home tab under the Clipboard, Font and Alignment sections should be familiar. This is where you will find your formatting options like changing the text size, color, and so forth. You can use all these options in Excel as well – and you will especially become familiar with the alignment tools. One tip however – avoid centering data (numbers). This can play havoc with your formulas later on. Take the time to explore what some of the icons do. If you hold the mouse pointer under each icon, a dialog box will appear telling you what the icon does. While some of these options you may not use for basic Excel applications, it is still good to know what they do. Practice Exercise Type this data into cells C1:F1 (the colon stands for a range – meaning you would type data in cells C1 through F1). You will begin with cell C1 and end with cell F1. Starting in cell C1, type in the word Car. Press the tab button. Now type in Phone. Tab, Food. Tab, Other bills. Now click back to cell A2 (January). You will notice when you click on a cell it is outlined in black and in the lower right hand corner of the cell there is a box. It takes a steady hand, but if you click on the box and hold the mouse button down then drag your mouse over the remaining cells in that column (in this case, A3:A13) Excel will auto fill the cells with the appropriate data (in this case, the remaining months of the year). This is a great time saver, but remember that this shortcut may not always work, depending on the type of content you are trying to fill. TechCenter - The Public Library of Cincinnati & Hamilton County www.cincinnatilibrary.org Excel for Beginners Your spreadsheet should now look like the image to the right. It may not be the prettiest thing ever, but you have the makings of a budget at this point. You have rows for the 12 months of the year and columns for your five major monthly expenses. By filling in the appropriate dollar amounts for each month you will soon be able to get a total amount spent on each bill, and even better, a total amount for all of your expenses on a monthly or yearly basis. We can now fill in the rest of the cells in our spreadsheet with the appropriate dollar amounts. In cell C2, type in 250. In cell D2, 50. In cell E2, 125. In cell F2, 150. Rent, car payment, and phone bills will be the same every month. Rather than manually filling in each row for the next 11 months, we can again use the auto-fill feature. Click on cell B2. Click on the box in the lower right hand corner of the cell and drag your mouse down to cell B13. Once you release the mouse button, 500 will fill the entire column. We will do the same to the next two columns (car and phone). Again, this becomes a great time saver. Food and other bill expenses will likely change a little from month to month. We will practice manually entering data for these rows. For cells E2:E13, enter in this order: 100, 125, 100, 125, 90, 90, 100, 100, 100, 150, 90. For cells F2:F13, enter in this order: 125, 100, 150, 150, 150, 150, 150, 150, 150, 150, 250. Our spreadsheet should now look like the one in the image to the right. Now we are starting to see a real budget! We will do a few minor things to make our spreadsheet a little more precise and pretty now. First, let’s highlight cells B2:F13. Start by clicking in cell B2. Hold down the shift button on your keyboard and press the down arrow at the same time. Continue pressing the down arrow until you reach cell B13. With the shift button still pressed, now use the right arrow key to maneuver over to cell F13. Stop pressing shift now. A box should appear around the entire selection at this point. TechCenter - The Public Library of Cincinnati & Hamilton County www.cincinnatilibrary.org Excel for Beginners Move up to Number group on the Home tab. You will see a drop down box that currently says “General.” Click on it. You are given a list of different ways to display the content in your cells. For our purposes, since we are dealing with money, we will choose the option Currency. This changes all of the values in our cells to numbers with decimal points (and a dollar sign in front). The spreadsheet should now look like the image below. Before we go any further, let’s add a couple of extra bits of data to our spreadsheet. Click on cell B1. Now, make sure you are on the Home tab, and go to the Cells group. Click on Insert and then choose Insert Sheet Columns. This will add a new blank column. Now, in cell B1 type in the word Income. In cell B2 type in 1200, and auto fill it to cover cells B3:B13. Highlight the cells we just added and change the value here to currency as well. Now we are getting somewhere. The next step is to let Excel do what it does best – crunch numbers so we don’t have to. Which brings us to the idea of Formulas. TechCenter - The Public Library of Cincinnati & Hamilton County www.cincinnatilibrary.org Excel for Beginners SECTION IV: FORMULAS Excel has automatic formulas built into it. We will learn some of the shortcuts in the next few pages, but it’s also important to understand how these formulas work so as we go we will dissect and explain them. One thing to remember - when Excel sees an equal (=) sign in the formula bar, it tells Excel let's go to work. The basic mathematical formulas in Excel are as follows: + means to add - means to subtract * means to multiply / means to divide First, we will figure out what our total monthly expenses are. To do this, we need to add up the amounts in each monthly row (not including the income column obviously). In cell H1, let’s type in the words Total Expenses. Wait a second, the two words bleed over into the next cell (I1). To make this look more professional, we can adjust the width of the cell. Go to the line that divides cell H from I (shown in the diagram to the right). Click and hold the line, dragging it to the right until the words Total Expenses fit nicely in one long cell. This is an important skill to learn – often your content will be larger than one cell, but you want it to look even and be visible. Click & drag this line To get our total monthly expenses for January, we want to add up all of the bills in cells C2:G2. We will start by highlighting that group of cells AND the empty cell (H2) to the right of the bills under the Total Expenses column. Once these cells are highlighted, we can use the AutoSum feature to get a total. Make sure you are still on the Home tab. Move over to the Editing group and choose AutoSum. Excel will automatically add up the amounts in C2:G2 and place the total in H2! Remember the awesome auto-fill function we learned earlier? We can use it again here to save ourselves quite a bit of time. Select cell H2 and click and drag the box in the lower right hand corner of the cell down to cell H13. Excel will now automatically AutoSum every rows worth of expenses for us – just like that! Very quickly we can see what our total monthly expenses for the entire year are. But what we really want to know is how much money we will have left over from our income. First, in cell I1, type in the words “What’s left.” Now, click to cell I2. What we want to appear in cell I2 the amount of money we have left over from our Income (column B) after our Total Expenses (column H) have been taken out. To make this happen we will create a formula. So in cell I2, type in this formula =B2-H2. Notice how as you type the formula, Excel highlights in blue the cells that you are working with. Also notice in the Formula Bar across the top of Excel that what you type is showing up there as well as in the cell itself. TechCenter - The Public Library of Cincinnati & Hamilton County www.cincinnatilibrary.org Excel for Beginners Once you type in the formula, click Enter. Boom – just like a calculator, Excel has done the math for us. We now know that after expenses, we will have $125.00 left at the end of January. We can again use the auto-fill feature to determine our left over cash for the other months – again select cell I2 and click and drag the box in the lower right hand corner of the cell down to cell I13. We can see now that some months are better than others as far as extra cash! Let’s take it one step further and get our yearly totals for our various columns. To do this, go to cell A14 and type in the word Total. We can use the AutoSum feature to get our totals quickly – highlight cells B2:B14 and click AutoSum to get our yearly Income total. Repeat the process for each column (Rent, Car, Phone, Food, etc.). Once you are done, your spreadsheet should look like the one below. TechCenter - The Public Library of Cincinnati & Hamilton County www.cincinnatilibrary.org Excel for Beginners SECTION V: FORMATTING We already talked about how many of the formatting options that you would find in other Office products are available in Excel as well. To make our spreadsheet a little prettier, we can use some of these formatting tools now. Let’s highlight cells A14:I14. On the Home tab, under the Font group, let’s change our color to Red and make this row bold. Select the B for bold Click here to change the font color to red Now our Total line stands out a bit more, since these are the numbers that are most important. Let’s say we want to give our spreadsheet a nice heading or title at the top. Move back to cell A1. Still on the Home tab, go to the Cells group and select Insert Sheet Rows. In cell A1, begin typing “My Yearly Budget 2014.” This simple title will fill up both cells A1 and B1. But it’s not centered and it doesn’t look very pretty – so let’s fix that. Highlight cells A1:I1. Staying on the Home tab, move to the Alignment group and click the upside down triangle next to Merge & Center. Choose Merge & Center. This will merge all the cells in the highlighted range into one large cell – and it will also center whatever content was in those cells. With the range of cells still highlighted, we can now make our font size bigger (we will go up to size 16) and underlined. The spreadsheet should now look like the image to the right. TechCenter - The Public Library of Cincinnati & Hamilton County www.cincinnatilibrary.org Excel for Beginners SECTION VI: TIPS, TRICKS, & FURTHER INFORMATION For many people, Excel is the most challenging software application they will use on a regular basis. The keys to success with Excel are simple: be patient and don’t worry about making mistakes. Simple errors inputting formulas can cause havoc with a spreadsheet, but it’s something even the most seasoned Excel pros do from time to time. It should come as no surprise then that, as a beginner, you will be prone to making a lot of mistakes early on. The important thing is to learn from your mistakes, see what works best, and seek out appropriate help when needed. There are a few tips though that beginners can use to improve their spreadsheets. Page Layout The Page Layout tab (the third option along the ribbon tabs) and the Page Setup group is one of the first places to visit when doing an Excel spreadsheet and one of the last when you go to print your document. Under this tab you can set your paper size, reduce the printing area, add headers and footers and print your spreadsheet with (or without) lines and column headings. Orientation & Page Size Also under Page Layout, you can select your spreadsheet orientation as either portrait (up and down) or landscape. Most Excel spreadsheets will end up looking better in landscape format. Scaling Still under the Page Layout tab, go to the Scale to fit group. Scaling allows you to reduce the size of the spreadsheet. For example, if you wanted to print spreadsheet data on one sheet and when you look at your spreadsheet in print preview, it shows two pages - you could try scaling your spreadsheet to fit onto only one page. Usually 75% does a good job and the information can still be read; scaling below 75% may make the print too small to be legible. Sheet Options Sticking with the Page Layout tab, move to the Sheet Options group. You can print a spreadsheet showing the gridlines (those are all the lines you see on the spreadsheet) by clicking in the box beside gridlines. This can be a busy looking spreadsheet and not easy to read, however. You can print a spreadsheet showing the column headings (A-Z+) and rows (1-1000) by clicking in the box beside row and column headings. This may be a busy looking spreadsheet too. Adjust the page orientation & size here Choose to print gridlines or headings here Adjust the scaling here TechCenter - The Public Library of Cincinnati & Hamilton County www.cincinnatilibrary.org Excel for Beginners Another neat feature in Excel is the ability to have multiple spreadsheets in one book. In the lower left-hand corner of Excel you will tabs listing “Sheet 1, Sheet2, Sheet3” as seen in the image to the right. If you right click on one of these tabs you will get a series of options – including the ability to delete the tab, rename the tab, or insert a new tab. New users may not use this feature much, but as your books grow you may feel the need to add multiple sheets. Reviewing Your Spreadsheet Not only do you have to be sure that your formulas are accurate, your spelling and grammar is correct, and that you have all the data needed in the spreadsheet, but you also have to format the spreadsheet so that it is easy to read. Remember, your data may be read by someone who knows nothing about Excel – but they still need to be able to understand the information provided! Below are some good tips to producing a clear and concise Excel spreadsheet. Use color sparingly. While color can be fun, it can also be distracting – and too much color can be completely overwhelming. The color red is typically reserved for negative numbers – we broke this rule for our example, but in general you should only use red when dealing with negative amounts. Change font size for titles and column labels so they stand out more. Use bold formatting for titles and labels. Label your sheets. Avoid fancy or large fonts for data. Some script fonts can be difficult to read, especially in a small cell. Likewise, unless you are adjusting the cell sizes to fit larger fonts, it will be difficult to see all of your data properly. SECTION VI: ADDITIONAL RESOURCES The TechCenter at the Main Branch of the Public Library of Cincinnati & Hamilton County hosts over two dozen technology related classes each month. Ask your instructor today for a calendar of upcoming events or visit our website at www.cincinnatilibrary.org/programs/ for a complete list of all Library events. If you are liked our Excel for Beginners class, you may also find these related classes of interest: PowerPoint for Beginners Word Processing for Beginners, Part II Feel free to ask for a copy of any class handout at the Technology Center desk or talk to your instructor today. Online The Public Library of Cincinnati & Hamilton County offers a variety of databases to all card holders which provide excellent learning opportunities on a variety of topics, including computers and technology. Learning Express Library offers a wide variety of interactive computer classes (Complete Microsoft Office Suite, Adobe CS3, Windows, and Mac OSX). Videos and screencasts make learning easy while quizzes help assess your progress. Free with your library card. From http://www.cincinnatilibrary.org, click on Research & Homework > Research Databases > Education > Learning Express Library. Universal Class offers more than 500 classes on many topics. These classes are instructed by real teachers who guide your learning and provide feedback on your work. Learn about Microsoft Office, Web Design, Computer Basics, Business Applications, and more! Free with your library card. From http://www.cincinnatilibrary.org, , click on Research & Homework > Research Databases >Education > Universal Class. TechCenter - The Public Library of Cincinnati & Hamilton County www.cincinnatilibrary.org
