corkscrew
advertisement

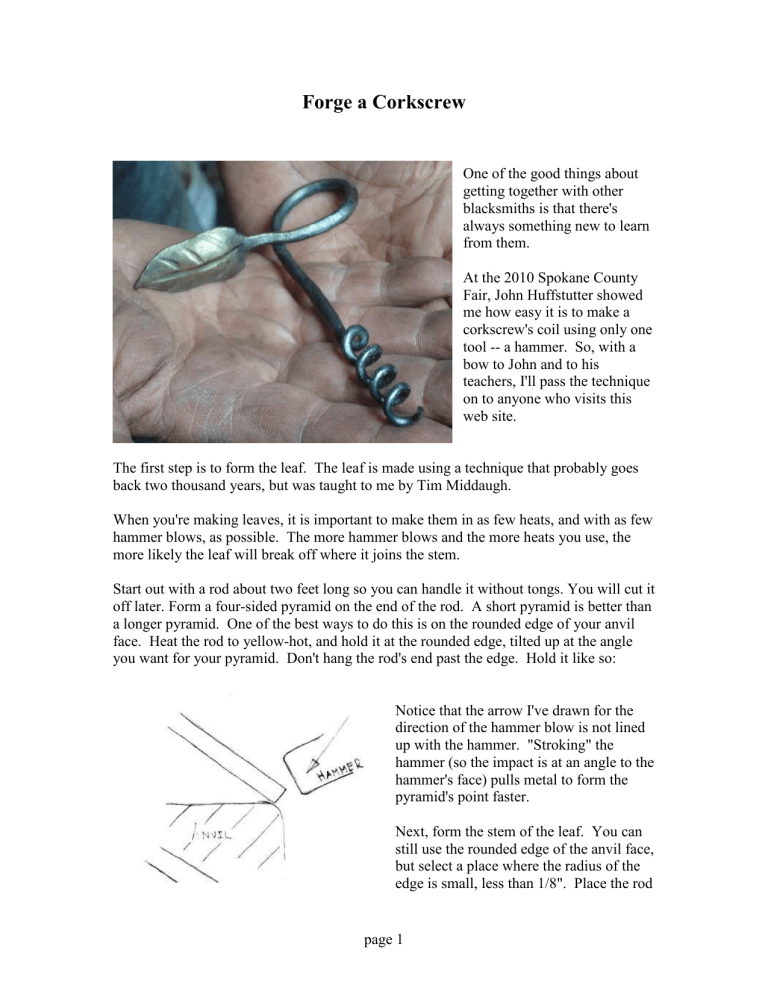
Forge a Corkscrew One of the good things about getting together with other blacksmiths is that there's always something new to learn from them. At the 2010 Spokane County Fair, John Huffstutter showed me how easy it is to make a corkscrew's coil using only one tool -- a hammer. So, with a bow to John and to his teachers, I'll pass the technique on to anyone who visits this web site. The first step is to form the leaf. The leaf is made using a technique that probably goes back two thousand years, but was taught to me by Tim Middaugh. When you're making leaves, it is important to make them in as few heats, and with as few hammer blows, as possible. The more hammer blows and the more heats you use, the more likely the leaf will break off where it joins the stem. Start out with a rod about two feet long so you can handle it without tongs. You will cut it off later. Form a four-sided pyramid on the end of the rod. A short pyramid is better than a longer pyramid. One of the best ways to do this is on the rounded edge of your anvil face. Heat the rod to yellow-hot, and hold it at the rounded edge, tilted up at the angle you want for your pyramid. Don't hang the rod's end past the edge. Hold it like so: Notice that the arrow I've drawn for the direction of the hammer blow is not lined up with the hammer. "Stroking" the hammer (so the impact is at an angle to the hammer's face) pulls metal to form the pyramid's point faster. Next, form the stem of the leaf. You can still use the rounded edge of the anvil face, but select a place where the radius of the edge is small, less than 1/8". Place the rod page 1 so it overhangs the far edge by about 1.25" and is angled slightly downward. Using halfface blows, form a notch about 2/3 through the rod. Rotate the rod 90 degrees and repeat, forming a notch a little more than 1/2 through the rod.. Go back and forth between the two notches (only on two sides!) until the stem you're forming has a square cross section about 1/2 to 1/3 the diameter of the original rod. On a larger-radius portion of your anvil's edge, draw out the stem until it is about 4.5 inches long. Do NOT hammer your piece as shown in the drawing below. If you do, it will flex the stem where it joins the leaf, will form cracks, and the leaf will eventually break off. On the worked end of your two-foot rod, you should end up with 4.5 inches of about 3/16" square rod, terminating in a cylindrical chunk with a pyramid on the end. The stem will be offset on the end of the cylindrical section, flush with the side of the pyramid at one point. page 2 Now round the stem. Knock in the corners of the square cross section to make an octagonal cross section, then knock in the corners of the octagon and it will be very nearly round. Make sure you always hang the thicker part that has a pyramidal point off the edge of the anvil, so you don't flex the material where the stem starts. Note that there is only one way you can lay your workpiece on the anvil face (as shown in the drawing above), so that there is no gap between the face and the workpiece. This is because you only notched the rod from two directions 90 degrees apart. Heat it to yellow-orange, lay it flat on the anvil face in that one way, and hit it hard with a heavy (2 or 3 lb) hammer, straight down against the anvil face.. Flatten it to about 1/8" thick. page 3 Re-heat. Switch to a smaller hammer for greater control and use stroking blows to pull metal toward the edges of the leaf, leaving the center line of the leaf thicker than the edges. I like to use the anvil horn for this operation. Heat to orange and vein the leaf, starting with a straight fuller for the center vein and then using curved fullers for the side veins. Here are photos of my three veining fullers. After it is first veined, the leaf is flat and lifeless. Give it some life by bending the leaf's point over sideways, and putting some ripple into the leaf. My favorite tool for this doesn't have a name. Maybe it could be called a "squiggle stake". It's made from 1/2" rod bent into a distorted "S", and welded to a 1"x1"x 2.5" bar. The bar fits into the hardie hole. I also like to use my "leafing hammer", which is made from a railroad Unit Clip. page 4 Now you can start drawing out the part that will become the corkscrew. You need to make what amounts to a wire, about 3/32" in diameter and about 6" long. That is 1/4 the original diameter of your rod, so to make an 6" wire you only need 3/8" of your 3/8" rod (it will draw out to 4x4=16 times its original length). I never believe my calculations, always start with too much metal, and end up cutting off the excess. Cut off your 3/8" bar about one inch beyond the end of the stem. For drawing out the wire, just put the part you're drawing out into your forge. Keep the leaf and stem cool and avoid flexing them. Hold the leaf and stem in flat tongs or V-bit bolt tongs. It's okay to dip the leaf and stem into water to keep them cool. Gradually draw out the rod to make a wire. You should keep the cross-section rectangular, with the wide side of the rectangle never more than about 1.5 times the width of the narrow side. So, you can draw out to a thickness of about 5/16", then rotate 90 degrees and draw down to about 1/8", then rotate 90 degrees and draw down to about 3/32", then rotate 90 degrees and make it square. You can start drawing out on the horn, moving out on the horn as the cross section of the wire gets smaller, or using the radiused edge of your anvil face. Make sure the wire is uniform along its full length while it is still square in cross section, then make it round in cross section. Straighten it carefully. page 5 The screw part of a good corkscrew should be smooth. Holding the straight wire end of your workpiece flat on a chunk of smooth wood, use a sandpaper-wrapped wood block to make the wire as smooth as you can. Now make the loop that will serve as a handle. You can do this with two pairs of tongs, or clamp the base of the stem in your vise and use one pair of tongs to do the bending. At this stage, the plane of the leaf should be in the plane of the loop. You will turn the leaf perpendicular to the loop later. Most corkscrews are right-handed. A lefthanded corkscrew is almost never going to be used, so make sure your coil goes in the right direction. Start making the screw by cutting the wire to a length of 6". Heat the wire and bend it 90 degrees. For this you can use a vise. Next, heat the wire and curl it into a loose coil. Heat the wire and start tapping the coil tighter using a light hammer and the face of your anvil. Your hammer blows should be light, stroking blows, as you roll the coil to the left, on the near side of your anvil face. Keep the coils tight together so they support each other. The coil will automatically get more even as it gets tighter and gains turns. If the coil gets skewed, hang it over the far side of your anvil and tap it lightly to straighten it. page 6 Keep heating, tapping, and rolling the coil until its outside diameter is a bit less than 3/8". It will have about 5 turns. Make it uniformly round and non-skewed. When the coil looks like the photo below, heat it up to orange, grip it with two pairs of tongs, and stretch the coil out. It is helpful to have a pair of spreading tongs and some fine-point scrolling tongs or needle nose pliers to fine-tune the coil spacing. If you don't have spreading tongs, a chisel or screwdriver can serve the purpose. Use a 1/4" rod to check the coil spacing, and squeeze or spread to make the spacing uniform. Heat and twist the leaf stem so the plane of the leaf faces the same direction as the screw. When the corkscrew is used to pull a cork, the user's fingers will rest against the leaf's veined face and it should be comfortable to the hand. After the whole corkscrew with its coil and loop handle is adjusted to your satisfaction, harden it. If it is mild steel, heat it to cherry red and quench it quickly in water. Do not temper it. If it is a higher grade of steel, harden and temper appropriately. Touch up the point of the coil with a grinder or sandpaper. page 7 Wire-brush to remove scale. Here is the near-finished corkscrew after wirebrushing. To add a bit of pizzazz, bronze the leaf. Heat only the loop and leaf until the surface turns blue (definitely NOT red), then rub vigorously with a brass brush while the metal is still hot. Brass will rub off the brush onto the hot steel. Finally, rub some wax onto the corkscrew. Sno Seal boot wax is what I use, because it lets steel remain silvery instead of darkening it. Rub on the wax, warm it near the mouth of your forge just enough to melt it, then wipe off the excess with a paper towel. You're done! Steve McGrew Incandescent Ironworks, Ltd. http://www.incandescent-iron.com/ page 8


