Instruction Sheet
408-- 9426
2 mm Common Termination (CT)
Head Assembly 58372- 1
Feed Pawl
(Portion of Head Assembly
Shown Cut Away for Clarity)
Wire
Guide
Drag
Rev E
ORIGINAL INSTRUCTIONS
Wire Inserter (Shown
In Up Position)
05 MAY 14
Wire Insertion
Rod and Adjuster
Carriage
Adjustable
Stop
Connector
Slot
2 mm CT CONNECTOR
PART NUMBER
TYPE
173977--[ ]
Receptacle Assembly
173983--[ ]
Horizontal Mount Header
173985--[ ]
Vertical Mount Header
179694--[ ]
Receptacle Assembly
WIRE SIZE
INSULATION DIA RANGE
28--26
0.85--1.05 [.033--.041]
[
]
24
0.95--1.05 [.037--.041]
Figure 1
1. INTRODUCTION
2. DESCRIPTION
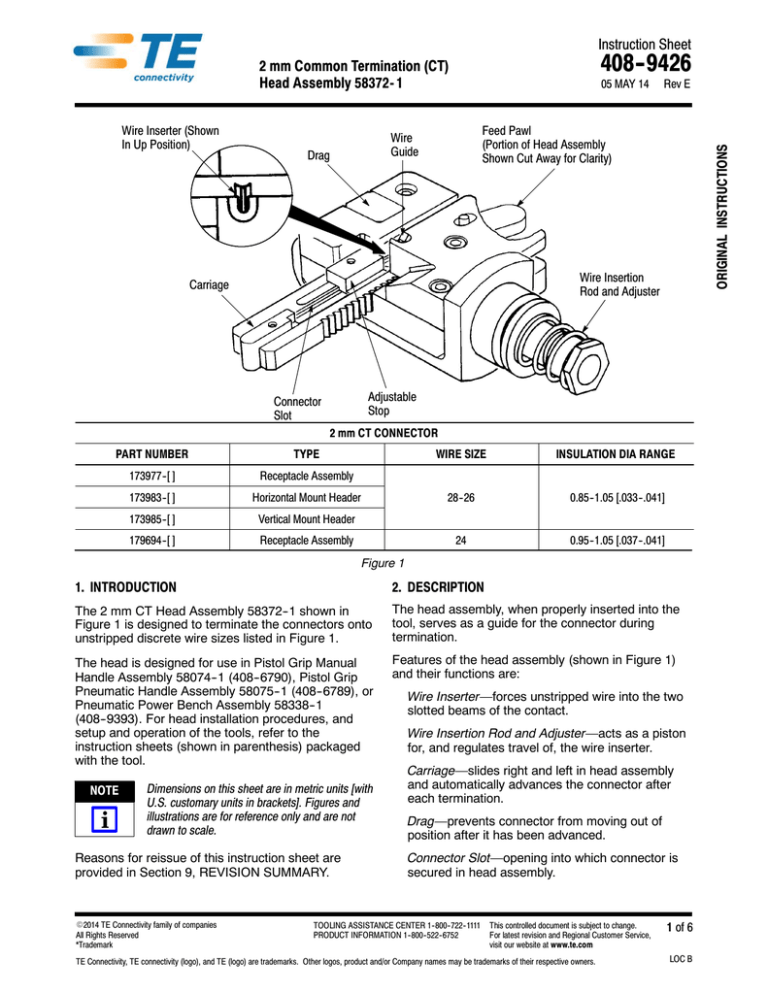
The 2 mm CT Head Assembly 58372--1 shown in
Figure 1 is designed to terminate the connectors onto
unstripped discrete wire sizes listed in Figure 1.
The head assembly, when properly inserted into the
tool, serves as a guide for the connector during
termination.
The head is designed for use in Pistol Grip Manual
Handle Assembly 58074--1 (408--6790), Pistol Grip
Pneumatic Handle Assembly 58075--1 (408--6789), or
Pneumatic Power Bench Assembly 58338--1
(408--9393). For head installation procedures, and
setup and operation of the tools, refer to the
instruction sheets (shown in parenthesis) packaged
with the tool.
Features of the head assembly (shown in Figure 1)
and their functions are:
NOTE
i
Dimensions on this sheet are in metric units [with
U.S. customary units in brackets]. Figures and
illustrations are for reference only and are not
drawn to scale.
Reasons for reissue of this instruction sheet are
provided in Section 9, REVISION SUMMARY.
.2014 TE Connectivity family of companies
All Rights Reserved
*Trademark
Wire Inserter—forces unstripped wire into the two
slotted beams of the contact.
Wire Insertion Rod and Adjuster—acts as a piston
for, and regulates travel of, the wire inserter.
Carriage—slides right and left in head assembly
and automatically advances the connector after
each termination.
Drag—prevents connector from moving out of
position after it has been advanced.
Connector Slot—opening into which connector is
secured in head assembly.
TOOLING ASSISTANCE CENTER 1--800--722--1111
PRODUCT INFORMATION 1--800--522--6752
This controlled document is subject to change.
For latest revision and Regional Customer Service,
visit our website at www.te.com
TE Connectivity, TE connectivity (logo), and TE (logo) are trademarks. Other logos, product and/or Company names may be trademarks of their respective owners.
1 of 6
LOC B
408- 9426
Adjustable Stop—controls the size of the connector
slot, permitting different size connectors to be
secured in head assembly.
Wire Guide—open channel into which unstripped
wire is inserted and bottomed for terminating.
Feed Pawl—when pushed forward, allows carriage
to be moved either right or left, depending on
where connector is to be located in head assembly.
The wire is terminated in the connector contact using
the insulation displacement technique (a terminating
technique which inserts unstripped wire into a slotted
contact beam to form a reliable electrical connection
between the wire and the contact). Contact
termination is complete when the tool is actuated.
3. SETUP
The setup procedure consists of determining the size
of the connector slot, securing the connector in that
slot, and positioning the connector for termination.
Proceed as follows:
1. To determine the size of slot required for the
connector to be terminated, push the feed pawl
forward and slide the carriage to the left as far as it
will go. Then loosen the socket head cap screw
located at bottom side of the adjustable stop
(shown in Figure 2), allowing the stop to be moved
right or left.
Socket Head
Cap Screw
Push Feed
Pawl Forward
Connector
Slot
cap screw securing the connector to the head
assembly.
3. Push the feed pawl forward and slide the
carriage (with connector) to the right as far as it will
go. Then release the feed pawl. The connector is
now in position to begin termination.
4. TEST TERMINATION AND INSPECTION
At least one termination should be performed and
inspected before starting production terminating. The
steps which follow are recommended to perform the
test termination and inspection.
Open Part of Contact
Insulation Displacement Slot
Up and Facing Back
of Tool
Receptacle
Assembly
Vertical Mount
Header
Horizontal Mount
Header
Adjustable Stop Moved
to Allow Connector to
Fit into Connector Slot
Back of
Tool (Ref)
Connector
Slot
Figure 3
1. Perform the setup procedure as described in
Section 3. Note that at the end of this procedure
the connector is in position to begin the termination
process.
Adjustable
Stop
Figure 2
2. Orient the connector with the head assembly as
shown in Figure 3 — the open part of the insulation
displacement slot is up and facing the back of the
tool. Making sure that the connector slot is large
enough to accept the connector, fit the connector
in slot. Then move the adjustable stop flush
against the connector, and tighten the socket head
2 of 6
2. Without inserting the wire into the wire guide,
perform one cycle. The connector will be indexed
in position for the first termination.
3. Insert an unstripped wire into the wire guide until
the wire bottoms, making sure wire is centered in
the slot. See Figure 4.
4. Perform one termination cycle: the inserter will
bottom, forcing the wire between the contact slots,
and will then retract. The connector will advance to
the next contact position.
Rev E
408- 9426
Unstripped Wire Inserted
and Bottomed in Wire Guide
CAUTION
!
DO NOT increase the air pressure beyond
483 kPa [70 psi]; otherwise, excessive wear and
strain to the tool and head could result.
Turn Clockwise
to Reduce
Wire Insertion Depth
Figure 4
Turn Counterclockwise
to Increase
Wire Insertion Depth
5. Release the feed pawl by pushing it forward
then move the carriage to left and remove the
connector from head assembly.
6. Inspect termination in accordance with
Application Specification 114--5103. If wire
insertion depth is incorrect or if the carriage is not
feeding properly, refer to Section 5.
5. ADJUSTMENTS
5.1. Wire Insertion Depth (See Figure 5)
A. For Pistol Grip Manual Handle Assembly
If the wire is too deep in the contact insulation
displacement slot, remove the head from the tool and
turn the adjuster 1/6--revolution clockwise. This will
reduce the wire insertion depth by approximately
0.20 mm [.008 in.]. Install the head onto the tool; then
terminate and inspect a sample connector.
If the wire is not deep enough in the contact insulation
displacement slot, remove the head from the tool and
turn the adjuster 1/6--revolution counterclockwise. This
will increase the wire insertion depth by approximately
0.20 mm [.008 in.]. Install the head onto the tool; then
terminate and inspect a sample connector.
Figure 5
2. If the proper wire insertion depth is not obtained,
set the air pressure to 276 kPa [40 psi], and follow
the procedure in Paragraph 5.1, A.
5.2. Carriage Feed
The carriage feed adjustment setscrew, shown in
Figure 6, controls the location of the carriage. If the
screw is positioned in too far, the feed pawl will not
engage in the carriage and the carriage will not
advance. If the screw is out too far, the carriage will
back up until the feed pawl engages, and thus, will
incorrectly position the contact to be terminated.
Adjust the carriage by turning the adjustment screw
either in or out until the contact aligns with the wire
inserter.
Carriage Feed
Adjustment Setscrew
Carriage
B. For Pneumatic Assembly
DANGER
To avoid personal injury, ALWAYS disconnect air
supply from pneumatic power bench when
removing head from tool.
1. Increase the air pressure for the pneumatic
bench mount in increments of 69 kPa [10 psi] until
proper wire insertion depth is obtained.
Rev E
Feed
Pawl
Figure 6
3 of 6
408- 9426
Once the carriage feed is adjusted correctly, the
following should be observed:
: wire inserter is aligned with the connector
contact
: no movement of the connector housing occurs
as the tool is actuated
6. TERMINATION PROCEDURE
1. Select the applicable connector and wire to be
terminated.
2. Perform the setup procedure as described in
Section 3. Note that at the end of this procedure
the connector is in position to begin the termination
process.
3. Without inserting the wire into the wire guide,
perform one cycle. The connector will be indexed
in position for the first termination.
4. Insert an unstripped wire into the wire guide until
the wire bottoms, making sure wire is centered in
the slot.
5. Perform one termination cycle: the inserter will
bottom, forcing the wire between the contact slots,
and will then retract. The connector will advance to
the next contact position.
6. Continue to insert unstripped wire and cycle the
tool until all contacts of the connector are
terminated.
7. Remove the connector from the left side of the
carriage.
8. Repeat these steps until all connectors are
terminated.
7. MAINTENANCE AND INSPECTION
7.1. Daily Maintenance
It is recommended that each operator of the head
assembly be made aware of—and responsible
for—the following steps of daily maintenance:
1. Remove dust, moisture, and other contaminants
with a clean brush or a soft, lint--free cloth. DO
NOT use objects that could damage the head
assembly.
2. Make sure all components are in place and are
properly secured.
4 of 6
3. Actuate the tool to ensure that mechanisms
inside the head assembly move smoothly.
7.2. Periodic Inspection
Regular inspections should be be performed by
quality control personnel. A record of scheduled
inspections should remain with the head assembly or
be supplied to supervisory personnel responsible for
the head assembly. Though recommendations call for
at least one inspection a month, the inspection
frequency should be based on the amount of use,
ambient working conditions, operator training and
skill, and established company standards. These
inspections should include a visual inspection and
should be performed in the sequence listed.
1. Remove any accumulated film with a suitable
commercial degreaser that will not affect paint or
plastic material.
2. Make sure all components are in place and are
properly secured.
3. Make a few test terminations and inspect the
terminations in accordance with 114--5103.
4. Check for chipped, cracked, worn, or broken
areas. If damage is evident, repair is necessary.
See Section 8.
8. REPLACEMENT AND REPAIR
Customer--replaceable parts are listed in Figure 7.
A complete inventory should be stocked and
controlled to prevent lost time when replacement of
parts is necessary. Parts other than those listed
should be replaced by TE Connectivity to ensure
quality and reliability. Order replacement parts
through your TE Representative, or call
1--800--526--5142, or send a facsimile of your
purchase order to 717--986--7605, or write to:
CUSTOMER SERVICE (038--035)
TYCO ELECTRONICS CORPORATION
PO BOX 3608
HARRISBURG PA 17105--3608
For customer repair service, call 1--800--526--5136.
9. REVISION SUMMARY
Revisions to this instruction sheet include:
: Updated document to corporate requirements
: Corrected balloon numbers in Figure 7
Rev E
408- 9426
12
65.02 mm
[2.56 in.]
13
14
15
11
16
6
17
10
18
19
9
8
21
7
20
6
12
5
10
22
23
88.9 mm
[3.5 in.]
4
25
24
28.7 mm
[1.13 in.]
1
2
Weight: 142 g [5 oz]
3
27
26
REPLACEMENT PARTS
DESCRIPTION
QTY PER
ASSEMBLY
ITEM
PART NUMBER
1
1--21989--2
SCREW, Socket Head Shoulder
1
2
2--22281--2
SPRING, Compression
1
3
314058--1
HEAD, Finished
1
4
314061--1
GUIDE, Housing
1
5
314066--1
STOP, Fixed
1
6
21000--9
SCREW, Socket Head Cap, 2--56¢.19 in. L
2
7
314062--1
CARRIAGE
1
8
1--21000--6
SCREW, Socket Head Cap, 4--40¢.62 in. L
1
9
314065--1
DRAG
1
10
1--21000--4
SCREW, Socket Head Cap, 4--40¢.38 in. L
2
11
314067--1
STOP, Adjustable
1
Figure 7 (Continued)
Rev E
5 of 6
408- 9426
REPLACEMENT PARTS
ITEM
PART NUMBER
12
3--21028--2
13
314063--1
14
DESCRIPTION
QTY PER
ASSEMBLY
PIN, Slotted Spring
2
PAWL, Feed
1
21028--3
PIN, Slotted Spring
1
15
4--22487--0
SPRING, Extension
1
16
21028--6
PIN, Slotted Spring
1
17
2--21008--1
SCREW, Set, 4--40¢.25 in. L
1
18
1--21919--2
PIN, Dowel
2
19
314064--1
ARM, Feed
1
20
1--22278--2
SPRING, Compression
1
21
312148--6
ROD, Inserter
1
22
314068--1
INSERTER, Wire
1
23
1--21000--7
SCREW, Socket Head Cap, 4--40¢.75 in. L
2
24
314060--1
GUIDE, Wire
1
25
5--22488--6
SPRING, Compression
1
26
312149--1
ADJUSTER, Rod Inserter
1
27
314059--1
BASE
1
Figure 7 (End)
6 of 6
Rev E
