LED light bar with module
advertisement

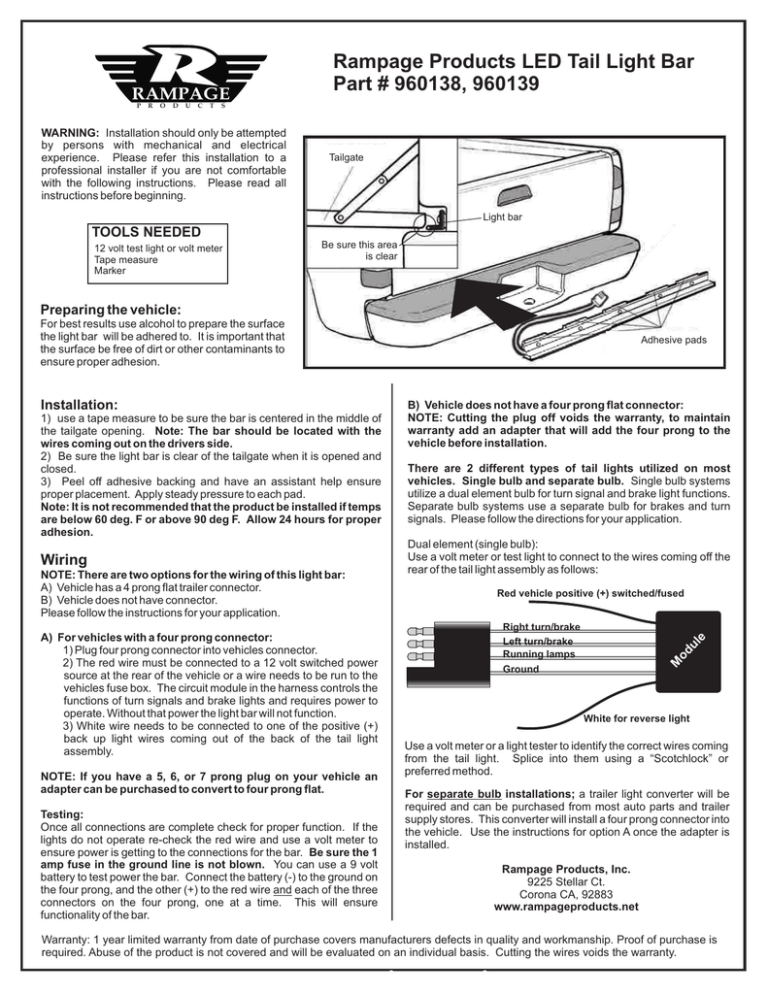
RAMPAGE P R O D U C T Rampage Products LED Tail Light Bar Part # 960138, 960139 S WARNING: Installation should only be attempted by persons with mechanical and electrical experience. Please refer this installation to a professional installer if you are not comfortable with the following instructions. Please read all instructions before beginning. Tailgate Light bar TOOLS NEEDED 12 volt test light or volt meter Tape measure Marker Be sure this area is clear Preparing the vehicle: For best results use alcohol to prepare the surface the light bar will be adhered to. It is important that the surface be free of dirt or other contaminants to ensure proper adhesion. 1) use a tape measure to be sure the bar is centered in the middle of the tailgate opening. Note: The bar should be located with the wires coming out on the drivers side. 2) Be sure the light bar is clear of the tailgate when it is opened and closed. 3) Peel off adhesive backing and have an assistant help ensure proper placement. Apply steady pressure to each pad. Note: It is not recommended that the product be installed if temps are below 60 deg. F or above 90 deg F. Allow 24 hours for proper adhesion. Wiring NOTE: There are two options for the wiring of this light bar: A) Vehicle has a 4 prong flat trailer connector. B) Vehicle does not have connector. Please follow the instructions for your application. A) For vehicles with a four prong connector: 1) Plug four prong connector into vehicles connector. 2) The red wire must be connected to a 12 volt switched power source at the rear of the vehicle or a wire needs to be run to the vehicles fuse box. The circuit module in the harness controls the functions of turn signals and brake lights and requires power to operate. Without that power the light bar will not function. 3) White wire needs to be connected to one of the positive (+) back up light wires coming out of the back of the tail light assembly. NOTE: If you have a 5, 6, or 7 prong plug on your vehicle an adapter can be purchased to convert to four prong flat. Testing: Once all connections are complete check for proper function. If the lights do not operate re-check the red wire and use a volt meter to ensure power is getting to the connections for the bar. Be sure the 1 amp fuse in the ground line is not blown. You can use a 9 volt battery to test power the bar. Connect the battery (-) to the ground on the four prong, and the other (+) to the red wire and each of the three connectors on the four prong, one at a time. This will ensure functionality of the bar. B) Vehicle does not have a four prong flat connector: NOTE: Cutting the plug off voids the warranty, to maintain warranty add an adapter that will add the four prong to the vehicle before installation. There are 2 different types of tail lights utilized on most vehicles. Single bulb and separate bulb. Single bulb systems utilize a dual element bulb for turn signal and brake light functions. Separate bulb systems use a separate bulb for brakes and turn signals. Please follow the directions for your application. Dual element (single bulb): Use a volt meter or test light to connect to the wires coming off the rear of the tail light assembly as follows: Red vehicle positive (+) switched/fused Right turn/brake Left turn/brake Running lamps Ground M od ul e Installation: Adhesive pads White for reverse light Use a volt meter or a light tester to identify the correct wires coming from the tail light. Splice into them using a “Scotchlock” or preferred method. For separate bulb installations; a trailer light converter will be required and can be purchased from most auto parts and trailer supply stores. This converter will install a four prong connector into the vehicle. Use the instructions for option A once the adapter is installed. Rampage Products, Inc. 9225 Stellar Ct. Corona CA, 92883 www.rampageproducts.net Warranty: 1 year limited warranty from date of purchase covers manufacturers defects in quality and workmanship. Proof of purchase is required. Abuse of the product is not covered and will be evaluated on an individual basis. Cutting the wires voids the warranty.


