5419 Series Roll, Mandrel and Cage Replacement Instructions

5419 Series Roll, Mandrel and Cage Replacement Instructions
Roll replacement:
To replace the rolls on your 5419 Series tool, follow these instructions:
1. Un-thread the cage.
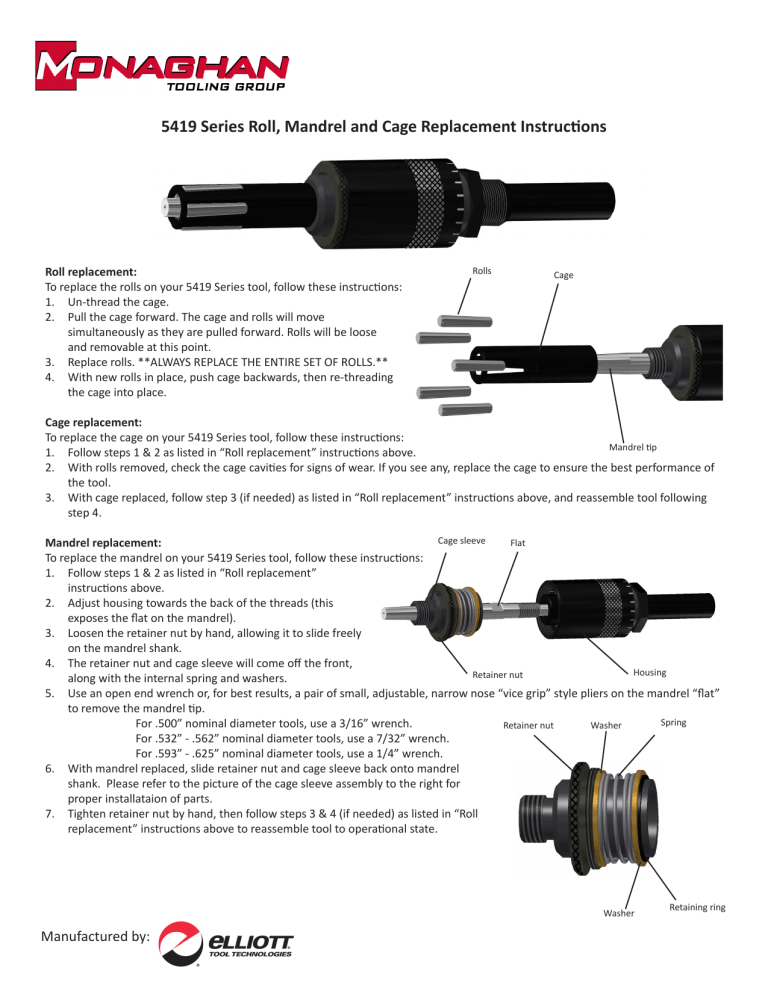
2. Pull the cage forward. The cage and rolls will move simultaneously as they are pulled forward. Rolls will be loose and removable at this point.
3. Replace rolls. **ALWAYS REPLACE THE ENTIRE SET OF ROLLS.**
4. With new rolls in place, push cage backwards, then re-threading the cage into place.
Rolls
Cage
Cage replacement:
To replace the cage on your 5419 Series tool, follow these instructions:
1. Follow steps 1 & 2 as listed in “Roll replacement” instructions above.
Mandrel tip
2. With rolls removed, check the cage cavities for signs of wear. If you see any, replace the cage to ensure the best performance of the tool.
3. With cage replaced, follow step 3 (if needed) as listed in “Roll replacement” instructions above, and reassemble tool following step 4.
Mandrel replacement:
To replace the mandrel on your 5419 Series tool, follow these instructions:
1. Follow steps 1 & 2 as listed in “Roll replacement” instructions above.
2. Adjust housing towards the back of the threads (this exposes the flat on the mandrel).
3. Loosen the retainer nut by hand, allowing it to slide freely on the mandrel shank.
Cage sleeve Flat
4. The retainer nut and cage sleeve will come off the front, along with the internal spring and washers. Retainer nut
Retainer nut Washer
Housing
5. Use an open end wrench or, for best results, a pair of small, adjustable, narrow nose “vice grip” style pliers on the mandrel “flat” to remove the mandrel tip.
Spring For .500” nominal diameter tools, use a 3/16” wrench.
For .532” - .562” nominal diameter tools, use a 7/32” wrench.
For .593” - .625” nominal diameter tools, use a 1/4” wrench.
6. With mandrel replaced, slide retainer nut and cage sleeve back onto mandrel shank. Please refer to the picture of the cage sleeve assembly to the right for proper installataion of parts.
7. Tighten retainer nut by hand, then follow steps 3 & 4 (if needed) as listed in “Roll replacement” instructions above to reassemble tool to operational state.
Washer
Retaining ring


