8"
Direct-Coupled ControlSet® Actuators (120/180/320 in-lb.)
MEP-7200/7500/7800 Series
5"
Installation Guide
Mounting
1. Ensure that the damper can move freely through
its entire range of motion, and fix any binding
before installing the actuator. Turn the damper
blade to its fully closed position.
3"
2-7/16"
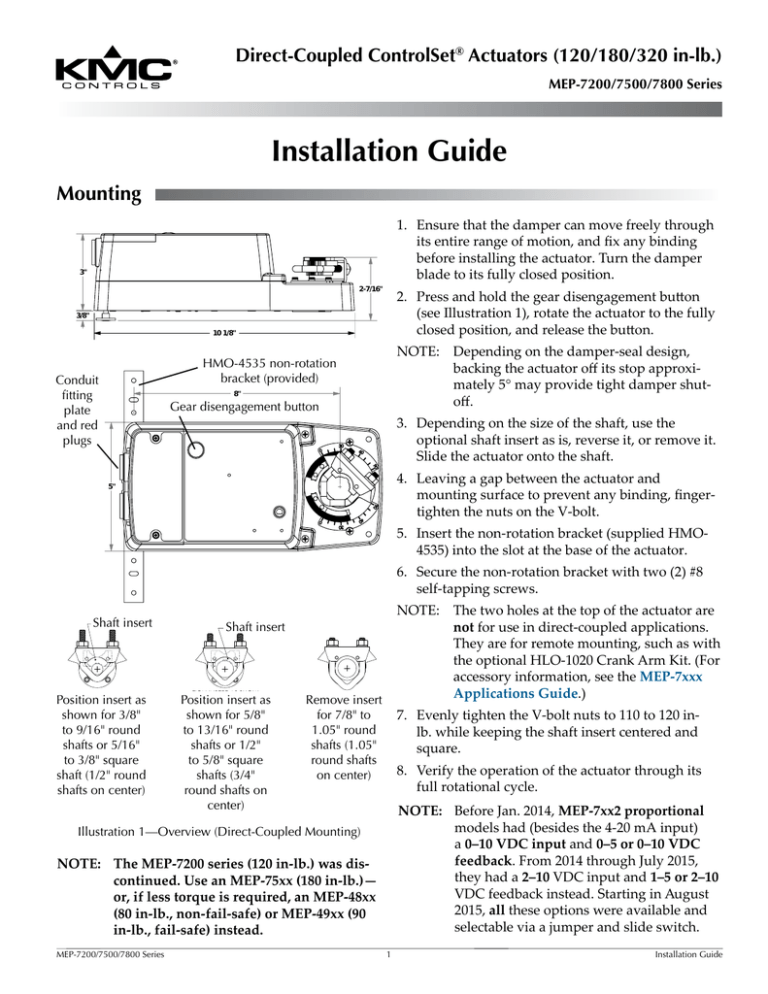
2. Press and hold the gear disengagement button
(see Illustration 1), rotate the actuator to the fully
closed position, and release the button.
3/8"
10 1/8"
NOTE: Depending on the damper-seal design,
backing the actuator off its stop approximately 5° may provide tight damper shutoff.
HMO-4535 non-rotation
bracket (provided)
Conduit
fitting
plate
and red
plugs
8"
Gear disengagement button
3. Depending on the size of the shaft, use the
optional shaft insert as is, reverse it, or remove it.
Slide the actuator onto the shaft.
4. Leaving a gap between the actuator and
mounting surface to prevent any binding, fingertighten the nuts on the V-bolt.
5"
5. Insert the non-rotation bracket (supplied HMO4535) into the slot at the base of the actuator.
6. Secure the non-rotation bracket with two (2) #8
self-tapping screws.
NOTE: The two holes at the top of the actuator are
not for use in direct-coupled applications.
They are for remote mounting, such as with
3"
the optional HLO-1020 Crank Arm Kit. (For
2-7/16"
accessory information, see the MEP-7xxx
POSITION
ASFOR
SHOWN
POSITION
ASFOR
SHOWN
FOR POSITION
INSERT
AS SHOWN
FORFOR
INSERT
ASINSERT
SHOWN
POSITION
INSERT
ASINSERT
SHOWN
POSITION
INSERT
AS SHOWN
FORPOSITION
Applications Guide.)
REMOVE
INSERT
INSERT
FORFOR
INSERT
FOR
3/8"
5/8"
to
13/16"
ROUND
or REMOVE
3/8"
to 9/16"
ROUND
or to
5/8"
to 13/16"
ROUND
SHAFTS
13/16"
ROUND
SHAFTS
orSHAFTS
Position
insert
asor REMOVE
Position
insert
as
Remove
insert
3/8"
to
9/16"
ROUND
SHAFTS
orSHAFTS
3/8"
to 9/16"
ROUND
SHAFTS
or 5/8"
7/8"
to 1.05"
ROUND
SHAFTS.
7/8"
to 1.05"
ROUND
SHAFTS.
1.05"
ROUND
SHAFTS.
1/2"
to 5/8"
SQUARE
SHAFTS. 7/8" to
5/16"
to 3/8"
SQUARE
SHAFTS.1/2" to
1/2"
toSQUARE
5/8"
SQUARE
SHAFTS.
5/8"
SHAFTS.
5/16"5/16"
to 3/8"
SHAFTS.
toSQUARE
3/8"
SQUARE
SHAFTS.
(1.05"
ROUND
SHAFTS
ON CENTER)
(1.05"
ROUND
SHAFTS
ON
CENTER)
(1.05"
ROUND
SHAFTS
ON
CENTER)
(3/4"
ROUND
SHAFTS
ON CENTER)
for
3/8"
shown
for
5/8"
(1/2"
ROUND
SHAFTS
ON CENTER)
ROUND
SHAFTS
ON
CENTER)
(3/4" (3/4"
ROUND
SHAFTS
ON
CENTER)
for 7/8" to
7. Evenly tighten the V-bolt nuts to 110 to 120 in10
1/8"
(1/2"shown
ROUND
SHAFTS
ON
CENTER)
(1/2"
ROUND
SHAFTS
ON CENTER)
to 13/16" round
to 9/16" round
1.05" round
lb. while keeping the shaft insert centered and
shafts or 5/16"
shafts or 1/2"
shafts (1.05"
square.
INSERT
INSERT
INSERT
Shaft
insert
to 3/8" square
shaft (1/2" round
shafts on center)
Shaft insert
INSERT
INSERT
INSERT
to 5/8" square
shafts (3/4"
round shafts on
center)
round shafts
on center)
8. Verify the operation of the actuator through its
full rotational cycle.
NOTE: Before Jan. 2014, MEP-7xx2 proportional
models had (besides the 4-20 mA input)
a 0–10 VDC input and 0–5 or 0–10 VDC
feedback. From 2014 through July 2015,
they had a 2–10 VDC input and 1–5 or 2–10
VDC feedback instead. Starting in August
2015, all these options were available and
selectable via a jumper and slide switch.
Illustration 1—Overview (Direct-Coupled Mounting)
NOTE: The MEP-7200 series (120 in-lb.) was discontinued. Use an MEP-75xx (180 in-lb.)—
or, if less torque is required, an MEP-48xx
(80 in-lb., non-fail-safe) or MEP-49xx (90
in-lb., fail-safe) instead.
MEP-7200/7500/7800 Series
1
Installation Guide
24 VAC/VDC
Power In
2. Slide the conduit fitting plate out.
INPUT
VOLTAGE
RANGE
4. Thread wires through the plugged opening and
connect to the terminal block according to the
appropriate model and options desired. (See
Illustrations 2 through 5.)
CW
OFF
CCW
0/2-10 0/1-5
CW CCW
OUT
4-20 mA IN
0/2-10 IN
COM
24 VAC
~
NOTE: The red plugs (or similar fittings) protect
the internal components from debris, helping to ensure long actuator life.
DIRECTION
AND MAPPING
0/1–5 or 0/2–10 VDC
Feedback Signal
3. Using a utility knife or drill, cut the red plug
to accept wiring or replace the plug with an
application-specific fitting.
FAIL-SAFE
DIRECTION
Illustration 2—MEP-7xx2 Wiring (Proportional)
24 VAC/VDC
Power In
CW
NOTE: For your convenience, the wiring terminal
block is removable.
CW
COM
CCW
P1
P3
CCW
CW
COM
Feedback
Potentiometer
(MEP-7xx3 only)
~
~
1. For clockwise rotation when the 24 volt
circuit switch/contact is closed, jumper
the 24 VAC terminal to the CW terminal
and select CCW on the Fail switch. When
the circuit opens, the actuator rotates
fully counterclockwise.
P2
CCW
NOTE: For two-position wiring on a fail-safe tristate actuator (see Illustration 5), choose
one of these (jumpered) rotation options:
(Feedback Only)
Illustration 3—MEP-7x01/7x03 Wiring (Tri-State, Non-Fail-Safe)
Feedback
Potentiometer
(MEP-7xx3 only)
CW
24 VAC/VDC
Power In
CCW
CW
(Feedback Only)
CW
OFF
CCW
P1
COM
~
~
24 VAC
~
5. Reinstall the terminal block on the pins (if
removed) and the conduit fitting plate.
P2
CCW
P3
2. For counterclockwise rotation when
the 24 volt circuit switch/contact is
closed, jumper the 24 VAC terminal to
the CCW terminal and select CW on the
Fail switch. When the switch opens, the
actuator rotates fully clockwise.
FAIL-SAFE
DIRECTION
Illustration 4—MEP-7x51/7x53 Tri-State Wiring (Fail-Safe)
Feedback
Potentiometer
(MEP-7xx3 only)
24 VAC/VDC
Power In
Switch/Contact
CCW
CW
COM
(Feedback Only)
CW
OFF
P1
~
~
24 VAC
P3
~
NOTE: After initial power connection or reconnection (until the capacitors are fully charged),
fail-safe operation might be delayed up to
20 seconds for the MEP-725x/755x or up to
40 seconds for the MEP-785x.
2
1
2
1
P2
7. For MEP-7x5x models, adjust the fail-safe
(clockwise, counter-clockwise, or off) selector
switch, beside the terminal block, as needed.
Jumper
CCW
6. For MEP-7xx2 models, adjust the auto-mapping
range reset, rotation direction, input voltage
range, and feedback voltage as needed. See
Proportional (MEP-7xx2) Models Setup on page
3.
FAIL-SAFE
DIRECTION
Illustration 5—MEP-7x51/7x53 Two-Position Wiring
(Fail-Safe)
8. Reinstall the tethered cover and tighten the
screws.
MEP-7200/7500/7800 Series
0-10
Control Signal Common
0/2–10 VDC Control Signal
4–20 mA Control Signal
(MEP-7x52 Only)
1. Loosen the screws on the tethered access cover
and remove the cover.
2-10
Wiring (General)
Wiring (Master/Slave)
See the MEP-7xxx Applications Guide.
2
Installation Guide
Proportional (MEP-7xx2) Models Setup
NOTE: Before Jan. 2014, MEP-7xx2 proportional
models had (besides the 4-20 mA input)
a 0–10 VDC input and 0–5 or 0–10 VDC
feedback. From 2014 through July 2015,
they had a 2–10 VDC input and 1–5 or 2–10
VDC feedback instead. Starting in August
2015, all these options were available and
selectable via a jumper and slide switch.
MEP-7xx2 models also offer a actuator/signal range
reset program (auto-mapping) feature that reassigns
the full 0/2–10 VDC input signal scale over a reduced
stroke range for more precise control.
NOTE: The auto-mapping feature works best for
ranges that are more than about 45°.
To set the auto-mapping:
1. If desired, use the HMO-4536 adjustable end stop
kit to limit the stroke of the actuator.
Proportional actuators are shipped with factory settings of 2–10 VDC input, 1–5 VDC feedback voltage, and CW movement with increasing voltage.
To change any settings, access the selector switches
and jumper (see Illustrations 2 and 6) by loosening
the screws on the conduit fitting and lifting up to
remove the fitting.
2. With power applied to the actuator, flip the
Direction switch (from its required CW or
CCW increasing voltage direction) to start the
reset mode. The actuator will first move to the
CCW limit. The complete reset process will take
approximately four minutes.
1. Select actuator rotation with the Direction switch.
2. Use the Input Voltage Range jumper to select
either 0–10 or 2–10 for the VDC input range.
This also sets the starting point for the feedback
voltage (e.g., 2–10 VDC input provides a
corresponding feedback voltage of either 2–10 or
1–5 VDC). Select the desired feedback range with
the Feedback switch.
0/2–10 VDC
CW
3. Return the Direction switch to the required
increasing voltage direction before the reset
finishes. The reset process is complete after the
actuator has moved to the CW limit and has
begun to position normally.
4. Verify that the actuator travels completely across
the new range.
For example, after completing the auto-mapping
program, the new actuator stroke is 0–80°:
2-10
Down
0-10
CCW
DIRECTION
AND MAPPING
Direction*
0/1–5 VDC
0/2-10 0/1-5
CW CCW
Feedback
Up
OUT
Switch
NOTE: On fail-safe models, wait for at least one
minute after power has been applied to the
actuator (allowing the capacitors to fully
charge) before initiating the automap feature.
INPUT
VOLTAGE
RANGE
• With a 0–10 VDC input, a 5 VDC input signal
(halfway between 0–10 VDC) will drive the actuator to the 40° position (50% of its adjusted range)
and the feedback voltage will be 2.5 VDC if the
Feedback switch is set at the 0–5 VDC position or
5 VDC if the Feedback switch is set at 0–10 VDC.
Illustration 6—Feedback Selector Detail MEP-7xx2
*NOTE: The Direction Switch has two functions:
1. It determines the direction to rotate (CW or
CCW) with increasing voltage and is factory
set in the CW position (down). To change, remove power before flipping the switch up to
the CCW position. Removing power prevents
initiation of the auto-mapping feature.
2. It initiates the auto-mapping feature. (See
description below.) This feature is initiated
only by cycling the switch with power
applied to the unit. The auto-mapping feature
will NOT begin if the switch position is
changed with power removed or in the event
of a power failure.
MEP-7200/7500/7800 Series
• With a 2–10 VDC input, a 6 VDC input signal
(halfway between 2–10 VDC) will drive the actuator to the 40° position (50% of its adjusted range)
and the feedback voltage will be 3 VDC if the
Feedback switch is set at the 1–5 VDC position or
6 VDC if the Feedback switch is set at 2–10 VDC.
NOTE: The auto-mapping option is not available
with Master/Slave applications.
3
Installation Guide
P
P
P
CCW
CW
COM
~
~
C
(Feedback Only)
Fail-Safe Direction (MEP-7x5x)
Important Notices
All fail-safe models offer selectable CW/CCW fail
Feedback
direction
and the option
to turn off the fail-safe using
CW
Potentiometer
(MEP-7xx3 only)
a slide switch to the right of the terminals.
The KMC logo is a registered trademark of KMC
Controls, Inc. All rights reserved. No part of this
publication may be reproduced, transmitted, transcribed, stored in a retrieval system, or translated
into any language in any form by any means without
the written permission of KMC Controls, Inc.
CCW
(Feedback Only)
CW
OFF
CCW
P1
P2
COM
CW
~
~
24 VAC
~
P3
CCW
The material in this document is for information
purposes only. The contents and the product it
describes are subject to change without notice.
KMC Controls, Inc. makes no representations or
warranties with respect to this document. In no event
shall KMC Controls, Inc. be liable for any damages,
direct or incidental, arising out of or related to the
use of this document.
FAIL-SAFE
DIRECTION
Illustration 7—Fail-Safe Direction Switch
CCW
CW
(Feedback Only)
CW
OFF
CCW
P1
P2
~
~
24 VAC
~
Maintenance
COM
ntact
P3
Feedback
NOTE: After initial connection
or reconnection to
Potentiometer
(MEP-7xx3
only)
power, proper
fail-safe
operation might be
Jumper delayed up to 40 seconds (until the capaci2
1
2 tors are fully charged).
1
C
More Information
FAIL-SAFE
DIRECTION
No routine maintenance is required. The motors are
permanently lubricated. Careful installation will also
ensure long term reliability and performance.
For models, specifications, and additional
information, see the
MEP-7500/7800 Series
Data Sheet on the KMC
web site.
Accessories
See the MEP-7xxx Applications Guide.
Specifications
For accessories, troubleshooting, master/slave
wiring, torque selection,
links to sample applications, and other information, see the MEP-7xxx
Applications Guide on
the KMC web site.
See the MEP-7500/7800 Series Data Sheet.
Applications
For possible proportional heating/cooling applications using the CTE-5202 electronic thermostat, see
the CTE-5202 Applications Guide.
For valve applications, see information on:
• VEB-53 Series Two-Way, Flanged Ball Valves (4
to 6")
• VEB-56 Series Three-Way, Flanged Ball Valves
(4 to 6")
• VEF-53 Series Two-Way, Rubber-Lined, Butterfly Valves (2 to 6")
• VEF-56 Series Three-Way, Rubber-Lined, Butterfly Valves (2 to 6")
KMC Controls, Inc.
19476 Industrial Drive
New Paris, IN 46553
574.831.5250
www.kmccontrols.com
info@kmccontrols.com
The latest support files are always available on the
KMC Controls web site (www.kmccontrols.com).
MEP-7200/7500/7800
Series
© 2015 KMC Controls,
Inc. 4
Installation
Guide
031-019-01I


