Application Specification
114-13206
ELCON Drawer Series Connectors
NOTE
i
26 NOV 07
Rev B
All numerical values are in metric units [with U.S. customary units in brackets]. Dimensions are in millimeters [and
inches]. Unless otherwise specified, dimensions have a tolerance of +0.13 [+.005] and angles have a tolerance of +2 .
Figures and illustrations are for identification only and are not drawn to scale.
_
1. INTRODUCTION
This specification covers the requirements for application of ELCON Drawer Series Connectors: True Hot Plug,
Blind Mating Mixed Signal and Power Connectors. These connectors are designed for use in pluggable
wire–to–board applications of power supplies. The connectors are available in a variety of custom
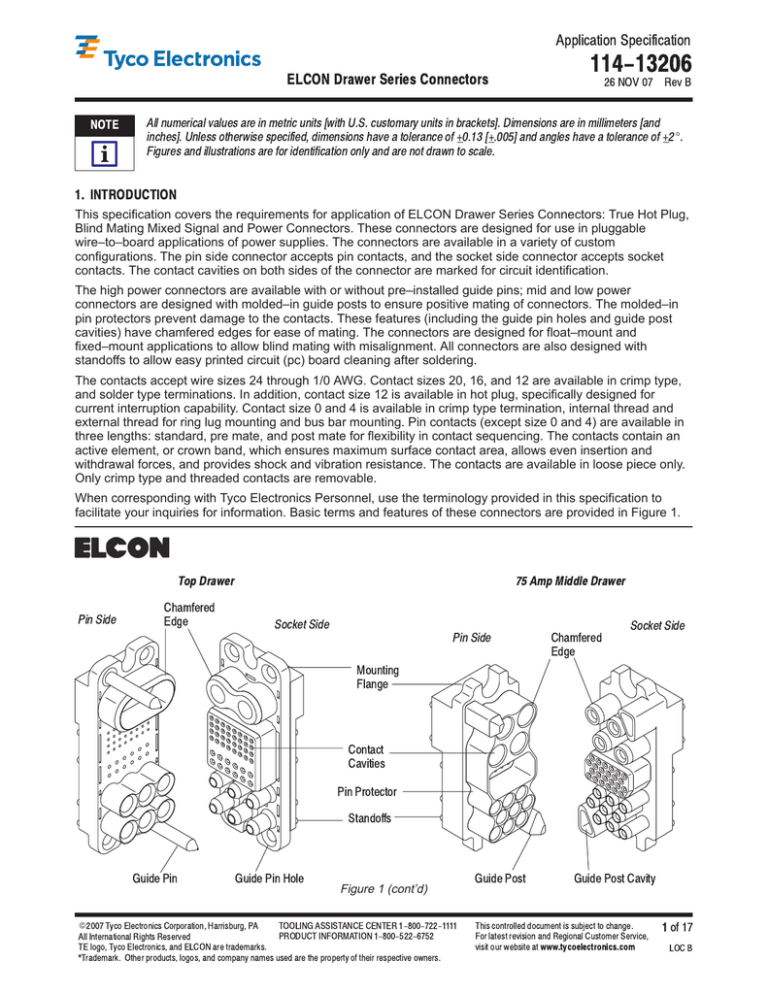
configurations. The pin side connector accepts pin contacts, and the socket side connector accepts socket
contacts. The contact cavities on both sides of the connector are marked for circuit identification.
The high power connectors are available with or without pre–installed guide pins; mid and low power
connectors are designed with molded–in guide posts to ensure positive mating of connectors. The molded–in
pin protectors prevent damage to the contacts. These features (including the guide pin holes and guide post
cavities) have chamfered edges for ease of mating. The connectors are designed for float–mount and
fixed–mount applications to allow blind mating with misalignment. All connectors are also designed with
standoffs to allow easy printed circuit (pc) board cleaning after soldering.
The contacts accept wire sizes 24 through 1/0 AWG. Contact sizes 20, 16, and 12 are available in crimp type,
and solder type terminations. In addition, contact size 12 is available in hot plug, specifically designed for
current interruption capability. Contact size 0 and 4 is available in crimp type termination, internal thread and
external thread for ring lug mounting and bus bar mounting. Pin contacts (except size 0 and 4) are available in
three lengths: standard, pre mate, and post mate for flexibility in contact sequencing. The contacts contain an
active element, or crown band, which ensures maximum surface contact area, allows even insertion and
withdrawal forces, and provides shock and vibration resistance. The contacts are available in loose piece only.
Only crimp type and threaded contacts are removable.
When corresponding with Tyco Electronics Personnel, use the terminology provided in this specification to
facilitate your inquiries for information. Basic terms and features of these connectors are provided in Figure 1.
Top Drawer
Pin Side
75 Amp Middle Drawer
Chamfered
Socket Side
Edge
Pin Side
Socket Side
Chamfered
Edge
Mounting
Flange
Contact
Cavities
Pin Protector
Standoffs
Guide Pin
Guide Pin Hole
E
2007 Tyco Electronics Corporation, Harrisburg, PA
All International Rights Reserved
Figure 1 (cont’d)
Guide Post
Guide Post Cavity
TOOLING ASSISTANCE CENTER 1-800-722-1111
This controlled document is subject to change.
PRODUCT INFORMATION 1-800-522-6752
For latest revision and Regional Customer Service,
TE logo, Tyco Electronics, and ELCON are trademarks.
*Trademark. Other products, logos, and company names used are the property of their respective owners.
visit our website at
www.tycoelectronics.com
1 of 17
LOC B
ELCON Drawer Series Connectors
Pin Side
Lower Drawer
Chamfered
Edge
114-13206
Mini Drawer
Pin Side
Socket Side
Socket Side
Mounting
Flange
Contact
Cavities
Pin Protector
Standoffs
Guide Post Cavity
Pin Side
Chamfered Edge
Guide Post
Dual Power
Socket Side
Pin Side
Quad Power
Socket Side
Pin Side
125 Amp Middle Drawer
Socket Side
Mounting
Flange
Contact
Cavities
Pin Protector
Pin Side
Double Drawer
Socket Side
Mounting
Flange
Contact
Cavities
Pin Protector
Crimp Type
Contact
Solder Type
Contact
Contact Size 0
Crimp Type
Internal Thread
External Thread
Figure 1 (end)
2. REFERENCE MATERIAL
2.1. Revision Summary
S Updated document to corporate requirements
S Added text to Paragraph 2.4
2 of 17
Tyco Electronics Corporation
Rev B
ELCON Drawer Series Connectors
114-13206
2.2. Customer Assistance
Product Part Number 1648578 and Product Code D033 are representative numbers of the ELCON Drawer
Series Connectors. Use of these numbers will identify the product line and expedite your inquiries through a
service network established to help you obtain product and tooling information. Such information can be
obtained through a local Tyco Electronics Representative or, after purchase, by calling the Product Information
number at the bottom of page 1.
2.3. Drawings
Customer Drawings for product part numbers are available from the service network. If there is a conflict
between the information contained in the Customer Drawings and this specification or with any other technical
documentation supplied by Tyco Electronics, call Product Information at the number at the bottom of page 1.
2.4. Specifications
Design Objective 108–2285 provides expected product performance and test information.
Workmanship Specification 101–654 is a guide for evaluating installed connectors for conditions which effect
the cosmetics and/or function of the connector.
2.5. Manuals
Manual 402–40 is available upon request and can be used as a guide in soldering. This manual provides
information on various flux types and characteristics along with commercial designations and flux removal
procedures. A checklist is included in the manual as a guide for information on soldering problems.
2.6. Instructional Material
Instruction sheets (408–series) contain detailed assembly instructions and repair procedures for product and
tooling. Documents available which pertain to this product are:
Document Number
Document Title
408–7516
408–10159
Screw Machine Contacts and Application Tooling
Insertion/Extraction Tools for ELCON Circular Contacts
3. REQUIREMENTS
3.1. Material
Crimp type contacts are made of copper alloy plated with silver or gold. Solder type contacts are made of brass
or copper alloy plated with silver or gold. The crown band is made of copper alloy plated with gold over nickel.
Hot plug contacts are made of copper alloy plated with gold. Connector housings are made of polyester, 30%
glass filled, UL94–V.
3.2. Storage
A. Ultraviolet Light
Prolonged exposure to ultraviolet light may deteriorate the chemical composition used in the connector
material.
B. Shelf Life
The connectors should remain in the shipping containers until ready for use to prevent deformation to the
contacts. The connectors should be used on a first in, first out basis to avoid storage contamination that
could adversely affect signal transmissions. The shelf life is six months from date of shipment.
NOTE
Silver-plated contacts are shipped in silver-saver packaging to prevent tarnishing until opened.
i
3.3. Chemical Exposure
Do not store connectors near any chemical listed below as they may cause stress corrosion cracking in
the contacts.
Alkalies
Amines
Rev B
Ammonia
Carbonates
Citrates
Nitrites
Phosphates Citrates
Sulfur Nitrites
Tyco Electronics Corporation
Sulfur Compounds
Tartrates
3 of 17
ELCON Drawer Series Connectors
114-13206
3.4. Special Features
The length of the pin contacts (except size 0 and 4), designated by standard, pre–mate, and post–mate, varies
among contact sizes and applies to the portion of the contact that protrudes from the connector after insertion
(socket length does not include depth of the connector standoff). Mating socket contacts accept all pin lengths
of the same contact size. The length of pin and socket contacts, as described, are shown in Figure 2.
Pin Contact
Socket Contact
A"
A"
Connector
Connector
CONTACT LENGTH (DIMENSION A")
PIN
CONTACT SIZE
SOLDER TYPE
CONTACT
PROBE PROOF CRIMP TYPE AND SOLDER TYPE
20
(STANDARD)
PRE-MATE
POST-MATE
8.12 [.320]
11.93 [.470]
6.85 [.270]
4.06 [.160]
16
8.38 [.330]
12.19 [.480]
7.36 [.290]
4.06 [.160]
12D
10.92 [.430]
11.68 [.460]
9.90 [.390]
5.33 [.210]
8
10.92 [.430]
12.19 [.480]
---
6.85 [.270]
---
---
---
---
4
0
12.95 [.510]
---
10.92 [.430] Probe Proof
Probe Proof
12.57 [.495]
---
DIncludes hot plug contacts
Figure 2
Probe–proof socket contacts size 0 are designed with a protective cap to provide additional probe–proof
protection along with the crown band. This cap must not be removed from the contact. See Figure 3.
Some crimp type contacts feature a sight hole located on the side of the wire barrel or in the center of the
inside of the wire barrel. See Figure 3. Crimp contacts are rear–insertable and removeable. PC board tail are
rear–insertable and non–removable.
The connector contact cavities contain retention clips. The retention clip is an important feature in holding the
crimped contact in the connector. When the contact is fully inserted, the retention clips engage the shoulder of
the contact and prevent backing out during mating of the connector.
Typical Socket Contact Size 0
Typical Probe-Proof Socket Contact Size 0
Crimp Type Pin Contact
With Sight Hole
Protective
Cap
Sight Hole
Crown Band
Figure 3
3.5. Wire Selection and Preparation
The contacts will accept stranded wire sizes 24 through 1/0 AWG. Proper strip length is necessary to properly
insert the wire into the contact. The strip length of the wire is shown in Figure 4.
CAUTION
Reasonable care must be taken not to nick, scrape, or cut any strands during the stripping operation.
!
4 of 17
Tyco Electronics Corporation
Rev B
ELCON Drawer Series Connectors
114-13206
Wire
e St
Strip
p Length
e gt
Note: Not to Scale
D Refer to MS 3348, Contact Bushing, Electrical, Wire Barrel"
WIRE STRIP
WIRE SIZE
WIRE SIZE
RANGE (AWG)
RANGE (mm )
20
24-20
0.241-0.616
5.33 [.210]
16
18-16
0.963-1.23
6.86 [.270]
12
14-12
1.94-2.98
6.86 [.270]
D
4.74-8.61
12.7 [.500]
21.60
12.7 [.500]
53.00
15.2 [.600]
CONTACT SIZE
8
10-8
4
6-4
0
D
1/0
2
LENGTH
+0.51 [+.020]
Figure 4
3.6. Crimp Type Contacts
Crimp contact to wire according to instructions packaged with applicable tooling. These requirements apply
equally to the pin contact and the socket contact.
A. Wire Barrel Crimp
The crimp applied to the wire barrel portion of the contact is the most compressed area and is most critical
in ensuring optimum electrical and mechanical performance of the crimped contact. The wire insulation
must not enter the contact wire barrel. The crimp height is controlled by proper use of MIL–DTL–22520
crimp tooling. Refer to Section 5, TOOLING for tooling information.
CAUTION
Reasonable care must be taken not to cut or break the wire insulation during the crimping operation.
!
B. Tensile Strength
Crimped splices must hold the wire firmly and have a crimp pull–out test value meeting that specified in
Figure 5 (the test value is that of the smallest wire size used in the contact).
NOTE
Adjust tensile testing machine for head travel of 25.4 mm [1.0 in.] per minute. Directly and gradually apply force for
one minute.
i
Crimped
Wire Barrel
Wire
Conductor Location
(Visible in Sight Hole) (Ref)
Sight Hole (Ref)
WIRE SIZE
TENSILE STRENGTH WITH SILVER
TOOL
WIRE BARREL EFFECTIVE CRIMP
(AWG)
PLATED COPPER WIRE (N [lbs])
SELECTOR
LENGTH (Max)
20
89 [20]
4
16
222 [50]
6
12
489 [110]
8
8
979 [220]
4
1779 [400]
1/0
3114 [700]
---
3.30 [.130]
5.33 [.210]
Figure 5
Rev B
Tyco Electronics Corporation
5 of 17
ELCON Drawer Series Connectors
NOTE
114-13206
Each crimp dimension represents the functional range of wire and contact combination. The developed crimp
configuration is unique for each tool design and is acceptable provided the crimp height is within the functional range.
i
For crimp dimensions relating to a specific tool, refer to the instruction sheet packaged with manual tools and the
applicator log packaged with power tools.
C. Conductor Location
After crimping, the conductor ends must be flush to the end of the wire barrel. In contacts having a sight
hole, this can be verified by checking that the conductor ends are visible in the sight hole. See Figure 5.
D. Effective Crimp Length
The effective crimp length is the area where the crimp pressure is applied over the length of the wire
barrel.
E. Straightness
After crimping the wire to the contact, the contact must be chucked, and rotated a minimum of 360_. The
point of TIR (total indicator reading) measurement must not exceed the dimensions shown in Figure 6.
Chucking Area
Dial Indicator Probe Placed
Here
Measurementt off TIR
H
ffor M
Wire
WIRE SIZE RANGE
TIR MEASUREMENT
(AWG)
(Max)
20
0.279 [.011]
18-12
0.305 [.012]
10-4
1/0
0 762 [.030]
0.762
[ 030]
Figure 6
3.7. Threaded Contacts and Guide Posts and Threaded Contacts
S
S
S
Threaded guide posts should not exceed a torque limit of 1.7 N D m [15 in.–lb]
Threaded contacts with M6 threading should not exceed a torque limit of 4.5 N D m [40 in.–lb]
Threaded contacts with 1/4–20 threading should not exceed a torque limit of 6.8 N D m [60 in.–lb]
3.8. Connector Spacing
Care must be taken to avoid interference between adjacent connectors and/or other components. There is no
required spacing between connectors, however spacing may be dependent on variable hardware used and the
clearance required for mating connectors.
3.9. Panel Cutout
The pin side connector and socket side connector can be installed or removed from either the back or the front
of the panel (front of the panel is recommended). Usually, the socket side connector is mounted in the cabinet
(energized) panel, while the pin side connector is mounted in the drawer (passive) panel. Dimensions for
mounting holes, guide pins (if applicable), and panel cutouts, and maximum panel thickness for rear mounting
are shown in Figure 7.
3.10. Contact Insertion and Extraction
Normally an insertion tool is not required to insert contacts into connectors, but if the wire bundle is large or
individual wires are fragile, using an insertion tool is recommended. Push contact straight into the contact
cavity until it bottoms (an audible click). After inserting contact into connector, pull back lightly on the wire to
ensure contact is fully seated.
The contacts are rear–insertable and rear–releasable; an extraction tool is needed to disengage the connector
retention clips and remove the contact from the back of the connector. Only crimp type and threaded contacts
are removable. Refer to Section 5 for tooling information.
3.11. PC Board Connectors
A. PC Board Material and Thickness
The pc board material shall be glass epoxy (FR–4 or G–10). The pc board thickness range shall be
1.38 through 5.08 mm [.054 through .200 in.].
6
of 17
Tyco Electronics Corporation
Rev B
ELCON Drawer Series Connectors
NOTE
114-13206
Contact the Product Information Center at the number listed at the bottom of page 1 for suitability of other board
materials and thicknesses.
i
B. PC Board Tolerance
Maximum allowable bow of the pc board shall be 0.03 mm [.001 in.] over the length of the connector.
C. Connector Placement
The connector number one position must be aligned with the number one position board hole. When
placing connectors on the pc board, make sure that the contact solder tails are aligned and started into the
matching holes before seating the connector onto the pc board.
CAUTION
Connectors should be handled only by the housing to avoid deformation, contamination, or damage to the contact
solder tails.
!
Recommended Panel Cutout
6.35 mm [.250 in.]
Mounting Hole Dia
(4 Places)
A
B
D
Threaded Hole for Applicable
Shoulder Screw (2 Places)
E
C
Panel Thickness: 4.76 mm [.188 in.] (Max)
CONNECTOR
A
B
C
D
E
QUADPOWER
53.98 [2.125]
43.18 [1.700]
43.18 [1.700]
50.80 [2.000]
24.89 [.980]
DUALPOWER
35.56 [1.400]
25.40 [1.000]
43.18 [1.700]
33.02 [1.300]
24.89 [.980]
TOP DRAWER, DOUBLE DRAWER
98.29 [3.870]
88.90 [3.500]
43.18 [1.700]
95.25 [3.750]
24.89 [.980]
125A MIDDLE DRAWER
72.01 [2.835]
62.99 [2.480]
35.56 [1.400]
---
---
75A MIDDLE DRAWER
76.20 [3.000]
67.31 [2.650]
36.83 [1.450]
---
---
LOWER DRAWER
76.20 [3.000]
66.67 [2.625]
25.40 [1.000]
---
---
MINI DRAWER
69.75 [2.746]
58.55 [2.305]
23.62 [.930]
---
---
Figure 7
CAUTION
For applications using panel mounted threaded fasteners, care must be taken that the threaded hole does not
compromise the shoulder area of the shoulder screw used to fasten the float mount connector.
!
Rev
B
Tyco Electronics Corporation
7 of 17
ELCON Drawer Series Connectors
114-13206
D. PC Board Layout
The mounting holes and contact holes in the pc board must be precisely located to ensure proper
placement and optimum performance of the connector. Design the pc board using the dimensions
provided in Figure 8.
Recommended PC Board Layout
Top Drawer Pin Side
A
B
C
A = 2.65+0.08
[.104+.003] 6 Plc
B = 1.78+0.08
[.070+.003] 12 Plc
C = 1.19+0.08
[.047+.003] 32 Plc
Top Drawer Socket Side
A
B
C
Figure 8 (cont’d)
8 of 17
Tyco Electronics Corporation
Rev B
ELCON Drawer Series Connectors
114-13206
75A Middle Drawer
Socket Side
75A Middle Drawer
Pin Side
Figure 8 (cont’d)
Rev B
Tyco Electronics Corporation
9 of 17
ELCON Drawer Series Connectors
114-13206
Lower Drawer
Pin Side
Lower Drawer
Socket Side
Mini Drawer
Pin Side
Mini Drawer
Socket Side
Figure 8 (cont’d)
10 of 17
Tyco Electronics Corporation
Rev B
ELCON Drawer Series Connectors
114-13206
Double Drawer
18.42 [0.725]
2X 8.89 [0.350] = 26.67 [1.05]
43.18[1.70]
5.08 [0.200]
PC BOARD
CUT-OUT
17.78
[0.70]
36.32
[1.43]
59.44
[2.34]
43.18
[1.70]
50.55
[1.99]
85.60
[3.37]
68.07
[2.68]
2X 3.8 [.150] = 7.62 [0.300]
Quad Power
5.40 [0.21]
18.42
[0.725]
4X
98.29
[3.870]
6.35 [0.25]
17.78
[0.70]
7X 3.8 [0.150] = 26.67[1.050]
2X 12.32 [0.485] = 24.64 [0.970]
43.18
[1.700]
50.80
[2.000]
18.42
[0.725]
53.98
[2.125]
PANEL
CUT OUT
34.54
[1.36]
17.27 [0.680]
16.51 [0.650]
8.26 [0.325]
2X
THREADED
INSERT
24.89
[0.980]
43.18
[1.700]
CLEARANCE
CUT-OUT
FOR SIZE No.4
CONTACTS
Dual Power
18.29
[0.72]
3.81[0.150] TYP
43.18
[1.700]
4X
24.89
[0.980]
6.35 [0.25]
33.02
[1.30]
1.91 [0.075] TYP
9.14 [0.36]
44.86
[1.776]
16.79 [0.661]
72.01
[2.835]
9.17 [0.361]
12.55 [0.494]
16.51 [.650]
PANEL
CUT OUT
125A Middle Drawer
25.40
[1.00]
18.42
[0.725]
35.56
[1.40]
8.89 [0.350]
9.91[0.390]
3.30[0.130] TYP
19.81[0.780]
17.78 [0.700]
2X THREADED INSERT
Figure 8 (end)
Rev B
Tyco Electronics Corporation
11 of 17
ELCON Drawer Series Connectors
114-13206
E. PC Board Hole Dimensions
The solder type contacts may be used with or without plated through holes. If plated, the drilled hole size,
plating types, and plating thickness are dependent on the application requirements. The finished hole size
must be as stated to provide unrestricted insertion and ensure adequate application of solder to the solder
tines. See Figure 9.
ÉÉÉÉ
ÉÉÇ
ÇÇ
ÉÉÉÉ
ÉÉÉÉ
ÉÉÉ
ÇÇ
ÉÉÉÉ
ÉÉÉÉ
É
ÉÉÇ
ÇÇ
ÉÉÉÉ
ÉÉÉÉ
É
ÉÉÇ
ÇÇ
ÉÉÉÉ
ÉÉÉÉ
É
ÉÉÇ
ÉÉÉÉ
ÉÉÉÉ
Trace Width (As Required)
Pad Width (As Required)
Drilled Hole Diameter
(As Required)
Plating Recommendations:
Tin Plate 0.005 mm [.0002 in.] Min. Thick
Over Copper 0.025 mm [.0010 in.] Thick
Finished Hole Diameter
Copper Plating (Ref)
After Plating (Refer to Table)
(Max Hardness 150 Knoop)
Tin-Lead Plating (Ref)
CONTACT SIZE
FINISHED HOLE DIAMETER (+0.08 [+.003])
20
1.20 [.047]
16
1.80 [.070]
12
G
2.65 [.104]
8
3.82 [.152]
GIncludes hot plug contacts
Figure 9
3.12. Connector Seating
The connector standoffs must be seated on the pc board or panel not exceeding the dimension shown in
Figure 10.
NOTE
Hold-downs may be used to ensure stability during the soldering procedure.
i
Connector
0.51
0.51
[.020]
[.020]
PC Board (Ref)
Standoffs
Wire
Figure 10
3.13. Soldering
Observe guidelines and procedures when soldering contacts is required. All solder joints should conform to
those specified in Workmanship Specification IPC–A–610 and all other requirements specified in this
document. Contacts must be stabilized during soldering with a non–metallic material. Solder, clean, and dry all
wire leads to contacts according to the following:
12 of 17
Tyco Electronics Corporation
Rev B
ELCON Drawer Series Connectors
114-13206
A. Flux Selection
Wire lead and contact wire barrel interior shall be fluxed prior to soldering using a mildly active rosin. Flux
must be compatible with manufacturing, safety, and health guidelines.
B. Cleaning
After cleaning, removal of fluxes, residues, and activators is mandatory. Cleaning procedures and solvents
depend on the type of flux used. See Figure 11.
DANGER
Consideration must be given to toxicity and other safety and health requirements as recommended in the Material
Safety Data Sheet supplied by the solder cleaning solvent manufacturer.
CLEANER
TEMPERATURE (Maximum)
TIME
TYPE
(Minutes)
ALPHA 2110
Aqueous
1
132
270
BIOACT EC-7
Solvent
5
100
212
Butyl CARBITOL
Solvent
1
Isopropyl Alcohol
Solvent
5
100
212
KESTER 5778
Aqueous
5
100
212
KESTER 5779
Aqueous
5
100
212
LONCOTERGE 520
Aqueous
5
100
212
LONCOTERGE 530
Aqueous
5
100
212
Terpene Solvent
Solvent
5
100
212
NAME
CELSIUS
FAHRENHEIT
Ambient Room
Figure 11
C. Drying
When drying cleaned connector assemblies, make certain that the recommended temperature limitations
of –40 to +105 C [–40 to +221 F] are not exceeded. Excessive temperatures may cause housing
degradation.
_
_
3.14. Connector Loading
These connectors provide optimum mapping of pin to function, and ease of routing in the system by accepting
various contact sizes, quantities, and types. All connector contact positions accept crimp type and solder type
terminations. In addition, high power connectors accept threaded contacts (size 0 only). Possible contact
options for loading individual connectors are shown in Figure 12.
CONTACTS
CONNECTOR
DOUBLE DRAWER
0
4
8
12
16
20
4
---
---
11
---
24
TOP DRAWER
2
---
---
6
12
32
125 MIDDLE DRAWER
---
2
---
6
---
32
75A MIDDLE DRAWER
---
---
4
9
---
24
---
---
---
8
---
21
---
---
---
4
4
21
---
---
---
---
8
21
---
---
---
6
---
16
LOWER DRAWER
Y
---
---
---
3
3
16
---
---
---
---
6
16
DUALPOWER
2
---
---
---
---
---
QUADPOWER
4
---
---
---
---
---
MINI DRAWER
{
J
J
CONNECTOR RATING
{
150A/200A{
150A/200A
125A
75A
35A
35A
{
150A/200A{
150A/200A
200A when mounted on bus bar. Three Lower Drawer housing variations with different combinations of contact size 12 and 16 are
available. Three Mini Drawer housing variations with different combinations of contact size 12 and 16 are available.
Y
Figure 12
Rev B
Tyco Electronics Corporation
13
of 17
ELCON Drawer Series Connectors
114-13206
3.15. Mounting Hardware
The connectors can be float mounted or fixed mounted to a backplane or chassis. The float mount shoulder
screws are designed to secure a connector to a panel. The panel must flex and be of sufficient gauge to
support mating loads. These screws allow some movement of the assembly for easier mating.
Connectors can be fixed mounted using commercially available screws with a head that will not interfere with
connector mating. Washers can also be used to make up the difference for the required hardware diameter.
High power connectors are fixed mounted using the mounting flange or, if available, the guide pins (which have
internal 6–32 threads). Hardware for specific connector types is shown in Figure 13.
NOTE
PC board connectors must be fixed mounted.
i
Float Mounting
Mounting Flange
Float Mount Shoulder Screw
Panel (Ref)
10-32 or M5
Top Drawer and Double Drawer
6-32, 8-32 or M4
Mini Drawer, Lower Drawer, and
75A/125A Middle Drawer
Fixed Mounting
Optional Fixed Mounting for
High Power Connectors Only
Internally Threaded
(6-32) Guide Pin
Commercially
Available Screw
G
and Washer
Commercially
Available Screw
G
and Washer
GHardware Diameter
9.52 mm [.375 in.] Top Drawer, Double Drawer
12.7 mm [.500 in.] 75A, 125A Middle Drawer,
Lower Drawer and Mini Drawer
Figure 13
14 of 17
Tyco Electronics Corporation
Rev
B
ELCON Drawer Series Connectors
114-13206
3.16. Connector Mating and Alignment
The pre–installed guide pins and molded–in guide posts ensure positive mating of connectors. In addition,
because of their symmetrical design, the low power connectors have a polarizing feature: a rib in the guide
post cavity that fits into a notch in the guide post. When fully engaged, the dimension between the pin side
connector and socket side connector must be within the limit provided to ensure full mating. See Figure 14.
When mounted, the float mount design allows blind mating with gatherability up to 2.54 mm [.100 in.].
Low Power Connectors
Polarizing Feature
A"
Rib in Guide
MATING DIMENSION
A" (MAX)
CONNECTOR
Post Cavity
Notch in
Double Drawer, Top Drawer
Guide Post
75A and 125A Middle Drawer,
12.70 mm [.500 in.]
Mini Drawer
Lower Drawer
10.16 mm [.400 in.]
Figure 14
3.17. Special Assembly Consideration
The system into which the connectors are installed must support the weight of the drawer when connectors are
engaged (for example, the drawer must bottom on a built–in stop, not on the connector).
3.18. Strain Relief and Wire Dress
If required, wires can be bundled together and supported with cable ties. Wires must not be stretched or
confined in any way that would restrict the floating action of the connectors. Therefore, the wires must remain
perpendicular to the connector and avoid an excessively sharp bend radius. The minimum distance for the
cable tie, measured from the wire end of the connector to the cable tie, and the minimum bend radius of a wire
bundle is shown in Figure 15.
152.4 [6.0]
(Min)
10 Times
Diameter of
Connector
Largest Cable
Cable Tie
Figure 15
Rev
B
Tyco Electronics Corporation
15 of 17
ELCON Drawer Series Connectors
114-13206
3.19. Repair
Damaged connectors must be removed, discarded, and replaced. Connectors with solder type contacts will
require desoldering of all contact solder tails. Solder type contacts are not removable from the housing
assembly.
Damaged crimp type contacts must be removed from the connector, discarded, and replaced with new ones.
CAUTION
Damaged product should not be used. If a damaged contact is evident before the contact is inserted into the housing,
cut the wire in back of the contact and re-terminate the wire end. If contact is damaged after insertion, remove the
!
contact with the extraction tool and cut the wire in back of the contact and re-terminate wire end.
4. QUALIFICATIONS
ELCON Drawer Series Connectors and Contacts are Recognized by Underwriters Laboratories Inc. (UL)/CSA
International in File E28476.
5. TOOLING
Hand and pneumatic crimping tools that accommodate the full wire size range are designed for terminating
crimp type contacts. The insertion/extraction tools are designed to insert and remove crimp type and threaded
contacts from connectors. The tool depresses the connector internal retention clips without deforming them.
Tooling part numbers and instructional material packaged with the tooling are shown in Figure 16.
NOTE
Military standard Daniels bench mount crimping machine is applicable for terminating crimp type contacts. This
machine has been designed to form indents to the proper depth in the contact wire barrel. It requires a specially
i
designed funnel which helps gather wire strands and guide them into the closed barrel of the contacts. It is designed
for production requirements. Refer to Figure 16.
For Wire Sizes 12-24 AWG
Hand Crimping Tool
601967-1 with
Turret Head 601967-2
(408-7516)
Insertion/Extraction
Tool (Typ)
(408-10159)
For Wire Sizes 1/0 and 8 AWG
Daniels Heavy Duty Pneumatic Bench Machine
TOOL
CONTACT
SIZE
M22520/23-01 with:
PN
INSERTION
TIP COLOR
EXTRACTION
TIP COLOR
1643914-1
---
Red
8
1643915-1
Yellow
White
12
1643916-1
Blue
White
16
Daniels Locator M22520/23-13
1643917-1
Red
White
20
Wire Size 4 AWG
1643921-1
---
Yellow
0
1643922-1
---
Blue
4
Wire Size 8 AWG
Daniels Indentor Head M22520/23-02
Daniels Locator M22520/23-09
Wire Size 1/0 AWG
Daniels Indentor Head M22520/23-05
Daniels Indentor Head M22520/23-04
Daniels Locator M22520/23-11
Figure 16
16 of 17
Tyco Electronics Corporation
Rev
B
ELCON Drawer Series Connectors
114-13206
6. VISUAL AID
Figure 17 shows a typical application of the ELCON Drawer Series Connectors. This illustration should be used
by production personnel to ensure a correctly applied product. Applications which DO NOT appear correct
should be inspected using the information in the preceding pages of this specification and in the instructional
material shipped with the product or tooling.
FIXED MOUNTING
SCREWS MUST BE
SECURE
SOLDER MUST BE EVENLY FORMED
AROUND ALL CONTACT TAILS
CRIMP MUST BE
CENTERED ON CONTACT
WIRE BARREL
WIRE CONDUCTOR ENDS
MUST BE VISIBLE IN
CONTACT SIGHT HOLE
FLOAT MOUNTING
SCREWS MUST
ALLOW MOVEMENT
OF CONNECTOR
WIRE INSULATION
MUST NOT ENTER
CONTACT WIRE
BARREL
CONNECTOR
MUST BE SEATED
ON PC BOARD
WIRE INSULATION AND
CONDUCTORS MUST
BE UNDAMAGED
CONNECTOR
MUST BE SEATED
ON PANEL
CONTACTS MUST BE
LOCKED IN PLACE
FIGURE 17. VISUAL AID
Rev B
Tyco Electronics Corporation
17 of 17

