Guide 3 - Oshkosh Designs
advertisement
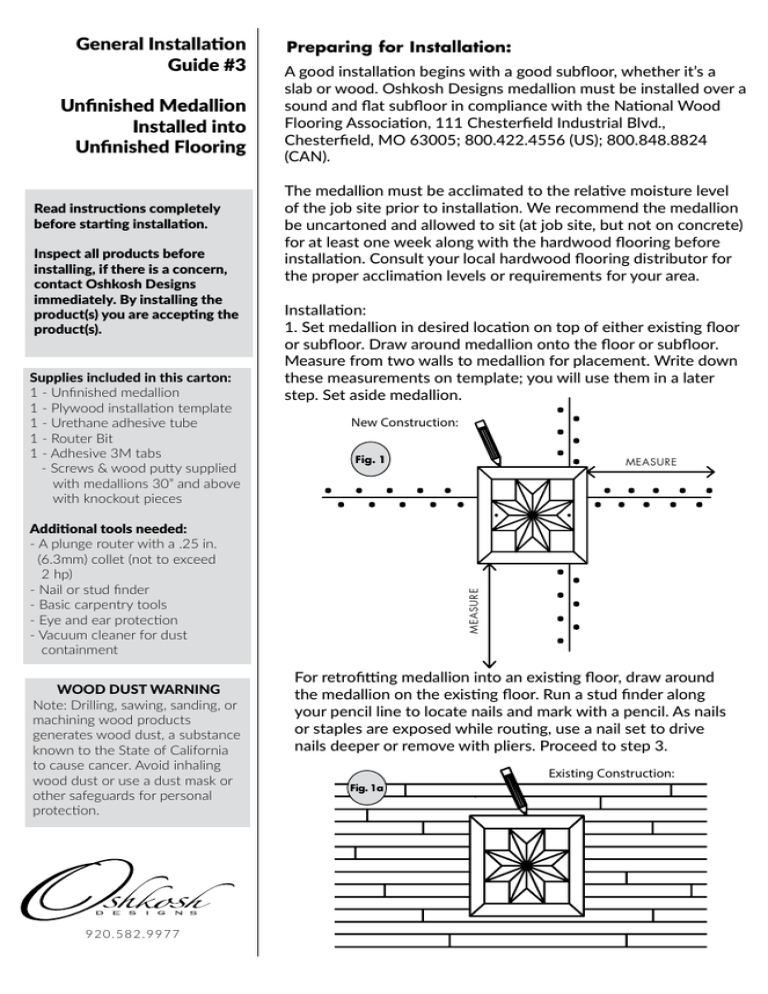
General Installation Guide #3 Unfinished Medallion Installed into Unfinished Flooring Read instructions completely before starting installation. Inspect all products before installing, if there is a concern, contact Oshkosh Designs immediately. By installing the product(s) you are accepting the product(s). Supplies included in this carton: 1 - Unfinished medallion 1 - Plywood installation template 1 - Urethane adhesive tube 1 - Router Bit 1 - Adhesive 3M tabs - Screws & wood putty supplied with medallions 30” and above with knockout pieces Preparing for Installation: A good installation begins with a good subfloor, whether it’s a slab or wood. Oshkosh Designs medallion must be installed over a sound and flat subfloor in compliance with the National Wood Flooring Association, 111 Chesterfield Industrial Blvd., Chesterfield, MO 63005; 800.422.4556 (US); 800.848.8824 (CAN). The medallion must be acclimated to the relative moisture level of the job site prior to installation. We recommend the medallion be uncartoned and allowed to sit (at job site, but not on concrete) for at least one week along with the hardwood flooring before installation. Consult your local hardwood flooring distributor for the proper acclimation levels or requirements for your area. Installation: 1. Set medallion in desired location on top of either existing floor or subfloor. Draw around medallion onto the floor or subfloor. Measure from two walls to medallion for placement. Write down these measurements on template; you will use them in a later step. Set aside medallion. New Construction: Fig. 1 WOOD DUST WARNING Note: Drilling, sawing, sanding, or machining wood products generates wood dust, a substance known to the State of California to cause cancer. Avoid inhaling wood dust or use a dust mask or other safeguards for personal protection. 920.582.9977 MEASURE Additional tools needed: - A plunge router with a .25 in. (6.3mm) collet (not to exceed 2 hp) - Nail or stud finder - Basic carpentry tools - Eye and ear protection - Vacuum cleaner for dust containment MEASURE For retrofitting medallion into an existing floor, draw around the medallion on the existing floor. Run a stud finder along your pencil line to locate nails and mark with a pencil. As nails or staples are exposed while routing, use a nail set to drive nails deeper or remove with pliers. Proceed to step 3. Existing Construction: Fig. 1a 2. For new construction begin installation of hardwood flooring. When you reach the drawn medallion outline, overlap it by 1 to 2 in. (25 to 50 mm). You may use urethane adhesive under the ends of hardwood flooring and up to the drawn medallion outline. Do not put any nails/staples or adhesive inside the drawn medallion outline; nails/staples and adhesive must stay at least 1 in. to the outside of the drawn medallion outline. ADHESIVE Fig. 2 3. Nail installation template to hardwood flooring. Use your measurements or outline from Step 1 to guide you. Try to place nails in a groove or joint of the hardwood flooring. Fig. 3 4. With the router in its full up position, insert the shank of the bit into your router so the cutter is flush with the router base plate (not below) and tighten. Now lower the router until the top of the bearing is even with the faceplate of your router. Lock the router at this depth for your first pass around the template (when in the cutting position, only the bearing and cutter should be exposed below the router faceplate). In this position the entire bearing will ride on the inside of the template and the depth of your first cut will be no more than 1/4 in. (6 mm) into hardwood flooring. ROUTER Fig. 4 3M COMMAND ADHESIVE STRIP PLYWOOD TEMPLATE HARDWOOD FLOOR FELT PAPER BEARING CUTTER SUBFLOOR 5. Plunge the bit into the flooring about 1 in. (25 mm) inside the template. This will prevent possible damage to the template when you insert or start your cutting into the floor. Pull the bit snugly against the template so the bearing makes contact with the inside wall of the template. Make all cuts in a clockwise direction. 2 ~ General Installation Guide #3: Unfinished Medallion Oshkosh Designs 920.582.9977 Move the router slowly, giving it time to cut and to keep heat build-up to a minimum. It is important to keep the faceplate of the router flat on the plywood template at all times to insure a clean cut. Make several shallow passes with the router, cutting no more than 1/4 in. (6 mm) with each pass. Vacuum the sawdust from the cutting groove after each pass. Pry loose flooring from the hole and scrape bottom of hole smooth, if necessary. Remove template and fill nail holes in floor with matching wood filler, if necessary. Do not remove felt paper from medallion cut-out area at this time. Vacuum cut-out area to remove all debris. 6. Dry fit the medallion. Attach two strips of packaging tape several inches longer than the medallion to the backside of the medallion. (This gives you a handle for removing the medallion from the hole.) The medallion should be slightly below (1/16 to 1/8 in.) the surrounding hardwood floor. Remove the medallion from the hole. (The adhesive will replace the thickness of the felt paper.) Remove tape handles from medallion back. Note: Some medallions will require installers to chisel the corners square. You may use a sharp 1/2 in. chisel or a corner chisel (available from Oshkosh Designs separately). If using 1/2 in. chisel, leave template in place and use as corner guide. When using the corner chisel, remove template and to protect prefinished flooring, apply painter’s masking tape to corner areas before striking chisel. Fig. 6 7. Using provided adhesive, bead even lines (1/8 to 1/4 inch in diameter) of adhesive approximately every 1-1/2 to 2 inches onto subfloor into cut-out area. Use only as much adhesive as necessary to cover cut-out area. Fig. 7 8. Remove knock-out pieces from medallion by striking back of medallion with hammer. Set them aside for Step #10. Fig. 8 Oshkosh Designs 920.582.9977 General Installation Guide #3: Unfinished Medallion ~ 3 9. Place medallion into adhesive and press into place. Using supplied screws, anchor medallion so that it is flush and level with the surrounding hardwood flooring. Fig. 9 10. Glue the knock-out pieces into their original places using woodworker’s glue or urethane adhesive. Allow adhesive to dry for 24 hours. NOTE: You may wish to cover medallion with a sheet or plywood and some weights to help press it down so the medallion is level with the floor. Fig.10 11. Use the coordinating wood putty around the edges of the knock-outs and any other areas that may need it. Allow to dry. Sand and finsh with rest of hardwood flooring taking care not to start or stop the belt sander on the medallion. Fig.11 CARE AND CLEANING: Commercial hardwood floor cleaners ( blue liquid with a neutral ph value) such as made by Bona Kemi or Basic Coatings will clean the wood medallion and surrounding hardwood floors. 4 ~ General Installation Guide #3: Unfinished Medallion Oshkosh Designs 920.582.9977 Rev 07/2014
