Outside
16 cm
Introduction
Back View
1
1
2
Front View
Set up & Installation
Step. 1
Power On the KVM Switch
1. Plug in the power adapter into a power outlet and the other end to the power jack on your KVM switch
3
4
3
Installation
2
11 cm
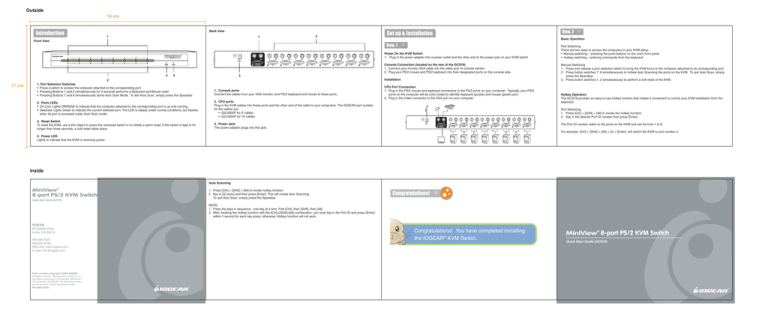
1. Port Selection Switches
• Press a switch to access the computer attached to the corresponding port.
• Pressing Buttons 1 and 2 simultaneously for 3 seconds performs a Keyboard and Mouse reset
• Pressing Buttons 7 and 8 simultaneously starts Auto Scan Mode. To exit Auto Scan, simply press the Spacebar
Console Connection (located on the rear of the GCS78)
1. Connect your monitor VGA cable into the video port of console section.
2. Plug your PS/2 mouse and PS/2 keyboard into their designated ports on the console side.
1. Console ports
Connect the cables from your VGA monitor, and PS/2 keyboard and mouse to these ports.
2. Ports LEDs
• On Line: Lights ORANGE to indicate that the computer attached to the corresponding port is up and running.
• Selected: Lights Green to indicate the current selected port. The LED is steady under normal conditions, but flashes
when its port is accessed under Auto Scan mode.
2. CPU ports
Plug in the KVM cables into these ports and the other end of the cable to your computers. The IOGEAR part number
for the cables are:
• G2L5002P for 6’ cables
• G2L5003P for 10’ cables
3. Reset Switch
To reset the KVM, use a thin object to press this recessed switch in to initiate a warm reset. If the switch is kept in for
longer than three seconds, a cold reset takes place.
3. Power Jack
The power adapter plugs into this jack.
CPU Port Connection
1. Plug in the PS/2 mouse and keyboard connectors to the PS/2 ports on your computer. Typically, your PS/2
ports on the computer will be color-coded to identify keyboard (purple) and mouse (green) port.
2. Plug in the Video connector to the VGA port on your computer.
Step. 2
Basic Operation
Port Switching
There are two ways to access the computers in your KVM setup:
• Manual switching – pressing the push-buttons on the unit’s front panel
• Hotkey switching – entering commands from the keyboard
Manual Switching
1. Press and release a port selection switch to bring the KVM focus to the computer attached to its corresponding port.
2. Press button switches 7, 8 simultaneously to initiate Auto Scanning the ports on the KVM. To quit Auto Scan, simply
press the Spacebar.
3. Press button switches 1, 2 simultaneously to perform a soft reset of the KVM.
Hotkey Operation
The GCS78 provides an easy-to-use hotkey function that makes it convenient to control your KVM installation from the
keyboard.
Port Switching:
1. Press [Ctrl] + [Shift] + [Alt] to invoke the hotkey function.
2. Key in the desired Port ID number then press [Enter].
The Port ID number refers to the ports on the KVM and can be from 1 to 8.
For example, [Ctrl] + [Shift] + [Alt] + [4] + [Enter], will switch the KVM to port number 4.
4. Power LED
Lights to indicate that the KVM is receiving power.
Inside
Auto Scanning
MiniView®
8-port PS/2 KVM Switch
Quick Start Guide (GCS78)
1. Press [Ctrl] + [Shift] + [Alt] to invoke hotkey function
2. Key in [0] (zero) and then press [Enter]. This will invoke Auto Scanning.
To quit Auto Scan, simply press the Spacebar.
Congratulations!
NOTE:
1. Press the keys in sequence - one key at a time. First [Ctrl], then [Shift], then [Alt].
2. After invoking the hotkey function with the [Ctrl]+[Shift]+[Alt] combination, you must key in the Port ID and press [Enter]
within 1 second for each key press; otherwise, Hotkey function will not work.
IOGEAR
23 Hubble Drive
Irvine, CA 92618
866.946.4327
949.453.8785
Web-site: www.iogear.com
E-mail: info@iogear.com
Entire contents copyright © 2005 IOGEAR
All rights reserved. Reproduction in whole or in
part without permission is prohibited. MiniView™
is a trademark of IOGEAR. All other trade marks
are the property of their respective owners.
PKG-M0141/QS
Congratulations! You have completed installing
the IOGEAR® KVM Switch.
MiniView® 8-port PS/2 KVM Switch
Quick Start Guide (GCS78)


