Using the Outlook Calendar
Choices for Calendar Entry Types
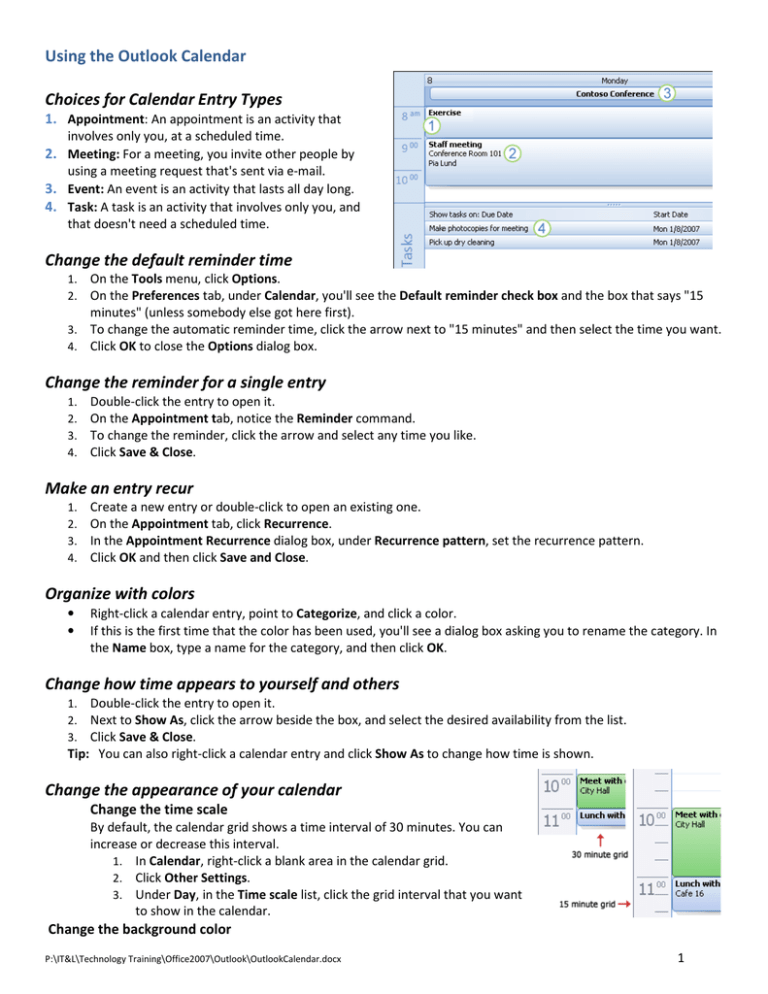
1. Appointment: An appointment is an activity that
involves only you, at a scheduled time.
2. Meeting: For a meeting, you invite other people by
using a meeting request that's sent via e-mail.
3. Event: An event is an activity that lasts all day long.
4. Task: A task is an activity that involves only you, and
that doesn't need a scheduled time.
Change the default reminder time
On the Tools menu, click Options.
On the Preferences tab, under Calendar, you'll see the Default reminder check box and the box that says "15
minutes" (unless somebody else got here first).
3. To change the automatic reminder time, click the arrow next to "15 minutes" and then select the time you want.
4. Click OK to close the Options dialog box.
1.
2.
Change the reminder for a single entry
1.
2.
3.
4.
Double-click the entry to open it.
On the Appointment tab, notice the Reminder command.
To change the reminder, click the arrow and select any time you like.
Click Save & Close.
Make an entry recur
1.
2.
3.
4.
Create a new entry or double-click to open an existing one.
On the Appointment tab, click Recurrence.
In the Appointment Recurrence dialog box, under Recurrence pattern, set the recurrence pattern.
Click OK and then click Save and Close.
Organize with colors
•
•
Right-click a calendar entry, point to Categorize, and click a color.
If this is the first time that the color has been used, you'll see a dialog box asking you to rename the category. In
the Name box, type a name for the category, and then click OK.
Change how time appears to yourself and others
Double-click the entry to open it.
Next to Show As, click the arrow beside the box, and select the desired availability from the list.
Click Save & Close.
Tip: You can also right-click a calendar entry and click Show As to change how time is shown.
1.
2.
3.
Change the appearance of your calendar
Change the time scale
By default, the calendar grid shows a time interval of 30 minutes. You can
increase or decrease this interval.
1. In Calendar, right-click a blank area in the calendar grid.
2. Click Other Settings.
3. Under Day, in the Time scale list, click the grid interval that you want
to show in the calendar.
Change the background color
P:\IT&L\Technology Training\Office2007\Outlook\OutlookCalendar.docx
1
1.
2.
On the Tools menu, click Options, and then click Calendar Options.
Under Calendar options, in the Background color list, click the color that you want.
Notes:
•
•
The color that you choose is applied to the Day and Work Week views. The Week and Month views use system
background colors, which are gray and white, by default.
The color that you choose is applied to weekday hours. A darker shade of the background color is applied to
night and weekend hours.
Change the font
1.
2.
3.
4.
On the Tools menu, click Options, and then click the Other tab.
Click Advanced Options.
Under Appearance Options, click Font.
Select the font and any other options that you want.
Show week numbers
You can show week numbers only in the Month view.
1. On the Tools menu, click Options.
2. Click Calendar Options.
3. Select the Show week numbers in the Date Navigator
check box.
1. Week 38 is displayed.
2. Week 39 is displayed.
Turn bolded dates on or off
1.
2.
3.
In Calendar, on the View menu, point to Current View, and then click Customize Current View.
Click Other Settings.
Under General settings, clear or select the Bolded dates in Date Navigator represent days containing items
check box.
Set work week options
1.
2.
3.
On the Tools menu, click Options.
Click Calendar Options.
Do any of the following:
• To select the days of your work week, select the
check boxes next to the days of the week that you want.
• To set the first day of the week, in the First day of week box, click the day that you want.
• To set the first week of the year, in the First week of year box, click the option that you want.
• To set the first and last hours of your work day, enter times in the Start time box and the End time box.
Change the displayed time range
•
In Calendar, click any of the following: Day
| Week
| Month
Add or remove a second time zone
You can display a second time zone in your calendar by selecting the Show an additional time zone check box in the
Time Zone dialog box. The second time zone is used only to show a second time bar in Calendar view, and does not
affect the way in which calendar items are stored or displayed. Note The
additional time zone is not affected by the current time zone settings; it is
completely separate.
1.
2.
3.
4.
On the Tools menu, click Options.
Click Calendar Options.
Click Time Zone.
Do one of the following:
2
•
Add a second time zone
1.
2.
3.
4.
•
Select the Show an additional time zone check box.
In the Label box, type a name for the second time zone.
In the Time zone box, click the time zone that you want to add.
If you want your computer clock to automatically adjust for daylight saving time changes, select the
Adjust for daylight saving time check box.
This option is available only in time zones that use daylight saving time (DST).
Remove a second time zone
Clear the Show an additional time zone check box.
Tip You can quickly switch your current time zone to the second time zone by clicking Swap Time Zones.
This affects all times displayed in Outlook as well as times displayed in other Microsoft Windows-based
applications.
Schedule a meeting
Schedule an in-person meeting
1. On the File menu, point to New, and then click Meeting Request.
2. In the Subject box, type a description.
3. In the Location box, type a description or click Rooms to choose from rooms available for automatic scheduling by
using Microsoft Exchange.
4. In the Start time and End time lists, select the start and end time for the meeting. If this is an all day event, select
the All day event check box. An all day event is a full 24
hour event lasting from midnight to midnight.
5. Type any information that you want to share with the
recipients, attach any files, or create a Meeting
Workspace.
6. On the Meeting tab, in the Show group, click Scheduling
Assistant. The Scheduling Assistant helps to find the
best time for your meeting.
7. Click Add Others, and then click Add from Address Book.
8. In the Select Attendees and Resources dialog box, in the Search box, enter the name of a person or resource that
you want to invite to the meeting. If you are searching with the More Columns
option, then click Go.
9. Select the name from the results list, and click Required, Optional, or Resources,
and then click OK.
• Required and Optional attendees appear in the To box on the Meeting
tab, and Resources appear in the Location box.
• The free/busy grid shows the availability of attendees.
• A green vertical line represents the start of the meeting. A red vertical
line represents the end of the meeting.
• The Suggested Times pane locates the best time for your meeting, which
is defined as the time when most attendees are available. The best
meeting time appears at the top of the pane. To select any of the
suggested times, click the time suggestion in the Suggested Times pane.
You can also manually pick a time on the free/busy grid.
10. If you want to make the meeting recur, on the Meeting tab, in the Options group,
click Recurrence, select the recurrence pattern, and then click OK.
When you add a recurrence pattern to a meeting request, the Meeting tab
changes to Recurring Meeting.
11. On the Meeting tab, in the Show group, click Appointment.
12. Click Send.
3
Change a meeting
1. Open the meeting that you want to change.
2. Do one of the following:
• Change options for a meeting that is not part of a series
Change the options, such as subject, location, and time, that you want to change.
Click Send Update.
• Change options for all meetings in a series
Click Open the series.
Change any options, such as subject, location, and time, that you want to change.
To change recurrence options, on the Recurring Meeting tab, in the Options group, click Recurrence, change the
options, such as time, recurrence pattern, or range of recurrence, and then click OK.
Click Send Update.
• Change options for one meeting that is part of a series
Click Open this occurrence.
On the Recurring Meeting tab, change the options, such as subject, location, and time that you want.
Click Send Update.
Tip In Calendar, you can drag the meeting to a different date and you can also edit the subject by clicking the
description text, pressing F2, and then typing your changes.
Make a meeting recurring
1. Open the meeting that you want to make recurring.
2. On the Meeting tab, in the Options group, click Recurrence.
3. Click the frequency—Daily, Weekly, Monthly, or Yearly—with which you want the meeting to recur, and then
select options for the frequency, and then click OK.
4. Click Send Update.
Set up or remove a reminder
1. Do one of the following:
• For all new meetings that you will create
1. On the Tools menu, click Options.
2. To have a reminder automatically turned on or off for new meetings, select or clear the Default
reminder check box.
3. If you selected the check box, enter the amount of time before the meeting that you want the reminder
to appear.
• For existing meetings
1. Open the meeting or series if the meeting is recurring.
2. To have a reminder turned on or off, on the Meeting tab, in the Options group, select None or a listed
reminder time.
© 2008 Microsoft Corporation. All rights reserved.
4

