Directions for Application
advertisement

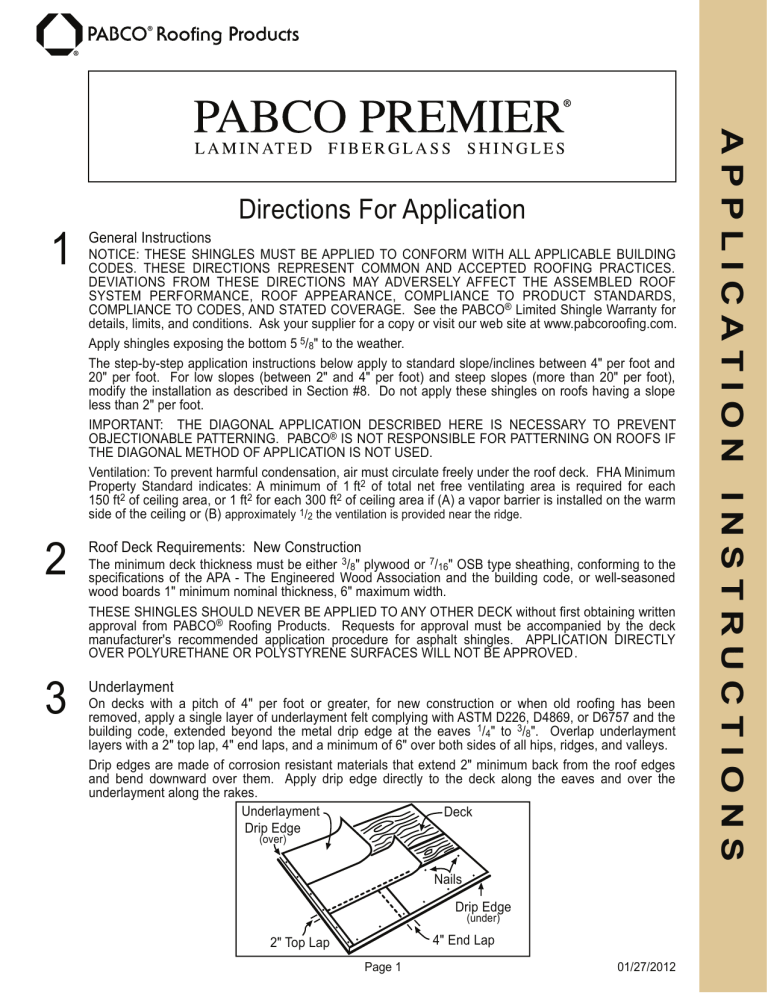
2 3 NOTICE: THESE SHINGLES MUST BE APPLIED TO CONFORM WITH ALL APPLICABLE BUILDING CODES. THESE DIRECTIONS REPRESENT COMMON AND ACCEPTED ROOFING PRACTICES. DEVIATIONS FROM THESE DIRECTIONS MAY ADVERSELY AFFECT THE ASSEMBLED ROOF SYSTEM PERFORMANCE, ROOF APPEARANCE, COMPLIANCE TO PRODUCT STANDARDS, COMPLIANCE TO CODES, AND STATED COVERAGE. See the PABCO® Limited Shingle Warranty for details, limits, and conditions. Ask your supplier for a copy or visit our web site at www.pabcoroofing.com. Apply shingles exposing the bottom 5 5/8" to the weather. The step-by-step application instructions below apply to standard slope/inclines between 4" per foot and 20" per foot. For low slopes (between 2" and 4" per foot) and steep slopes (more than 20" per foot), modify the installation as described in Section #8. Do not apply these shingles on roofs having a slope less than 2" per foot. IMPORTANT: THE DIAGONAL APPLICATION DESCRIBED HERE IS NECESSARY TO PREVENT OBJECTIONABLE PATTERNING. PABCO® IS NOT RESPONSIBLE FOR PATTERNING ON ROOFS IF THE DIAGONAL METHOD OF APPLICATION IS NOT USED. Ventilation: To prevent harmful condensation, air must circulate freely under the roof deck. FHA Minimum Property Standard indicates: A minimum of 1 ft2 of total net free ventilating area is required for each 150 ft2 of ceiling area, or 1 ft2 for each 300 ft2 of ceiling area if (A) a vapor barrier is installed on the warm side of the ceiling or (B) approximately 1/2 the ventilation is provided near the ridge. Roof Deck Requirements: New Construction The minimum deck thickness must be either 3/8" plywood or 7/16" OSB type sheathing, conforming to the specifications of the APA - The Engineered Wood Association and the building code, or well-seasoned wood boards 1" minimum nominal thickness, 6" maximum width. THESE SHINGLES SHOULD NEVER BE APPLIED TO ANY OTHER DECK without first obtaining written approval from PABCO® Roofing Products. Requests for approval must be accompanied by the deck manufacturer's recommended application procedure for asphalt shingles. APPLICATION DIRECTLY OVER POLYURETHANE OR POLYSTYRENE SURFACES WILL NOT BE APPROVED. Underlayment On decks with a pitch of 4" per foot or greater, for new construction or when old roofing has been removed, apply a single layer of underlayment felt complying with ASTM D226, D4869, or D6757 and the building code, extended beyond the metal drip edge at the eaves 1/4" to 3/8". Overlap underlayment layers with a 2" top lap, 4" end laps, and a minimum of 6" over both sides of all hips, ridges, and valleys. Drip edges are made of corrosion resistant materials that extend 2" minimum back from the roof edges and bend downward over them. Apply drip edge directly to the deck along the eaves and over the underlayment along the rakes. Underlayment Deck Drip Edge (over) Nails Drip Edge (under) 4" End Lap 2" Top Lap Page 1 01/27/2012 APPLICATION INSTRUCTIONS 1 General Instructions Directions For Application Eave Flashing If winter temperatures average 30 oF or less, and ice may form along eaves to cause a back-up of water, install an eave flashing for ice dam protection. Install a self adhering, peel and stick type underlayment sheet complying with ASTM D1970 parallel to the eaves, applied per the manufacturer’s instructions. This sheet overhangs the drip edge 1/4" to 3/8". This sheet extends up the roof to at least 24" inside the interior wall line. Horizontal laps (when needed), are located outside the wall line. Drip Edge Underlayment Deck (over) Self Adhering Underlayment Drip Edge Eaves flashing applied to a point at least 24" inside the interior wall line. (under) Eave flashing overhangs metal drip edge 1/4" to 3/8". Top lap is located outside of the exterior wall line and fully adhered. Wall Line 5 Nailing Instructions PABCO® recommends the use of nails. Use four nails per shingle for normal application, positioned in the nail zone as shown below. Nails shall be at least 1” long for Premier or Premier Professional, or 1 1/4“ long for Premier Elite or Premier Advantage®. They shall be aluminum or galvanized, 3/8" head, 11 or 12 gauge roofing nails. Drive nails flush with shingle surface. NAILS MUST NOT BE OVER DRIVEN. See our PABCO Premier® Application Details - Nailing Instructions for additional details. Location for 4 Nails 1" 13" 12" 13" 1" Nail Zone Improperly Driven Properly Driven 3/ 8" Under Driven Over Driven Crooked Asphalt Shingles Decking Nail straight and flush with the shingle surface. Page 2 01/27/2012 APPLICATION INSTRUCTIONS 4 Directions For Application Valley application must comply with the building code. Where allowed, PABCO ® recommends using open metal valleys (closed cut and woven valleys are also accepted). This valley starts with a 36" underlayment centered down the valley. PABCO® recommends self adhering underlayment (ASTM D1970) for this bottom layer. The underlayment felt covering the decks is trimmed to overlap this at least 6”. Apply a second layer of underlayment felt over this, centered down the valley. The metal valley flashing must be at least 26 gauge galvanized metal or an equally corrosion resistant metal, at least 24" wide. It is formed with a "W" shape and center rib. Apply the metal valley without puncturing it. Center the metal in the valley over the second layer of underlayment, extending beyond the eaves drip edge 1/4" to 3/8". If more than one piece of flashing metal is needed, the lower piece is nailed at the top. The upper piece laps over the lower piece nails by at least 8" and the lap is cemented together with asphalt roof cement complying with ASTM D4586. Snap 2 chalk lines down the valley, starting 2" on either side of the valley center line at the top of the valley and diverging 1/8" from each other per foot down the valley. Apply the shingles into the valley in the normal sequence of application for the rest of the roof. Trim the shingles to the chalk line, but never use a piece less than 12" wide. If necessary, trim the preceding shingle on the course. Apply the shingles into the valley so that no nails pass through the valley metal. Clip the upper shingle corner (in the valley) 1" at 45 o. Embed each shingle in a 3" wide strip of asphalt roof cement. See our PABCO Premier® Application Details - Valley Application for additional details. Valley Center Line Metal Valley Flashing Chalk Lines Cement flashing lap. Asphalt Roof Cement 1" clipped off corner at 45o. End shingles are trimmed to chalk line. Page 3 01/27/2012 APPLICATION INSTRUCTIONS 6 Valleys Directions For Application Application, 5 5/8" Diagonal Offset Pattern STARTER COURSE: Use PABCO® Universal Starter with the adhesive at the eaves (or a self sealing three tab shingle with the tabs cut off). Cut 6" off the length of the first starter course shingle and apply at the lower left hand corner of the roof. The starter course overhangs the rake edge and drip edge 1/4” to 3/8". Continue the starter course with full length shingles. FIRST COURSE: Start with a full shingle applied flush with the starter course at the lower left hand corner of the roof. SECOND COURSE: Cut 5 5/8" from the left end of a shingle and apply the 34 3/8" long piece over the headlap of the first course shingle, exposing the first course 5 5/8". THIRD COURSE: Cut 11 1/4" from the left end of the shingle and apply the 28 3/4" long piece over the headlap of the second course shingle, exposing the second course 5 5/8". SUCCEEDING COURSES: Courses four through seven are begun with a partial shingle, each 5 5/8" shorter, establishing the overall diagonal pattern. See illustration below. Pieces cut from shingles along the left rake can be used to finish off courses at the right rake. Now apply a full shingle to courses one through seven. Repeat the diagonal pattern from the first courses starting course eight as a full shingle and proceeding with the first shingle for each course cut 5 5/8" shorter each time. Drip Edge Underlayment 2" Top Lap Eaves Flashing (if required) 4" End Lap Nails Page 4 5 5/8" Offset Start 3rd course with 11 1/4" removed. Starter Course Shingles overhang drip edge 1/4" to 3/8". Start 2nd course with 5 5/8" removed. Start 1st course with a full shingle. 5 5/8" Exposure Page 4 01/27/2012 APPLICATION INSTRUCTIONS 7 Directions For Application Special Applications For areas where local knowledge indicates exposure to high winds may occur, shingles must be applied with 6 nails (spaced as shown below) and sealed to qualify for wind damage warranty coverage. Steep Slope Application: On slopes greater than 20" per foot (Mansard type roofs), 6 nails are required, spaced as shown below. These shingles must be hand sealed at the time of application with asphalt roof cement, applying 4 quarter sized spots equally spaced along the nail zone, above the exposed area of the shingle. Location for 6 Nails 10" 1" 6" 6" 6" 10" 1" Nail Zone Low Slope Application: On slopes between 2" and 4" per foot, where allowed by code, apply one layer of a self adhering ASTM D1970 sheet per the manufacturer's instructions. As an alternative, provide a double layer of underlayment felt (ASTM D226, D4869, or D6757) by applying a 19" wide underlayment strip across the eaves. Over this, apply a full 36" wide sheet. Continue 36" wide sheets, lapping each 19" over the preceding course. Alternate Low Slope Application 36" Drip Edge 17 " E xpo s e Deck 19" d (over) 12" End Lap 19” First Underlayment Strip First full course and succeeding courses are 36" wide with 19" lap. Page 5 01/27/2012 APPLICATION INSTRUCTIONS 8 Directions For Application Base Flashing The base flashing for the front of the chimney is installed as illustrated over the headlap of the last course of shingles below the chimney, and extending up the chimney. Set the roof and chimney overlaps in asphalt roof cement. Where shingle ends are against a vertical surface (sidewall or chimney), the shingles must be flashed with metal step flashing shingles applied over the end of each shingle. The flashing shingles are at least 8" by 7 5/8", bent to extend 4" out over the shingles on the roof deck and 4" up the vertical surface. Each flashing shingle is placed so that its leading (bottom) edge is just back from the exposed edge of the shingle which will overlap it. It is secured to the deck with one nail near the top corner. See ARMA Residential Asphalt Roofing Manual for additional details. Cap Flashing Cap Flashing 10 Cap (Counter) Flashing The base flashing of chimneys, skylights, vents, and adjoining walls must be covered by a metal cap flashing. The cap flashing extends at least 1" into the masonry mortar joints and is caulked with asphalt roof cement to insure a water-tight connection. The base flashing is cut to cover the cricket and extend 6" up the brickwork on the chimney. Cap Flashing Cap Flashing Page 6 01/27/2012 APPLICATION INSTRUCTIONS 9 Directions For Application Trim shingles even with the ridge and cover with PABCO ® Shadow Cap shingles exposed 5 5/8" to the weather. Nail 6 5 /8" back from the exposed edge and 1" up from the bottom edge with galvanized roofing nails long enough to penetrate into the deck at least 3/4". Applying PABCO® Shadow Cap double thick is recommended to accent the hip & ridge lines. IMPORTANT: In cold weather (40 oF or below) store shingles for hip & ridge in a heated location 24 hours prior to application to assist in bending the shingles without damaging or cracking them. At intersection of hip and ridge, trim shingles to fit and set in asphalt 5 " 6 /8 roof cement. 5 / 8" 5 12 Nail 6 5/8" back and 1" up from exposure. Reroofing If local building codes permit, removing old three-tab shingles is not required if 1) the existing framing will support workers, new roofing and the usual snow loads, and 2) the deck is sound and will provide good anchorage for nails. Make the surface as smooth as possible by replacing missing shingles and splitting and nailing all buckles, raised tabs, and curled shingles. Applying a drip edge along the rakes to cover edges of old roofing is recommended. Proceed with the application as new shingles, except using nails long enough to penetrate through all roofing material and 3/4” into the deck. If the old roofing shingles are laminated, interlocking, or Dutch Lap, their size or shape may result in an uneven surface appearance. If a smooth base surface is desired, remove the old shingles, prepare the deck and apply shingles as for new construction. Application of PABCO® laminated shingles over 5" exposure three-tab strip shingles. 13 1/4" X 40" Existing 5" exposure strip shingle roof 2 1 1. Starter strip 2. First and succeeding courses, full size shingles The PABCO® Limited Shingle Warranty PABCO® warrants that our shingles are free from manufacturing defects that adversely affect their performance. PABCO® is not responsible for failures of any roof system that are not directly attributable to a PABCO® product. See the PABCO® Limited Shingle Warranty for details, limits, and conditions. www.pabcoroofing.com Phone (253) 272-0374 1718 Thorne Road Tacoma, Washington 98421-3207 Page 7 01/27/2012 APPLICATION INSTRUCTIONS 11 Hips and Ridges Directions For Application


