REDUCING YOUR MICROSOFT OUTLOOK MAILBOX SIZE There are
advertisement

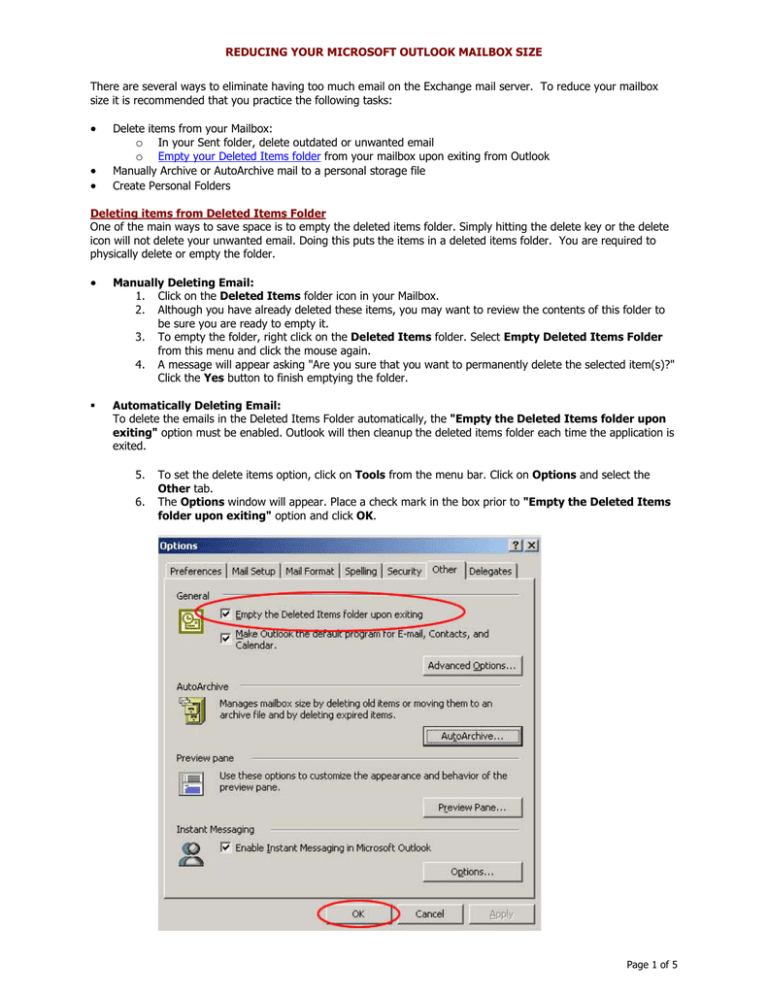
REDUCING YOUR MICROSOFT OUTLOOK MAILBOX SIZE There are several ways to eliminate having too much email on the Exchange mail server. To reduce your mailbox size it is recommended that you practice the following tasks: • • • Delete items from your Mailbox: o In your Sent folder, delete outdated or unwanted email o Empty your Deleted Items folder from your mailbox upon exiting from Outlook Manually Archive or AutoArchive mail to a personal storage file Create Personal Folders Deleting items from Deleted Items Folder One of the main ways to save space is to empty the deleted items folder. Simply hitting the delete key or the delete icon will not delete your unwanted email. Doing this puts the items in a deleted items folder. You are required to physically delete or empty the folder. • Manually Deleting Email: 1. Click on the Deleted Items folder icon in your Mailbox. 2. Although you have already deleted these items, you may want to review the contents of this folder to be sure you are ready to empty it. 3. To empty the folder, right click on the Deleted Items folder. Select Empty Deleted Items Folder from this menu and click the mouse again. 4. A message will appear asking "Are you sure that you want to permanently delete the selected item(s)?" Click the Yes button to finish emptying the folder. Automatically Deleting Email: To delete the emails in the Deleted Items Folder automatically, the "Empty the Deleted Items folder upon exiting" option must be enabled. Outlook will then cleanup the deleted items folder each time the application is exited. 5. 6. To set the delete items option, click on Tools from the menu bar. Click on Options and select the Other tab. The Options window will appear. Place a check mark in the box prior to "Empty the Deleted Items folder upon exiting" option and click OK. Page 1 of 5 REDUCING YOUR MICROSOFT OUTLOOK MAILBOX SIZE Archiving Your Email in Outlook In Outlook, archiving is a way to back up or delete old items, such as e-mail messages, appointments, contacts, tasks, journal entries, notes, posted items, and documents. Archiving email is a way to preserve old items in an area separate from your mailbox by transferring them from the server to your “archive” folder stored locally on your computer’s hard drive. AutoArchive backs up items for you automatically by using either the default settings or settings that you specify. However, sometimes you might not want to worry about all of those settings and just archive an individual folder manually. The three key benefits of archiving When you archive, you get three key benefits: you keep a historical record, you save disk space, and you cut down on visual clutter. Effective record keeping When you archive messages instead of deleting them, you'll have records of your work that can help you remember the details of events, projects, and processes. If you're the kind of person who never throws anything away, archiving is your dream. Save disk space Because archiving makes use of compression, archived items use less storage space. Cut down on visual clutter Archiving removes items from your mailbox and puts them in the archive file. Now that you can more easily see the messages you need, you can work with them more effectively. AutoArchive versus Archiving on Your Own There are two ways to archive: You can let Outlook automatically archive messages at regular intervals, or you can archive at times that you specify. AutoArchive allows you to set up a schedule and archive multiple folders at the same time at set intervals. You'll know you have this feature turned on if periodically you get a friendly dialog box like the one in Figure 1. By default, Outlook turns on the AutoArchive feature. Figure 1 You'll see this dialog box if AutoArchive is enabled. The catch with AutoArchive is that it doesn't simply archive stuff, it can also delete it. If you want to keep everything, you should adjust your AutoArchive settings accordingly, as shown in Figure 2. To change the AutoArchive settings, click Options on the Tools menu, click the Other tab, and click AutoArchive. Figure 2 You can change the AutoArchive settings on the AutoArchive dialog box. You can also use this dialog box to turn AutoArchive off if you prefer to archive things on your own. Page 2 of 5 REDUCING YOUR MICROSOFT OUTLOOK MAILBOX SIZE • Manually Archiving Your Email in Outlook You can manually archive your email in Outlook. Manually archiving your email allows you to select when you want to archive a particular folder (or mailbox). 1. In Outlook, click the File menu. (Select the double arrows at the bottom to expand the menu, if necessary.) 2. Select Archive.... 3. Click once on the individual folder that you want to archive. If you wish to archive everything including your Contacts and Calendar, select the Mailbox icon that has your name next to it. 4. In the "Archive Items Older Than" drop-down list, select a date for when you want the archive to begin. If this is your first time manually archiving your Exchange mailbox, do the following. Otherwise, go to the next numbered step. a. Click the Browse button. The default folder where your archive files are saved on the computer will display. b. You may rename the "archive.pst" file in this folder or any folder of your choosing. Click OK. 5. Click OK to complete archiving task. You can read your archived messages by clicking the plus sign next to Archive Folders in the Folder List. Page 3 of 5 REDUCING YOUR MICROSOFT OUTLOOK MAILBOX SIZE AutoArchiving Your Email in Outlook 2003 You can tell if Outlook is set up to use AutoArchive by opening the AutoArchive dialog box. To see this dialog box, you would click Options on the Tools menu, click the Other tab, and click AutoArchive. By default, AutoArchive is set to run every 14 days. To change the frequency, you would change the number in the days box. Tip You can also run AutoArchive at any time, if your Inbox is getting too full, by clicking AutoArchive in the Mailbox Cleanup dialog box (which you can get to from the Tools menu). Of course, you'll also know that AutoArchive is running if you see the friendly dialog box we showed you at the beginning of this lesson. If you'd rather not see that dialog box each time AutoArchive runs, you would clear the Prompt before AutoArchive runs check box (shown in the illustration). If the Run AutoArchive every check box is selected, AutoArchive will run. The number in the days box specifies how frequently messages will be archived. You can read your archived messages by clicking the plus sign next to Archive Folders in the Folder List. The list of your archived folders will appear. Clicking on an archived folder displays its contents in the same form that you are used to seeing in the Mailbox. When you open an archived message, it will look the same as before it was archived. Click this plus sign to read archived messages. Archived messages are visible in Archive Folders. Click a subfolder to read the messages. Page 4 of 5 REDUCING YOUR MICROSOFT OUTLOOK MAILBOX SIZE Creating Personal Folders in Outlook Filing e-mail in a personal folder gives you maximum control over how and where your stuff is stored. With personal folders, you set up the folders and move messages manually, exactly the way you want them. With personal folders, you design the filing system. You can combine folders that are separate in Mailbox, or you can split Mailbox folders, depending on your long-term needs for these filed messages. For example, you could group messages by project or divide them by sender. This freedom is unlike archive folders, which simply mimic Mailbox. By default, you should already have an item called “Personal Folders” on your folder list in Outlook. This resides locally on your computer, so you can move email from your Inbox to the Personal Folder to free up space. To Create New Personal Folders in Outlook You would start creating your personal folders by clicking New on the File menu. After that, follow the procedure shown in this illustration to the left. Once you create Personal Folders, it's a good idea to create some folders inside it—you're doing this because you want to get organized, right? For example, a folder named Temporary can be a useful place to put messages you need to keep but don't expect to keep for long. After you've got your filing system worked out, you can start moving messages by: Right-clicking them and then clicking Move (this is the only way to move a message while it's open for viewing). Dragging your message to the folder. Creating rules to move them automatically. On the File menu, click New. Select Outlook Data File. Select Microsoft Outlook Personal Folders File (.pst). Personal Folders appears in the Folder List. Page 5 of 5

