TechnicalInformation
QIAxcel quick-start guide
This Technical Information summarizes how to set up the QIAxcel system. Before using the QIAxcel system, it is essential that
you read the QIAxcel User Manual carefully and pay particular attention to the safety information.
Unpacking the QIAxcel instrument
1. Identify a suitable place for the QIAxcel on the laboratory bench
Table 1. QIAxcel specifications and operating
conditions
(see Table 1).
2. Ensure that the workbench is dry, clean, and vibration-proof, and
has additional space for accessories.
QIAxcel specifications
Dimensions
(door closed)
3. Unpack and place the QIAxcel onto the bench.
Depth: 559 mm (22 in.)
Dimensions
(doors open)
Installing the QIAxcel
Width: 362 mm (14.25 in.)
Height: 529 mm (20.83 in.)
Depth: 559 mm (22 in.)
Before operating the QIAxcel:
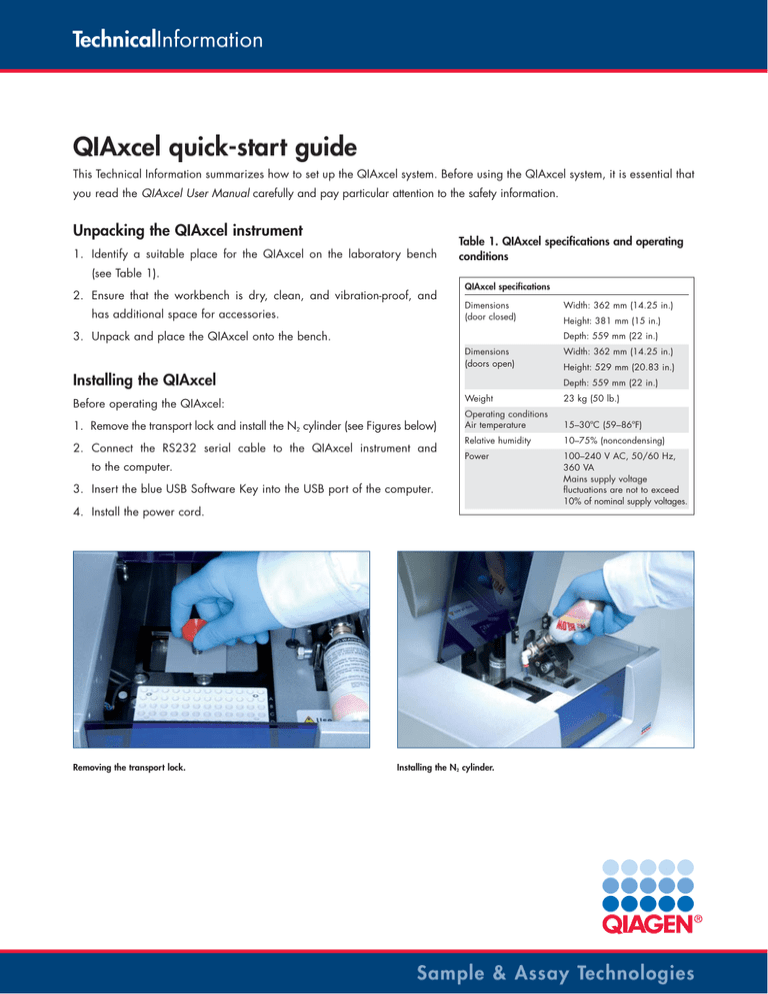
1. Remove the transport lock and install the N2 cylinder (see Figures below)
2. Connect the RS232 serial cable to the QIAxcel instrument and
to the computer.
Weight
23 kg (50 lb.)
Operating conditions
Air temperature
15–30ºC (59–86ºF)
Relative humidity
10–75% (noncondensing)
Power
100–240 V AC, 50/60 Hz,
360 VA
Mains supply voltage
fluctuations are not to exceed
10% of nominal supply voltages.
3. Insert the blue USB Software Key into the USB port of the computer.
4. Install the power cord.
Removing the transport lock.
Width: 362 mm (14.25 in.)
Height: 381 mm (15 in.)
Installing the N2 cylinder.
Sample & Assay Technologies
Unpacking the QIAxcel Gel Cartridge
1. Add 10 ml QX Wash Buffer to both reservoirs of the QX Cartridge Stand and cover with 2 ml
mineral oil.
2. Remove the QIAxcel Gel Cartridge from its packaging and carefully wipe off any soft gel
debris from the capillary tips using a soft tissue.
3. Remove the purge cap tape from the back of the QIAxcel Gel Cartridge. After removing the
purge cap tape, clean any gel oozing out of the purge port with soft tissue and then place the
QIAxcel Gel Cartridge in the QX Cartridge Stand.
Note: A soft tissue should be used to wipe off any gel that may have leaked from the port.
Note: Ensure that the capillary tips are submerged in QX Wash Buffer.
4. New cartridges should be allowed to stabilize in the QX Cartridge Stand for 20 minutes prior
to use.
Preparing the QIAxcel Gel Cartridge.
www.qiagen.com
Preparing the buffer tray
1. Wash the buffer tray with warm water and rinse thoroughly with
deionized or reverse osmosis water.
2. Fill the WP and WI positions of the buffer tray with 8 ml QX Wash
Buffer.
3. Fill the BUF position of the buffer tray with 18 ml QX Separation
Buffer or RNA Separation Buffer.
4. Add mineral oil to cover all 3 positions to prevent evaporation.
Add 2 ml mineral oil to positions WP and WI, and add 4 ml mineral
Preparing the buffer tray.
oil to position BUF.
5. Load 15 µl QX Alignment Marker into each well of a QX 0.2 ml
12-Tube Strip. Add 1 drop of mineral oil to each well and insert the
strip into the MARKER1 position of the buffer tray.
6. Load 15 µl QX Intensity Calibration Marker into each well of a QX
Colored 0.2 ml 12-Tube Strip. Add a drop of mineral oil, and insert
the strip into the MARKER2 position of the buffer tray.
Note: Be sure to spin down the 12-Tube Strip to get rid of any excess
air bubbles.
Loading the buffer tray
1. Close the cartridge door and the sample door.
2. Switch on the computer and launch the BioCalculator software.
3. Click “Change Buffer” in the “Instrument Control” window.
4. Open the sample door and carefully place the buffer tray into the
buffer tray holder.
Note: Make sure to place the buffer tray in the correct orientation.
See the picture opposite.
5. Close the sample door and click “Park” in the “Instrument Control”
window.
Sample & Assay Technologies
Loading the buffer tray.
Installing the QIAxcel Gel Cartridge and smart key
1. Remove the QIAxcel Gel Cartridge from the QX Cartridge Stand and
insert it into the QIAxcel instrument.
Note: Make sure that the label is facing toward you when inserting
the cartridge into the QIAxcel instrument.
2. Insert the smart key into the smart key socket and close the cartridge
door.
Performing cartridge calibration
Cartridges should only require calibration prior to their first use.
See the QIAxcel User Manual for more details.
1. Launch the calibration wizard by selecting “File” and then “Intensity
Calibration” in the “Instrument Control” window.
2. Click “Start” to begin the cartridge intensity calibration.
3. Once the calibration is complete, the “Calibration Verification”
dialog box will open. This will show either a “Pass” or “Fail” for
Installing the QIAxcel Gel Cartridge and smart key.
each channel.
4. If one or more channels fail, the calibration process should be
repeated.
Running samples
Refer to the QIAxcel User Manual for detailed instructions.
The QIAxcel instrument is intended to be used only in combination with QIAxcel Kits for applications described in the respective
QIAxcel Kit handbooks. QIAxcel Kits are intended for research only. Not for use in diagnostic procedures.
Trademarks: QIAGEN® (QIAGEN Group).
1050843 01/2008
© 2008 QIAGEN, all rights reserved.
www.qiagen.com
Finland
France
Australia
I
Austria
0800/281010
I
Belgium
1-800-243-800
I
0800-79612
Canada
I
800-572-9613
China
021-51345678
I
Denmark
I
80-885945
I
0800-914416
01-60-920-930
I
Germany
I
Hong Kong
Ireland
Italy
I
Japan
I
02103-29-12000
I
800 933 965
1800 555 049
800 787980
I
03-5547-0811
Korea (South)
I
1544 7145
Luxembourg
I
8002 2076
The Netherlands
Norway
I
I
0800 0229592
800-18859
Singapore
I
Sweden
020-790282
I
Switzerland
UK
I
USA
65-67775366
I
055-254-22-11
01293-422-911
I
800- 426- 8157
Sample & Assay Technologies


