Online Bidding – Quick Start Guide
advertisement
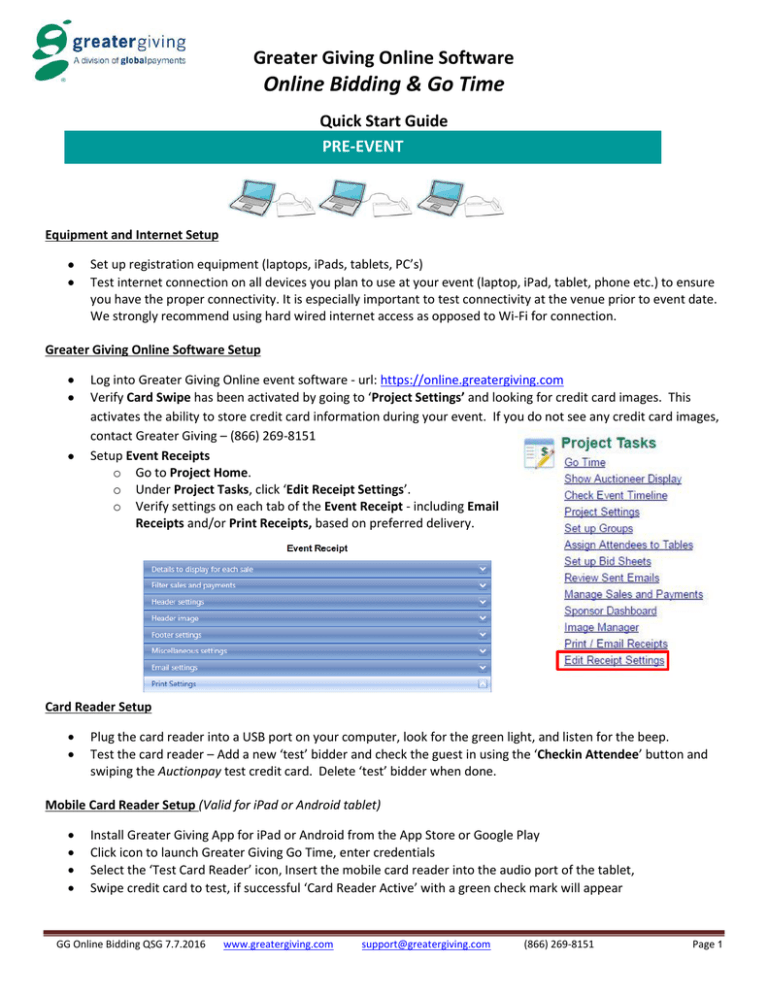
Greater Giving Online Software Online Bidding & Go Time Quick Start Guide PRE-EVENT Equipment and Internet Setup Set up registration equipment (laptops, iPads, tablets, PC’s) Test internet connection on all devices you plan to use at your event (laptop, iPad, tablet, phone etc.) to ensure you have the proper connectivity. It is especially important to test connectivity at the venue prior to event date. We strongly recommend using hard wired internet access as opposed to Wi-Fi for connection. Greater Giving Online Software Setup Log into Greater Giving Online event software - url: https://online.greatergiving.com Verify Card Swipe has been activated by going to ‘Project Settings’ and looking for credit card images. This activates the ability to store credit card information during your event. If you do not see any credit card images, contact Greater Giving – (866) 269-8151 Setup Event Receipts o Go to Project Home. o Under Project Tasks, click ‘Edit Receipt Settings’. o Verify settings on each tab of the Event Receipt - including Email Receipts and/or Print Receipts, based on preferred delivery. Card Reader Setup Plug the card reader into a USB port on your computer, look for the green light, and listen for the beep. Test the card reader – Add a new ‘test’ bidder and check the guest in using the ‘Checkin Attendee’ button and swiping the Auctionpay test credit card. Delete ‘test’ bidder when done. Mobile Card Reader Setup (Valid for iPad or Android tablet) Install Greater Giving App for iPad or Android from the App Store or Google Play Click icon to launch Greater Giving Go Time, enter credentials Select the ‘Test Card Reader’ icon, Insert the mobile card reader into the audio port of the tablet, Swipe credit card to test, if successful ‘Card Reader Active’ with a green check mark will appear GG Online Bidding QSG 7.7.2016 www.greatergiving.com support@greatergiving.com (866) 269-8151 Page 1 Online Bidding SETTINGS Verify Online Bidding Settings Go to Project Home Under the Online Bidding area, select ‘Online Bidding Settings’ Preview each option to ensure your bidding, display and communication settings are set up to your specifications GG Online Bidding QSG 7.7.2016 www.greatergiving.com support@greatergiving.com (866) 269-8151 Page 2 If you are planning on offering your bidders the ability to donate via your Online Bidding site, you will need to add that feature. From the Project Home screen, select ‘Online Bidding Settings’ Select ‘Edit’ and check the box to ‘Use online bidding to collect donations’ Select the Donation package to use or select the pencil icon to create a new Donation package Indicate the donation increments, separated by a comma. We recommend entering the highest amounts first. Add a donation label Add an image to appear on the donation button If you are planning to use the Greater Giving Appeal Display, you will need to set your options accordingly. Select to have your bidders name appear once they donate Upload an image to appear on the bottom left of the appeal display and the donation button Important: Events should only be marked as an “Appeal-only event” if you are only going to use the Online Bidding site to conduct an appeal (and not do any bidding). GG Online Bidding QSG 7.7.2016 www.greatergiving.com support@greatergiving.com (866) 269-8151 Page 3 Go Time SETTINGS Go Time Volunteer Access Volunteers working check-in, entering sales, and checkout will need to have Greater Giving Online Software credentials. We recommend one login be shared amongst all Volunteers. Follow these steps to set up Volunteer Access: From Project Home, go to ‘Project’, ‘Organization Home’. In the User area at the bottom of the page, click ‘View/Edit Users & Permissions’. Click ‘Add’. In the appropriate fields, enter Username, Full Name, and Email for the new user. An email will sent to the provided email address to create a new password. The password must be at least six characters and contain at least two non-alpha characters such as numbers. In the Default Permissions area, assign desired permissions. If processing charges in a batch make sure ‘Charge Credit Cards’ is not selected. For the Online Bidding Admin lead(s) ensure the ‘Manage Online Bidding’ permission is checked. This will give them access to the Online Bidding Admin Panel. Verify Go Time Settings Go to Project Home Under ‘Project Tasks’ on the home page, click ‘Go Time’ Preview each step to ensure Go Time is set up to your specifications Reconfigure Go Time Settings Click ‘Project Settings’ on the home page Click ‘Edit Go Time Settings’ Make necessary changes Make sure to select Show Select Guests Step, as that is the crucial step in Checkin to allow bidders access to the Online Bidding site Add special instructions/notes for Volunteers in the Message field. This information will appear on the Go Time Dashboard Click ‘Save’ GG Online Bidding QSG 7.7.2016 | www.greatergiving.com | support@greatergiving.com | (866) 269-8151 | Page 4 GUEST REGISTRATION Go Time handles Registration, Auction Sales, Payments, and Guest Checkout. When you check your guests in using Go Time, they are automatically sent a text to allow them to start bidding. All that is required is an allocated admission, a bidder number assigned, and the guest’s cell phone number in the guest info record. Print recommended reports from the Admin computer to be used for reference during Registration: ● BID-01: BID-01: Guest listing and check in or BID-02: Guest listing (2 column) ● UTL-05: Blank Bidder Registration Forms (Walk-ins, Replacements, Ticket Sales) ● TBL-01: Table Listing ● GRP-01: Group Listing To access Go Time click the link under ‘Project Tasks’ on the home page of Greater Giving Online Software. Note: Go Time will open in another window or tab of your internet browser. Select ‘Check in Attendee’ Checkin Step 1: Get Name The Go Time wizard is configured to match the flow of a typical guest registration. Type the guest’s name in the ‘Attendee’ field ○ ○ Type a portion of the first or last name to see a list of potential matches – e.g. - type “sky” to locate “Tchaikovsky” Once correct name appears, highlight the name and click ‘Next’ If a guest name cannot be found in the software, you will need to create a new guest record ○ Type the guest’s name, ‘Enter’ ○ Click ‘Create New Supporter’ ○ Type in contact information - Only name and bidder number are required to continue. For an Online Bidding event you will also want to capture cell phone and email address. All contact info can be captured on the UTL-05: Blank Bidder Registration Form. ○ Click ‘Assign Next Available’ to auto assign a bidder number or simply enter the bidder number to assign a specific one, click ‘Update’ to save ○ Click ‘Next’ to continue to Checkin Step 2 – Select Guests GG Online Bidding QSG 7.7.2016 | www.greatergiving.com | support@greatergiving.com | (866) 269-8151 | Page 5 Checkin Step 2 – Select Guests: ● ● ● This screen displays the guest name, mobile #, email, table, group, and meal (each of which can be managed under ‘Project Settings’, ‘Edit Go Time Settings’). Verify bidder number and mobile number Check the box next to each guest to check them in ● ● Click on ‘Details’ to view or edit the Attendee Details, make necessary changes, click ‘Update’ to save Click ‘Next’ to continue to Checkin Step 3 – Add Credit Card If the guest does not have an admission allocated then you will need to sell them a New Admission or use an Existing Admission – see below: A) New Admissions If the attendee needs to purchase a new admission ● Click on ‘Sell New’ ● Select ‘Admission Package’ from the drop down menu ● Specify the quantity to be sold – note the number of seats included before adjusting the quantity (e.g. – If a Couple Ticket has 2 seats you only need to sell 1 package for 2 guests) ● Confirm sale price ● Click ‘Sell Admission’ to complete ● Check the box next to each guest to check them in ● Assign Group and Table for each member (if the Group has already been assigned to a table in the project then it will default to the correct table. However, you can overwrite this, if needed.) ● Click ‘Next’ to continue to Checkin Step 3 – Add Credit Card B) Existing Admission Assign an admission purchased by another guest: ● Click ‘Use Existing’ ● Type the purchaser’s name ● Check the number of admissions needed ● Click ‘Use’ ● Assign Group and Table for each member (Table will auto assign if the Group has already been assigned to a table in the project. However, you can overwrite this, if needed.) ● Click ‘Next’ to continue to Checkin Step 3 – Add Credit Card GG Online Bidding QSG 7.7.2016 | www.greatergiving.com | support@greatergiving.com | (866) 269-8151 | Page 6 C) Replace Admission When an attendee is replacing another guest Click on ‘Use Existing’ button Type the purchaser’s name Select the guest being replaced which is listed in the Assigned Attendee column Click ‘Use’ Check box next to each guest to check them in Assign Group and Table for each member (Table will auto assign if the Group has already been assigned to a table in the project. However, you can overwrite this, if needed.) Click ‘Next’ to continue to Checkin Step 3 – Add Credit Card Checkin Step 3 - Add Credit Card This area is used to store the credit card to be used for the guest’s purchases. A guest may already have opted to store a credit card prior to the event which will show on file. They may also swipe a credit card at checkout. Add a Credit Card: Click ‘Swipe Card’ Swipe the credit card with the magnetic strip facing the arrows on the card reader The credit card info will automatically be saved and will appear in the grid view If the card cannot be read you can click ‘Cancel’ and then click ‘Type Manually’. Type the credit card number, expiration date, and card holder name. Click ‘OK’ Click ‘Next’ to complete the check in GG Online Bidding QSG 7.7.2016 | www.greatergiving.com | support@greatergiving.com | (866) 269-8151 | Page 7 ADDITIONAL CREDIT CARD OPTIONS Edit a Credit Card: (Maximum amount) Click ‘Edit’ Enter the maximum dollar amount to be charged Click ‘Save’ Deactivate a Credit Card: Click ‘Edit’ Uncheck the box for ‘In Use’ Click ‘Save’ Void a Credit Card Click the red ‘X’ to delete Click ‘Delete Card’ to confirm Click ‘Next’ to complete the check in GG Online Bidding QSG 7.7.2016 | www.greatergiving.com | support@greatergiving.com | (866) 269-8151 | Page 8 Online Bidding Tasks During the silent auction you will be monitoring the performance of Online Bidding. You can keep an eye on the bidding and packages that have no bids. You may also need to retract a bid for a bidder or look up a bid number or a package. Online Bidding Admin Access From the Project Home screen, select ‘Online Bidding Admin’ Show Auction Statistics Under the project name & bidding time, select ‘Generate and show statistics’ Look up Bidders From the home screen of Online Bidding Admin: Under Guest Functions, select ‘View Registered Bidders’ Search by name or bidder number Select ‘Re-send welcome text’ to send a welcome text to the guest’s phone Look up Packages From the home screen of Online Bidding Admin: Under Auction Package Functions, select ‘View Packages’ Search by name or package number GG Online Bidding QSG 7.7.2016 | www.greatergiving.com | support@greatergiving.com | (866) 269-8151 | Page 9 Retracting Bids To delete a max bid from a bidder from the home screen of Online Bidding Admin, under Auction Package Functions: Select ‘View Packages’ Search for package by Number or Name Select ‘Del Max Bid’ Select ‘OK’ Texting Bidders You may want to send messages out to your bidders throughout the bidding to keep them informed and to encourage bidding. From the Online Bidding Admin Home page: Go to Bidders in the menu bar Select ‘Text Bidders’ Compose your texts in the field provided Select the type of bidders you wish to send the text to o All Supporters: This will text all Supporters assigned with a bidder number o Winning Supporters: This will text any Supporter who has a winning bid on a package in Online Bidding o Non-winning Supporters: This will text any Supporter who does not have any winning bids in Online Bidding Select the ‘Send to Queue’ button Extending the Auction If you would like to push the closing time for the auction, you can do this from the Online Bidding Admin screen: Under Auction Package Functions locate Push Closing times Using the drop down choose the time increment Select the ‘Push’ button Select ‘OK’ on the confirmation pop up to extend the auction ***Please note that we strongly recommend not extending your auction within 2 minutes of the close**** Show Bidding Page From the Project Home screen, select ‘Show Bidding Page’ o This launches your Online Bidding site GG Online Bidding QSG 7.7.2016 | www.greatergiving.com | support@greatergiving.com | (866) 269-8151 | Page 10 Online Bidding Displays Manage Event Displays Greater Giving Online Bidding offers you three types of event displays: 1. Leaderboard - Scrolls though the packages up for bid displaying current high bid and bidder number Choose which packages to display Adjust the number of packages on each page Adjust the number of seconds to display each page Change the color theme Preview the leaderboard by navigating to ggo.mobi/lb/orgshortname 2. Appeal - Displays an interactive arrow that fills in as bidders donate Adjust the donation goal Choose to thank bidders by name Select an image to appear on the bottom right of the display Preview the appeal display by navigating to ggo.mobi/ap/orgshortname 3. Countdown Timer - Displays a clock counting down to the end of your silent auction Preview the countdown timer display by navigating to ggo.mobi/ct/orgshortname Each display requires an internet connection and a laptop. We recommend using a computer with constant power and disabled screensaver. GG Online Bidding QSG 7.7.2016 | www.greatergiving.com | support@greatergiving.com | (866) 269-8151 | Page 11 SALES – Online Bidding All Online Bidding sales post within 15 minutes of the closing of the auction. No action is needed by you, just wait a few minutes and all your silent auction sales will be in Greater Giving ready for check out! SALES – Multi-Sale & Live Auction Select ‘Enter Sales’ from the ‘Go Time’ Dashboard Live Auction Sales ● ● ● ● ● Type Package Number or Name, ‘Enter’ Type Bidder Number or Name, ‘Enter’ Type winning bid amount in the price field, ‘Enter’ Click ‘Add Sale’ to confirm and save Repeat steps 1-4 for additional sales Multi-sales – Selling a package multiple times to single or multiple bidders (e.g. - raffle tickets, paddle raises, centerpieces) ● ● ● ● ● Type the Name or Number of the multi-sale package, ‘Enter’. Note: This package should already be setup prior to event night as a ‘Multi-sale’ package Type Bidder Number or Name, ‘Enter’ Type the quantity, (automatically sums the total price), ‘Enter’ Click ‘Add Sale’ to confirm and save Repeat steps 2-4 for additional sales Edit Sales - If a sale was incorrectly entered you can delete the sale from the list below. ● ● ● Click the red ‘X’ Click ‘Delete Sale’ to confirm Correctly reenter the sale, if needed Note: You will only be able to delete a sale from the computer that the sale was entered. To see all Sales, go to Checkout and pull up the bidder. If unable to locate the sale, go to the Admin computer to look it up in Greater Giving Online Software. ● Click ‘View/Edit Sales’ under the Sales section on Project Home ● Click ‘Show Advanced Search’ to filter for the package ● Type in either the Package Number or Name in the appropriate field, Click ‘Search’ ● Here you can either ‘Delete’ the sale so that it can be sold in Go Time or you can ‘Edit’ the sale and ‘Switch Supporter’ and/or sale price Print recommended reports from the Admin computer once all Sales are entered. These reports will be used for reference at Checkout and Item Pickup. ● BID-03: Sales listing by Bidder ● PKG-03: Sales listing by Package GG Online Bidding QSG 7.7.2016 | www.greatergiving.com | support@greatergiving.com | (866) 269-8151 | Page 12 CHECK-OUT Select ‘Checkout Attendee’ from the Go Time Dashboard ● ● ● Type Bidder Number or Name Click ‘Enter’ Review the following information: o Sales entered o Credit cards on file o Payments received o Event receipt Sales - View or edit all entered sales ● ● ● Edit a Sale o Click ‘Edit’ o Adjust as necessary o Click ‘Update Sale’ to save Delete Sale o Click the red ‘X’ o Click ‘Delete Sale’ to confirm Add Sale o Click ‘Add Sale’ o Type package Number or Name, ‘Enter’ o Type the price of the sale o Click ‘Add Sale’ to save Credit Cards ● ● ● Add a Credit Card – Used for non-Express Pay guests who did not swipe their card at Check In. Also for guests who would like to add an additional or different credit card at Checkout: o Click ‘Swipe Card’ o Swipe the credit card with the magnetic strip facing the arrows on the card reader o The credit card info will automatically be saved and will appear in the grid view o If the card cannot be read you can click ‘Cancel’ and then click ‘Type Manually’. Type the credit card number, expiration date, and card holder name manually. Click ‘OK’ Remove a Credit Card o Click the red ‘X’ o Click ‘Delete Card’ to confirm Splitting the Total Between Multiple Credit Cards o Add all credit cards to be split o Click ‘Edit’ and type the ‘Max Amount’ on each of the credit cards needing a maximum limit, ‘Save’ o If there is a maximum on each credit card, be sure to edit each credit card appropriately. Credit Cards will be charged in the order they appear, cards without a Max Amount will be charged the remainder of the balance (confirm the order that you want the credit cards to be charged). GG Online Bidding QSG 7.7.2016 | www.greatergiving.com | support@greatergiving.com | (866) 269-8151 | Page 13 Payments - Money received as Cash or Check (or other non-credit card payments) to be recorded. ● Add a Payment ○ Click ‘Add Payment’ ○ Type the amount of payment (if whole dollars, you do not have to add cents) ○ Select the Payment Type from the dropdown menu ■ If paying by check enter the check number ○ Select the sale associated with the payment. If the amount is equal to the package then it will automatically associate with the correct sale. ○ Click ‘Enter Payment’ to confirm ● Remove a Payment ○ Click the red ‘X’ ○ Click ‘Delete Payment’ to confirm ● Edit a Payment ○ Click ‘Edit’ ○ Make necessary changes ○ Click ‘Update Payment’ to confirm Receipts – You have the option of either emailing or printing receipts. You also have the option of individual receipts vs. batch receipts. IMPORTANT: All settings need to be setup in Greater Giving Online Software. Batch receipts need to be processed in Greater Giving Online Software as Go Time does not have this option. To edit receipt settings go to Page 1, section Greater Giving Online Software Setup. Setup Receipt Settings ● ● ● Go to Project Home in Greater Giving Online Software (Admin computer) Under Project Tasks, click ‘Edit Receipt Settings’ Verify settings on all tabs are correct for the Event Receipt - including ‘Email Receipts’ or ‘Print Receipts’ based on the delivery Individual Receipts from Go Time After reviewing the bidder’s sales and payments, scroll down to view the receipt. Email Receipt ● Confirm the email address or overwrite if different than what is populated, click ‘Email Receipt’ Note: If no email address is initially populated, the new address entered will be saved to the guest’s record. GG Online Bidding QSG 7.7.2016 | www.greatergiving.com | support@greatergiving.com | (866) 269-8151 | Page 14 Print Receipt ● In the preview area of the receipt, choose one of the following: ○ Click printer icon ○ Hover over the receipt and click the printer icon ○ Right-click receipt and select ‘Print’ Batch Receipts from Greater Giving Online Software ● Batch Email Receipts ● From Project Home, click ‘View/Edit Supporters’ under the Supporters section ● Click ‘Show Advanced Search’ ● Filter the information as needed (i.e. - click the box for ‘Search on Sales and Payments Info’ and/or ● ● ● ● ● ● ● ● ‘Include Only Bidders Who’), ‘Search’ Click ‘Print/Email Receipts’ from the toolbar To associate all payments to the sales, click on the button ‘Assign Sales to Payments’ (optional) Select ‘Email’ for the receipt format Select ‘Event Receipt’ The number of receipts to be emailed will be displayed Click ‘Preview Email Receipts’ Click ‘Send Emails’ Batch Print Receipts ● ● ● ● ● ● ● ● ● ● ● From Project Home, click ‘View/Edit Supporters’ under the Supporters section Click ‘Show Advanced Search’ Filter the information as needed (i.e. - click the box for ‘Search on Sales and Payments Info’ and/or ‘Include Only Bidders Who’), ‘Search’ Click ‘Print/Email Receipts’ from the toolbar If you would like to associate all payments to the sales, click on the button ‘Assign Sales to Payments’ (optional) Select ‘Print’ for the receipt format Select ‘Event Receipt’ The number of receipts generated will be displayed Click ‘Generate Receipts’ Hover over the receipt until you see the printer tool bar, select the printer icon Click ‘Done viewing or printing receipts’ to close POST EVENT All Post-Event tasks will need to be completed within Greater Giving Online Software. Reports After the event, run the following Reports to review bidder sales, payments, and prepare to submit credit card transactions to the bank. ● ● Go to Project Home of the Greater Giving Online Software (Admin computer) Click on ‘All Reports’ under the Reports & Exports section GG Online Bidding QSG 7.7.2016 | www.greatergiving.com | support@greatergiving.com | (866) 269-8151 | Page 15 ○ ○ ○ ○ BID-03 - List of sales, sorted by supporter PKG-03 - List of sales, sorted by package PAY-01 – List of payments recorded by each supporter BID-18 - List of all credit cards, amount per credit card, and status. Includes cards on file, charges waiting to be submitted, and charges submitted. Authorization codes and decline status also included. Before running any report you can filter and sort the grid to provide data that meets your criteria. Go to Advanced Search to apply filters. ● Some filter options include but are not limited to: o Range of bid numbers o Bidders from a certain table o Bidders who have not fully paid for purchases To sort - double click the desired column header in the grid view SUBMITTING PAYMENTS IMPORTANT: Prior to submitting credit card transactions to the bank, we strongly recommend comparing the BID-03 and the BID-18 report to confirm the amounts to be charged to each bidder’s credit card(s) on file. All checks, cash and other forms of payments other than credit cards must be posted to bidders’ records prior to submission. Unless a ‘Max Amount’ is specified on a bidder’s credit card, all outstanding balances will be charged to the card(s) on file. Submit Transactions to the Bank - Once you have verified the amounts to be charged to each credit card you may submit the transactions to the bank. Note: An internet connection is required to process credit card payments. ● ● ● ● ● ● ● Go to Project Home of Greater Giving Online Software (Admin computer) Click ‘Manage Charge Batches’ under the Payments section Click ‘Start New Batch’ Verify the charges in the batch o If any adjustments need to be made to the charges waiting to be submitted, cancel and go to Manage Sales & Payments on the Supporter record Click ‘Charge Cards in Batch’ Click ‘Done’ to complete A list will generate once the batch is complete GG Online Bidding QSG 7.7.2016 | www.greatergiving.com | support@greatergiving.com | (866) 269-8151 | Page 16 DECLINES Declined Transactions - Transactions can be declined for insufficient funds, or a bank’s regional security policy. In most cases, contacting the bank for authorization is the solution to a declined credit card. ● ● ● ● ● ● ● ● Go to Project Home of Greater Giving Online Software (Admin computer) Click ‘Manage Charge Batches’ under the Payments section Scroll down to the bottom of the screen and click ‘Start Decline Wizard’ You will need to provide: o Your Merchant ID o Bank Number o Credit card number o Amount to be charged If authorization was successful, you will be provided an authorization code that can be entered into the software Click ‘Submit’ to push the transaction through The cardholder can also contact their bank for authorization o If so, click ‘Attempt to Charge Now’, o Click ‘Go’ You can change the supporter’s card on file by selecting the supporter from the list of declined charges or you can obtain another form of payment. ECLINES RETURN SHIPPING Return Shipping – Return all equipment within 4 days of event to prevent late fees. ● ● ● ● ● Use the white shipping case that arrived with the equipment Refer to the packing slip to confirm that all of the items are returned (A fee will be assessed for any missing or damaged equipment) Place the white shipping case in the brown cardboard box that the equipment was shipped in Place the return shipping label provided in the box over the original shipping label Keep the back portion of the return shipping label for your records Shipping the white shipping case that was provided by Greater Giving, without the cardboard box can damage the equipment and may result in a damage fee. If you cannot locate the original brown box, you can purchase a replacement at any UPS store. UPS Ground for shipping return: You can place the box in a regular pick-up area if you have a UPS Ground pickup, or drop the package at a UPS location (1.800-PICK-UPS / 1.800.742.5877) Ship or Mail to: Greater Giving 1920 NW Amberglen Parkway, Suite 140 Beaverton, Oregon 97006 GG Online Bidding QSG 7.7.2016 | www.greatergiving.com | support@greatergiving.com | (866) 269-8151 | Page 17 DATA SECURITY (PCI) Card Holder Data Security (PCI) The Payment Card Industry (PCI) Data Security Standards were developed by the major credit card companies as a guideline to help organizations that process card payments prevent credit card fraud and to protect against security vulnerabilities. Greater Giving applies the PCI guidelines rigorously in its terminal and online products and maintains a level 1 certification with annual audits by an accredited 3rd party. When you use Greater Giving solutions to accept credit card payments, you can trust us to keep this information safe and secure to protect your donors. The Auctionpay products use strong encryption for the storage of credit card information and for the transmission of card information over public networks. These steps are absolutely necessary for compliance with PCI Data Security Standards. By complying with PCI, your donors’ credit card information is uncompromised, allowing you to focus on your fundraising activities. PCI Requirements for Wireless Implementations Greater Giving does not recommend nor support use of the Card Readers in wireless networks at this time, but if the Card Readers should ever be used in a wireless (Wi-Fi) network, PCI requires that wireless technology be securely implemented and transmission of cardholder data over wireless networks be secure. Install and configure perimeter firewalls between wireless networks and systems that store credit card data. Modify default wireless settings, as follows: ● ● ● ● ● ● ● Change default encryption keys upon installation and anytime anyone with knowledge of the encryption keys leaves the company or changes positions Change default service set identifier (SSID) Change default passwords or passphrases on access points Change default SNMP community strings Enable Wi-Fi protected access (WPA and WPA2) technology for encryption and authentication (note that WEP protection is prohibited by PCI) Update firmware on wireless access points to support strong encryption and authentication (WPA/WPA2) Change all other security-related wireless vendor defaults For wireless networks transmitting cardholder data or connected to the cardholder data environment, implement industry best practices for strong encryption of data transmission and authentication (for example, IEEE 802.11i). This guide is reviewed and updated continuously to keep in compliance with PCI Payment Application Data Security Standards. GG Online Bidding QSG 7.7.2016 | www.greatergiving.com | support@greatergiving.com | (866) 269-8151 | Page 18
