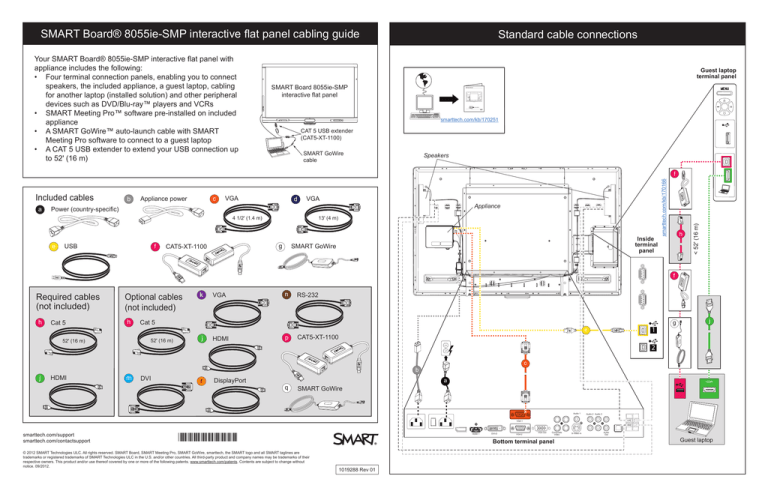
SMART Board® 8055ie-SMP interactive flat panel cabling guide
Your SMART Board® 8055ie-SMP interactive flat panel with
appliance includes the following:
• Four terminal connection panels, enabling you to connect
speakers, the included appliance, a guest laptop, cabling
for another laptop (installed solution) and other peripheral
devices such as DVD/Blu-ray­™ players and VCRs
• SMART Meeting Pro™ software pre-installed on included
appliance
• A SMART GoWire™ auto-launch cable with SMART
Meeting Pro software to connect to a guest laptop
• A CAT 5 USB extender to extend your USB connection up
to 52' (16 m)
Standard cable connections
Guest laptop
terminal panel
SMART Board 8055ie-SMP
interactive flat panel
smarttech.com/kb/170251
CAT 5 USB extender
(CAT5-XT-1100)
SMART GoWire
cable
Speakers
a
b
c
Appliance power
VGA
d
VGA
Appliance
Power (country-specific)
4 1/2' (1.4 m)
e
USB
f
13' (4 m)
g
CAT5-XT-1100
Inside
terminal
panel
SMART GoWire
h
< 52' (16 m)
Included cables
smarttech.com/kb/170166
f
f
Required cables
(not included)
h
Cat 5
Optional cables
(not included)
h
j
HDMI
m
VGA
n
RS-232
Cat 5
52' (16 m)
52' (16 m)
k
j
HDMI
p
j
2
c
b
DVI
1
e
CAT5-XT-1100
g
r
DisplayPort
q
a
HDMI
SMART GoWire
Audio 1
Audio 2 Audio 3
VGA 1
smarttech.com/support
smarttech.com/contactsupport
HDMI 1
*1019288*
© 2012 SMART Technologies ULC. All rights reserved. SMART Board, SMART Meeting Pro, SMART GoWire, smarttech, the SMART logo and all SMART taglines are
trademarks or registered trademarks of SMART Technologies ULC in the U.S. and/or other countries. All third-party product and company names may be trademarks of their
respective owners. This product and/or use thereof covered by one or more of the following patents. www.smarttech.com/patents. Contents are subject to change without
notice. 09/2012.
DVI-D
VGA 2
VGA Out
Composite
Video
Bottom terminal panel
1019288 Rev 01
S-Video In
Audio
Out
Guest laptop
Alternative cable connections
Guest laptop terminal panel
Speakers
Remotely managing your
SMART Board™ 8055i
interactive flat panel
Connecting your interactive display to an RS-232 system
Connection diagram
Serial interface settings
Power modes
RS-232 programming commands and responses
Interpreting the “invalid cmd” response
Command inventory
Designating video input source commands for a specific video input
Designating a target interactive display
Commands and controls
Power state commands
Video input source
Video source commands
Audio output commands
System information commands
Service information
Room
control
n
Inside terminal
panel
2
2
3
4
4
5
5
6
7
8
8
9
10
13
14
18
(For appliance)
This document includes detailed instructions on how to set up your computer or room control system
to remotely manage your SMART Board™ 8070i interactive display using an RS-232 serial interface.
1
smarttech.com/kb/170189
erminal panel
f
2
e
h
f
b
p
OR
g
h
OR
OR
r
k
j
DisplayPort
VGA
HDMI
m
j
q
Bottom terminal panel
Power switch
a
USB 1 / USB 2
HDMI
HDMI / DVI / DisplayPort
17/04/2012
DVI
HDMI
Configuring your SMART Board 8055i USB and video port mapping
C onfiguring the video and touch input for your
S MAR T B oard 8055i interactive flat panel
S MAR T ha rdwa re
SMART Board™ 8055i
S MAR T B oa rd 8055i intera ctive fla t pa nels
Interactive Display
User's Guide
Overview
You ca n connect your S MAR T B oa rd 8055i intera ctive fla t pa nel to up to three computers a t once. E a ch computer mus t be
connected to the intera ctive fla t pa nel with a U S B ca ble for touch input a nd a video ca ble for video input.
The following ta ble s hows the defa ult touch input a nd video input pa irings .
DVI
Computer
Defa ult touc h input c onnec tion
Defa ult video input c onnec tion
C omputer 1 (room computer)
US B 1
VG A 1
C omputer 2 (gues t computer)
US B 2
VG A 2
G ues t la ptop
US B 3
HDMI 2
If you wa nt to us e a video a nd touch input pa iring other tha n the defa ult, you ca n cha nge the video input s ettings in the ons creen dis pla y menu.
Details
IMP OR T ANT
If you cha nge the video input pa ired with a U S B touch input, ens ure the computer's video connection ma tches the new video
input. If the video connection does not ma tch the video input, you could los e touch control of your intera ctive fla t pa nel.
C onfiguring the video and touch input pairing
To c onfigure the video a nd touc h input
1. P res s MENU on the menu control pa nel.
smarttech.com/kb/170177
The on-s creen menu a ppea rs .
NO T E
You ca n configure the video a nd touch input with the remote control a s well.
2. B rows e to S E TU P us ing the down button.
3. P res s the S ET button to s elect S E TU P .
4. B rows e to U S B S E TTING us ing the down button.
DisplayPort
5. P res s the right button to s elect U S B S E TTING .
6. P res s the down button to s elect a U S B recepta cle.
7. P res s the left a nd right buttons to s elect a video input for ea ch U S B touch input.
8. P res s the MENU button twice to clos e the on-s creen menu.
Firs t publis hed
Apr. 16, 2012
intranet.smarttech.com/documentation/kb/NatS/Support/170190.htm
1/2
smarttech.com/kb/170190
*1019288*
Computer 2 (USB 2)
Guest laptop (USB 3)
smarttech.com/kb/170166
1
smarttech.com/kb/170157
52' (16 m) max.
1
c
52' (16 m) max.
Extending
USB Connections
SMART Board® 800 series interactive
whiteboards and systems
smarttech.com/kb/170166
p

