How to prepare a pest ID sample
advertisement

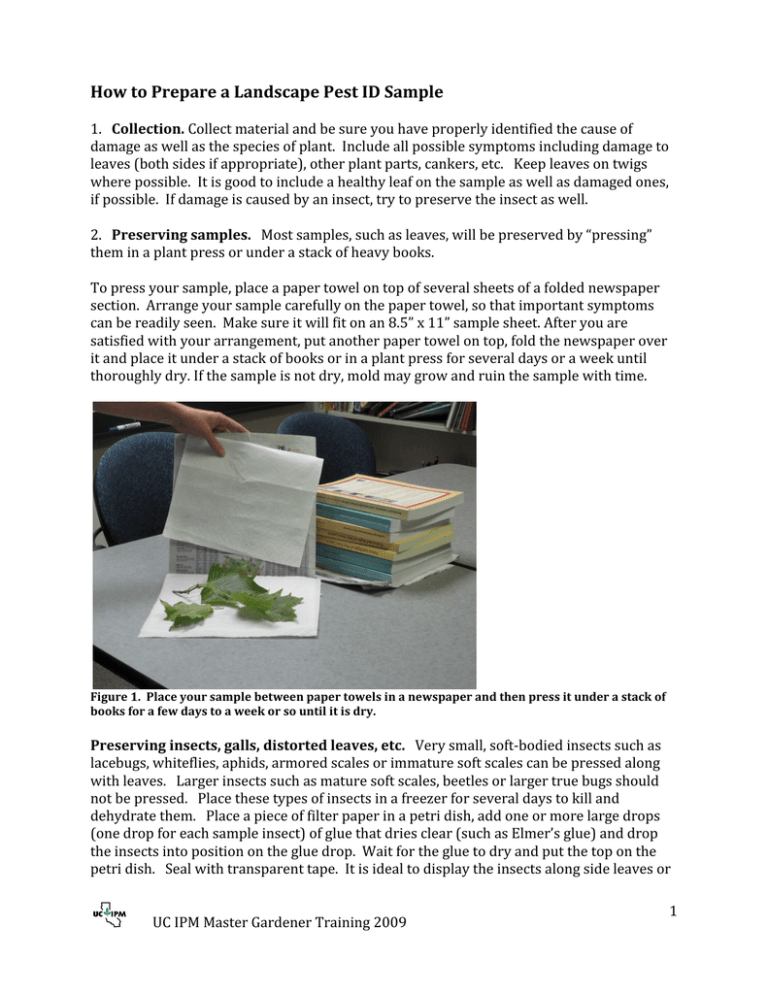
How to Prepare a Landscape Pest ID Sample 1. Collection. Collect material and be sure you have properly identified the cause of damage as well as the species of plant. Include all possible symptoms including damage to leaves (both sides if appropriate), other plant parts, cankers, etc. Keep leaves on twigs where possible. It is good to include a healthy leaf on the sample as well as damaged ones, if possible. If damage is caused by an insect, try to preserve the insect as well. 2. Preserving samples. Most samples, such as leaves, will be preserved by “pressing” them in a plant press or under a stack of heavy books. To press your sample, place a paper towel on top of several sheets of a folded newspaper section. Arrange your sample carefully on the paper towel, so that important symptoms can be readily seen. Make sure it will fit on an 8.5” x 11” sample sheet. After you are satisfied with your arrangement, put another paper towel on top, fold the newspaper over it and place it under a stack of books or in a plant press for several days or a week until thoroughly dry. If the sample is not dry, mold may grow and ruin the sample with time. Figure 1. Place your sample between paper towels in a newspaper and then press it under a stack of books for a few days to a week or so until it is dry. Preserving insects, galls, distorted leaves, etc. Very small, soft‐bodied insects such as lacebugs, whiteflies, aphids, armored scales or immature soft scales can be pressed along with leaves. Larger insects such as mature soft scales, beetles or larger true bugs should not be pressed. Place these types of insects in a freezer for several days to kill and dehydrate them. Place a piece of filter paper in a petri dish, add one or more large drops (one drop for each sample insect) of glue that dries clear (such as Elmer’s glue) and drop the insects into position on the glue drop. Wait for the glue to dry and put the top on the petri dish. Seal with transparent tape. It is ideal to display the insects along side leaves or UC IPM Master Gardener Training 2009 1 twigs showing damage by attaching them to the same page (Figure 2). Larger soft‐bodied insects such as caterpillars do not preserve well. Figure 2. Sample showing soft scales on twigs in petri dish and pressed leaves with immature scales Other bulky samples such as galls, twig swellings, borer damage should not be pressed. Place smaller, delicate samples in petri dishes as for insects. Larger symptoms such as bark beetle or borer galleries or branch swellings from mistletoe can often be mounted directly. You may need to be creative. 3. Assembling samples. Once your samples are dried or preserved in petri dishes they need to be mounted on 8.5” x 11” pieces of thin cardboard or heavy cardstock. White cardboard provides nice contrast. Arrange the sample to display as many symptoms as possible. Secure the sample to the cardboard with a few pieces of clear tape, as needed. If you have samples in a petri dishes to place on the sample, secure them in place with tape. 4. Labeling samples. Top of sample. Type up a label for the top of the sample on white paper using a fairly large font. Don’t include the name of the causal agent. We recommend including the name of the host plant, any environmental conditions associated with the problem and any other useful information that might help identification. Don’t get too wordy; one or two sentences should be enough. Tape the label on the cardboard. Examples: • What caused these shoot tips on rose to wilt, curl downward and die? Roots are healthy and only scattered shoots show damage. • What caused the waxy‐covered galls on this pyracantha stem? UC IPM Master Gardener Training 2009 2 Underside of sample. For the underside of samples, we suggest printing out both sides of the Landscape Pest ID card featuring the pest or problem. Since the cards usually include several related pests, it is important to also include in large letters the name of the species on the sample and also circle (in red) any information or photos on the card specifically related to this pest. See Figure 3 for an example. Powerpoint templates for each Landscape Pest ID card are available on the UC IPM Master Gardener web site http://www.ipm.ucdavis.edu/FAQ/mgipm.html. (Look in the section on “2009 Advanced IPM Training for MGs” and the Landscape Pest ID Activity.) Choose the pest ID card that is appropriate your sample, add the specific name of your pest in the space provided in the template, and using the “Shapes” function in Powerpoint, circle the relevant photos or text in red. Print this label out in color and tape it on to the back of the sample card. For problems not pictured on a Pest Card, print the appropriate page(s) from other ANR publications, such as Pest Notes, Pests of Landscape Trees and Shrubs, or screen captures from the Web pages at: www.ipm.ucdavis.edu Oak pit scales Figure 3. Example label for the back of samples. Go to the UCIPM Master Gardener web site to get images of the correct Landscape Pest ID card in Powerpoint. Type in the name of your pest and circle images and information related to your sample. UC IPM Master Gardener Training 2009 3 5. Protecting samples. Place each sample in a clear plastic archival preserver (sleeve) designed for photo prints. We have obtained these from PrintFile Archival Storage http://www.printfile.com/811‐2p85x11‐25pack.aspx. Be sure to purchase ones that hold a single 8.5” x 11” page. Tape the open edge closed once your sample and labels are inside and complete. Figure 4. Finished sample in plastic archival preserver sleeve. See the UC IPM Master Gardener web site under “2009 Advanced IPM Training for Master Gardeners” for templates and more information http://www.ipm.ucdavis.edu/FAQ/mgipm.html UC IPM Master Gardener Training 2009 4


