LED T8 REPLACEMENT LAMP
INSTALLATION GUIDE
Items:
L2T8B/840/9/UF-70, L4T8B/840/18/U/F-70, L4T8B/865/18/U/F-70,
L2T8B/850/9/U/F-70, L4T8B/850/18/U/F-70
Installation Instructions
WARNING: THIS PRODUCT MUST BE INSTALLED IN ACCORDANCE WITH THE APPLICABLE INSTALLATION
CODE BY A PERSON FAMILIAR WITH THE CONSTRUCTION AND OPERATION OF THE PRODUCT AND THE
HAZARDS INVOLVED
RISK OF SHOCK: DISCONNECT POWER BEFORE INSTALLATION
-
sions shown in the drawings and/or photographs.
Do not make or alter any open holes in an enclosure of wiring or electrical components during installation.
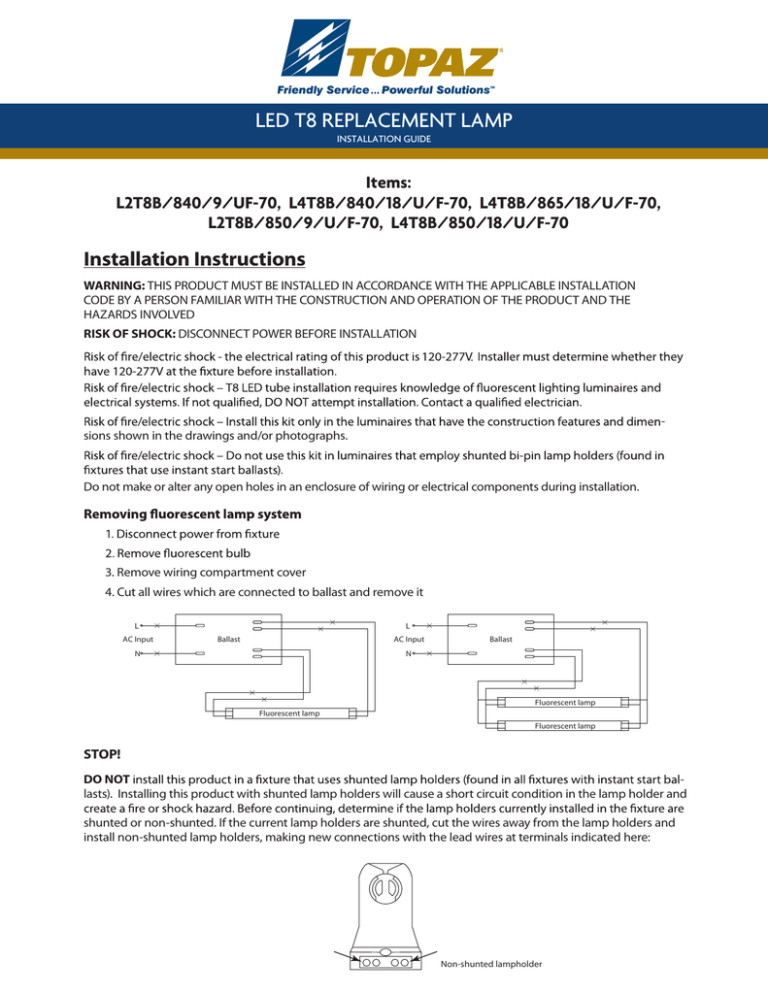
3. Remove wiring compartment cover
4. Cut all wires which are connected to ballast and remove it
L
AC Input
L
Ballast
AC Input
N
Ballast
N
Fluorescent lamp
Fluorescent lamp
Fluorescent lamp
STOP!
DO NOT
lasts). Installing this product with shunted lamp holders will cause a short circuit condition in the lamp holder and
shunted or non-shunted. If the current lamp holders are shunted, cut the wires away from the lamp holders and
install non-shunted lamp holders, making new connections with the lead wires at terminals indicated here:
Non-shunted lampholder
Installation Instructions Continued
WARNING: THIS PRODUCT MUST BE INSTALLED IN ACCORDANCE WITH THE APPLICABLE INSTALLATION
CODE BY A PERSON FAMILIAR WITH THE CONSTRUCTION AND OPERATION OF THE PRODUCT AND THE
NOTE:
OnlyINVOLVED
one end of this LED tube receives power. The “powered” end is indicated with a sticker on the tube
HAZARDS
RISK
DISCONNECT POWER BEFORE INSTALLATION
will
beOF
theSHOCK:
“dead” end.
3. Connect black (live) and white (neutral) lead wires from lamp holders on “powered” end to incoming AC
supply black (LIVE) and white (NEUTRAL) wires with approved wire connectors. If only one lamp is being
installed, proceed to step 4 below.
-
sions shown in the drawings and/or photographs.
No Live Connection
Live
Neutral
Do not make or alter any open holes in an enclosure of wiring or electrical components during installation.
Non-shunted Lampholder
terminals on “powered” lamp holder for second lamp with black (live) and white (neutral) wires, being sure to
maintain
polarity.
Repeat
this “daisy chain”
3. Remove
wiring
compartment
cover connection for each additional lamp.
4. Cut all wires which are connected to ballast
AC Input and remove it
L
AC Input
L
Ballast
AC Input
N
LED Tube
Ballast
N
LED Tube
Fluorescent lamp
LED Tube
LED Tube
Fluorescent lamp
Fluorescent lamp
STOP!
4. When all connections are complete, place appropriate connectors/wire nuts on the end of any unused wires.
Replace wiring compartment cover
DO5.NOT
lasts).
Installing
this
product
with with
shunted
holders
will cause
a short circuit
in the lamp place
holderonand
6. Place
sticker
that
is included
this lamp
product
on wiring
compartment
covercondition
or other conspicuous
shunted or non-shunted. If the current lamp holders are shunted, cut the wires away from the lamp holders and
install
non-shunted
lamp
holders,with
making
connections
with
thethe
lead
wires at terminals
indicated
here:
7. Place
sticker that
is included
this new
product
somewhere
near
“powered
end” socket(s).
Sticker
reads:
“The socket(s) on this end of the luminaire are supplying line voltage. Be sure to install the powered end of
the LED tube(s) into the sockets on this end of the luminaire.”
8. Install LED tube(s), matching the end of the lamp that has the “L/N” sticker to the lamp holder that is connected to the Live and Neutral wires.
Do not use with dimmers.
Non-shunted lampholder
Suitable for dry locations only.
NOTE: If using existingThis
non-shunted
holders, Installer
should
disconnectexits.
lead wires from lamp holders
device islamp
not intended
for use
withnot
emergency
and make new connections at terminals. Instead, cut lead wires away from lamp holders and make new connecHalco Lighting Technologies | 2940 Pacific Drive | Norcross, GA 30071 | Toll Free 800.677.3334 | Phone 770.242.3612 | Fax 800.880.0822 | halcolighting.com | Atlanta | Carlstandt | Cleveland | Houston | Phoenix
toLighting
leadTechnologies.
wires using
approved
connectors.
©tions
2014 Halco
All rights reserved.
Halco and ProLED
are registered trademarks of Halco Lighting Technologies. All product names are trademarks or registered trademarks of Halco Lighting


