12-Relay Softwired Contactor Panel With Integrated Outdoor
advertisement
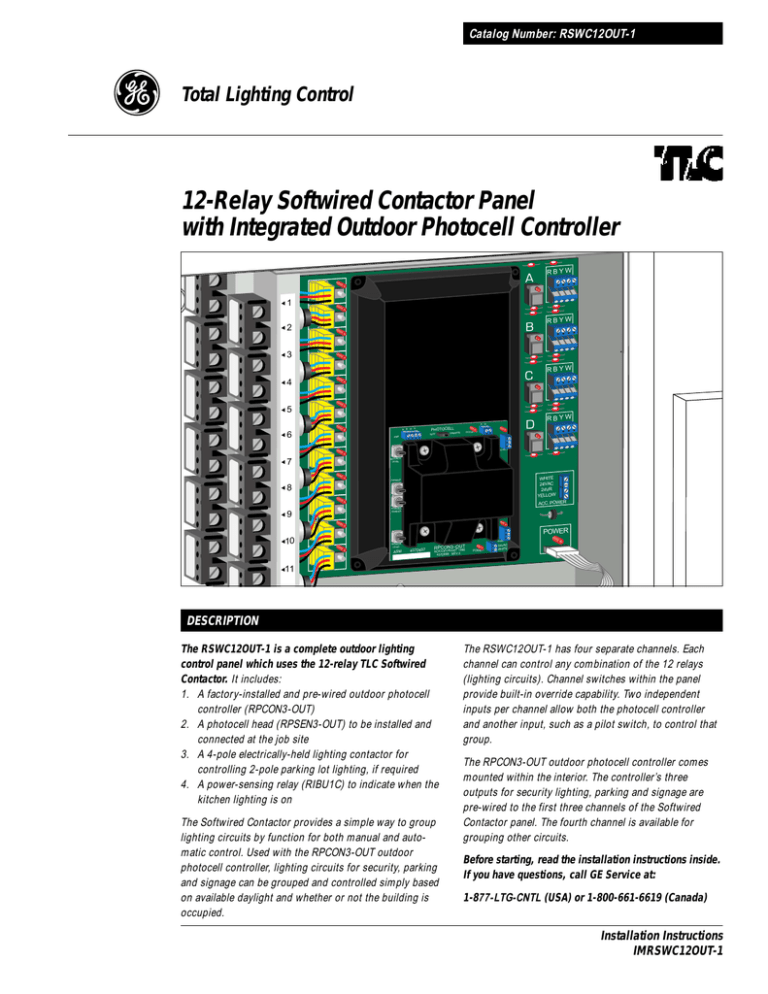
Catalog Number: RSWC12OUT-1 SC Total Lighting Control 12-Relay Softwired Contactor Panel with Integrated Outdoor Photocell Controller RBYW 1 1 2 2 3 RBYW 3 RBYW 4 4 5 5 RBYW 6 R W R B W S 6 PHOTOCELL TEST OCCUPIED OPERATE 4396 7 0 SECURITY SECURITY LEVEL 7 8 WHITE 24VAC 24VR YELLOW PARKING 8 0 9 0 ACC. POWER PARKING EGRESS 9 10 10 11 POWER 0 SIGNAGE SIGNAGE LEVEL ASM 11 437D697 UT RPCON3–O HT 1996 HCICOPYRIG 437D696 REV.0 24VAC WHITE POWER 12 115 NEU GRD VAC DESCRIPTION The RSWC12OUT-1 is a complete outdoor lighting control panel which uses the 12-relay TLC Softwired Contactor. It includes: 1. A factory-installed and pre-wired outdoor photocell controller (RPCON3-OUT) 2. A photocell head (RPSEN3-OUT) to be installed and connected at the job site 3. A 4-pole electrically-held lighting contactor for controlling 2-pole parking lot lighting, if required 4. A power-sensing relay (RIBU1C) to indicate when the kitchen lighting is on The Softwired Contactor provides a simple way to group lighting circuits by function for both manual and automatic control. Used with the RPCON3-OUT outdoor photocell controller, lighting circuits for security, parking and signage can be grouped and controlled simply based on available daylight and whether or not the building is occupied. GE Lighting Controls 12 GENERAL ELECTRIC The RSWC12OUT-1 has four separate channels. Each channel can control any combination of the 12 relays (lighting circuits). Channel switches within the panel provide built-in override capability. Two independent inputs per channel allow both the photocell controller and another input, such as a pilot switch, to control that group. The RPCON3-OUT outdoor photocell controller comes mounted within the interior. The controller’s three outputs for security lighting, parking and signage are pre-wired to the first three channels of the Softwired Contactor panel. The fourth channel is available for grouping other circuits. Before starting, read the installation instructions inside. If you have questions, call GE Service at: 1-877-LTG-CNTL (USA) or 1-800-661-6619 (Canada) Installation Instructions IMRSWC12OUT-1 Catalog Number: RSWC12OUT-1 CAUTION: Make sure all power is OFF before wiring. Do not energize wiring until the unit is fully assembled. Conform to all applicable codes. INSTALLATION 1. Mount Panel 5. Wire Low Voltage 32 to 131°F (0 to 50°C), 10 to 95% relative humidity, stationary applications. The tub should be level, plumb and rigidly installed with hardware sufficient to hold 100 lbs. (48kg). The orientation should be as illustrated below. (Refer to the illustration on the next page) Photocell Head Wire the photocell head to the “PHOTOCELL” input terminals on the RPCON3-OUT controller. Occupied Contact Connect the YELLOW and ORANGE low-voltage leads from the RIBU1C to the “OCCUPIED” contacts on the controller. Signage Switch Wire the signage pilot switch to the second set of Channel C inputs on the Softwired Contactor board. 2. Wire Line Voltage Before making any connections to the relays or contactor, make sure that none of the load circuits are shorted or miswired. Wire from the circuit breaker through each relay’s SPST output terminals, and from there to the loads. Wire the power supply. Relay #12 is pre-wired to the 4-pole lighting contactor. Wire 2-phase parking lot circuits through the contactor, if required. 6. Verify Photocell Controller Settings Refer to instructions on controller label for setting footcandle levels for security, parking and signage lighting and for parking egress delay. 3. Install Photocell Head Outdoors Mount the RPSEN3-OUT photocell head on the building roof facing toward the northern sky as illustrated on the next page. 7. Power Up and Test Relays 4. Wire Kitchen Light Sensor Mount the RIBU1C sensing module on the kitchen light junction box (see illustration on next page) or onto the wiring compartment of a kitchen fixture. The YELLOW/WHITE striped wire connects to the neutral and the BLACK/WHITE striped wire to the switched hot leg (115VAC). Bring the low-voltage YELLOW and ORANGE leads out of the junction box through the strain relief provided. Apply power to the power supply only. Press the Relay Control Button next to each relay’s yellow plug-in termination to toggle it ON/OFF. The relay should “click” and the LED status indicator should change state. Confirm the operation by measuring the linevoltage terminations of each relay (and the 4-pole contactor, if necessary). Apply power to the relays (and contactor). Being careful not to touch any line-voltage wiring, toggle each relay ON/OFF again and confirm that each controls the appropriate load. LINE-VOLTAGE WIRING (115VAC) SWITCHED LIGHTING CIRCUITS 2.25" TYP. LOW-VOLTAGE CIRCUITS RELAYS 1-12 CLASS 2 LOW-VOLTAGE WIRING SECTION 16" 4-P0LE CONTACTOR PRE-WIRED TO RELAY #12 4.5" D 2-PHASE CIRCUITS TO PARKING LOT LIGHTING WIRED THROUGH CONTACTOR * LINE-VOLTAGE WIRING SECTION CIRCUIT BREAKER PANEL POWER SUPPLY TERMINAL BLOCK (115VAC) 22.5" *RPCON3-OUT PHOTOCELL CONTROLLER ILLUSTRATION NOT TO SCALE Catalog Number: RSWC12OUT-1 SC INSTALLATION LOW-VOLTAGE CONTROL WIRING H RPSEN3-OUT 120VAC Y/W WEATHERTIGHT JUNCTION BOX N RIBU1C N 0.5" THREADED INLET R O 20/3 AWG 1000' MAXIMUM 20/2 AWG 1000' MAXIMUM H W Y KITCHEN CIRCUIT B/W A KITCHEN SWITCH R B Y W SECURITY B FACTORY SETTINGS SIGNAGE SWITCH R B Y W PHOTOCELL 3 = 6FC R B W S TEST OPERATE OCCUPIED Y R WB SECURITY C PARKING LEVEL 20/4 AWG 1000' MAXIMUM 0 R B W 0 PARKING 2 = 40FC P R B W SECURITY LEVEL 3 = 6FC 2 = 30 MIN PARKING R W 0 PARKING EGRESS R B W 0 SIGNAGE LEVEL SIGNAGE POWER R B Y W SIGNAGE D 24VAC WHITE DOTTED LINES SHOW FACTORY WIRING R B Y W WHITE 24VAC 24VR YELLOW ILLUSTRATION NOT TO SCALE 8. Document Wiring Record the circuit controlled by each relay on the Wiring Schedule located on the back page of these installation instructions. Also indicate which relays are controlled by each channel. Place the Schedule in the plastic envelope and attach it to the inside of the panel cover. 9. Softwire Relay Groups to Channels Following the instructions to the right, softwire relays to the appropriate channels: Channel A: Security lighting Channel B: Parking lot lighting (Note: Relay #12 controls the 4-pole contactor) Channel C: Signage lighting Channel D: Optional lighting 100. Test Operation Test photocell responsiveness by sliding the “PHOTOCELL” switch to “TEST” and covering the photocell head. Return to normal operation by sliding the switch to “OPERATE”. Test against the sequence of operations to ensure that all controls are operating as intended. A 1 A A FLASHING LED 2 FLASHING LED 3 A A A A ON OFF ON 4 PRESS AND HOLD CHANNEL PUSH BUTTON Softwiring a Relay Group to a Channel 1 2 3 4 Press and hold the Channel Push Button for several seconds. The channel LED and the LEDs for relays currently controlled by that input will begin to flash. Select the relays to be controlled. The LED for each relay “softwired” to the channel input selected will be flashing ON/OFF. Press the associated Relay Control Button to add/delete that relay to/from the group. Press the Channel Push Button again. The LEDs will stop flashing and the input switch will now control the relays selected. Test. Press the Channel Push Button to toggle the group ON/OFF/ON. The input LED will track the last action. Now, turn OFF each relay in the group using the individual Relay Control Buttons. When the last relay is turned OFF, the channel LED should also go OFF. Catalog Number: RSWC12OUT-1 Note: Check those relays which are controlled by each channel under that channel letter below. WIRING SCHEDULE: 12-RELAY SOFTWIRED CONTACTOR RELAY # SUPPLY CIRCUIT LOAD DESCRIPTION RELAYS CONTROLLED BY EACH CHANNEL A B C D SECURITY PARKING SIGNAGE 1 2 3 4 5 6 7 8 9 10 11 12 FOUR-POLE LIGHTING CONTACTOR GE Total Lighting Control, 41 Woodford Ave., Plainville, CT 06062 Made in U.S.A.
