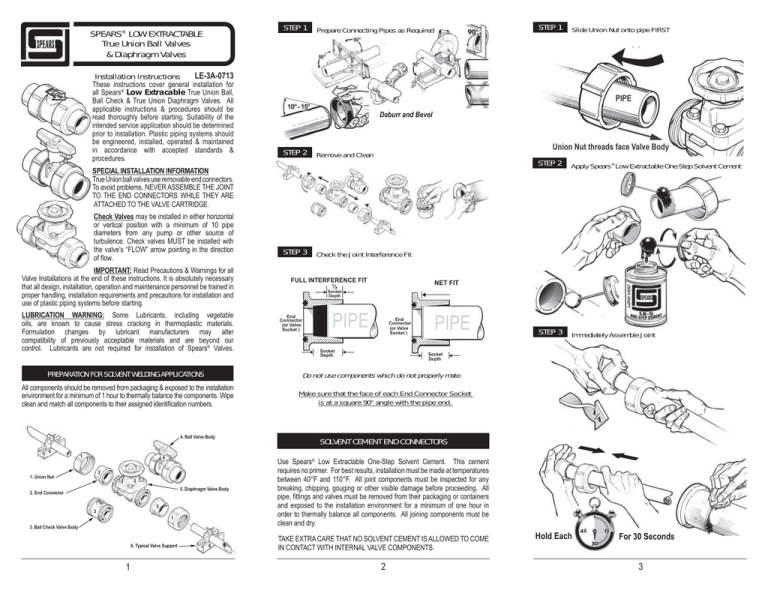
STEP 1
SPEARS® LOW EXTRACTABLE
True Union Ball Valves
& Diaphragm Valves
Installation Instructions
Prepare Connecting Pipes as Required
Check Valves may be installed in either horizontal
or vertical position with a minimum of 10 pipe
diameters from any pump or other source of
turbulence. Check valves MUST be installed with
the valve’s “FLOW” arrow pointing in the direction
of flow.
IMPORTANT: Read Precautions & Warnings for all
Valve Installations at the end of these instructions. It is absolutely necessary
that all design, installation, operation and maintenance personnel be trained in
proper handling, installation requirements and precautions for installation and
use of plastic piping systems before starting.
LUBRICATION WARNING: Some Lubricants, including vegetable
oils, are known to cause stress cracking in thermoplastic materials.
Formulation changes by lubricant manufacturers may alter
compatibility of previously acceptable materials and are beyond our
control. Lubricants are not required for installation of Spears® Valves.
PREPARATION FOR SOLVENT WELDING APPLICATIONS
STEP 2
Remove and Clean
4. Ball Valve Body
4
2
5
5. Diaphragm Valve Body
2. End Connector
2
3
1
3. Ball Check Valve Body
6. Typical Valve Support
1
Apply Spears® Low Extractable One-Step Solvent Cement
STEP 3
STEP 3
Immediately Assemble Joint
Check the Joint Interference Fit
FULL INTERFERENCE FIT
NET FIT
½
Socket
Depth
End
Connector
(or Valve
Socket )
PIPE
End
Connector
(or Valve
Socket )
Socket
Depth
Socket
Depth
Do not use components which do not properly mate.
All components should be removed from packaging & exposed to the installation
environment for a minimum of 1 hour to thermally balance the components. Wipe
clean and match all components to their assigned identification numbers.
1. Union Nut
STEP 2
Deburr and Bevel
SPECIAL INSTALLATION INFORMATION
True Union ball valves use removable end connectors.
To avoid problems, NEVER ASSEMBLE THE JOINT
TO THE END CONNECTORS WHILE THEY ARE
ATTACHED TO THE VALVE CARTRIDGE.
1
Slide Union Nut onto pipe FIRST
LE-3A-0713
These instructions cover general installation for
all Spears® Low Extracable True Union Ball,
Ball Check & True Union Diaphragm Valves. All
applicable instructions & procedures should be
read thoroughly before starting. Suitability of the
intended service application should be determined
prior to installation. Plastic piping systems should
be engineered, installed, operated & maintained
in accordance with accepted standards &
procedures.
6
STEP 1
6
Make sure that the face of each End Connector Socket
is at a square 90° angle with the pipe end.
SOLVENT CEMENT END CONNECTORS
Use Spears® Low Extractable One-Step Solvent Cement. This cement
requires no primer. For best results, installation must be made at temperatures
between 40°F and 110°F. All joint components must be inspected for any
breaking, chipping, gouging or other visible damage before proceeding. All
pipe, fittings and valves must be removed from their packaging or containers
and exposed to the installation environment for a minimum of one hour in
order to thermally balance all components. All joining components must be
clean and dry.
TAKE EXTRA CARE THAT NO SOLVENT CEMENT IS ALLOWED TO COME
IN CONTACT WITH INTERNAL VALVE COMPONENTS.
2
Hold Each
For 30 Secondss
3
STEP 4 Repeat STEP 3 to attach opposite end connector to pipe.
Hold joint together for approximately 30 seconds to make sure that the End
Connector Socket does not back off of pipe. Use a cloth to remove any excess
cement from the exterior juncture of the pipe and End Connector.
COMPLETE VALVE ASSEMBLY
STEP 1
STEP 2 Pressure test the system only after all solvent cement
joints have fully cured
Attach Valve Body to End Connector
Allow joint to cure according to
solvent cement instructions.
THREADED END CONNECTORS
Use only quality grade PTFE tape as a thread sealant for Spears® lowextractable applications. Warning: Some pipe joint compounds or PTFE
pastes may contain substances that could cause stress cracking to plastics
and increase the potential for system contamination. 1 to 2 full turns beyond
finger tight is generally all that is required to make a sound plastic threaded
connection. Unnecessary over-tightening will cause damage to both pipe
and fitting.
g
STEP 1
IMPORTANT:
IMPORTANTE:
1/16 Turn
Apply Thread Sealant
to male threads only.
DO NOT OVER TIGHTEN
TIGHTE AS DAMAGE MAY OCCUR
PRECAUTIONS AND WARNINGS
Hand Tighten Only
CAUTION: The system must be designed and installed so as not to
pull the valve in any direction. Pipe must be cut and installed in such
a manner as to avoid all stress loads associated with bending, pulling,
or shifting. Valve must be supported.
If you must
use PTFE Tape
Sealant:
CAUTION: BEFORE THE VALVE IS CYCLED, all dirt, sand, grit
or other material must be flushed from the system. This is to prevent
scarring of internal components; e.g., ball, cup, wedge, seats, etc.
2.5 Mil Thick
Initial wrap must
fully cover the
thread end
STEP 2
WARNING: Systems must not be operated or flushed out at flow
velocities greater than 5 feet per second.
Assemble Joint “FINGER TIGHT”
WARNING: NOT FOR DISTRIBUTION OF COMPRESSED AIR OR GAS
Attach final Union Nut
to Valve Body.
WARNING:
ALL AIR MUST BE BLED FROM THE SYSTEM DURING INITIAL FLUID
FILL. PRESSURE TESTING OF THE SYSTEM MUST NOT BE MADE
UNTIL ALL SOLVENT CEMENT JOINTS HAVE PROPERLY CURED.
INITIAL PRESSURE TESTING MUST BE MADE AT APPROXIMATELY
10% OF THE SYSTEM HYDROSTATIC PRESSURE RATING TO IDENTIFY
POTENTIAL PROBLEMS, PRIOR TO TESTING AT HIGHER PRESSURES.
STEP 3
Wrench Make Up
SPEARS® MANUFACTURING
COMPANY
1-2x
CORPORATE OFFICE
Unnecessary OVERTIGHTENING will cause damage to both pipe and valve.
4
BE SURE T
THAT
HAT
A TTHE
HE FACE OF THE END CONNECTOR SOCKET IS
SQUARELY ALIGNED (FLUSH) WITH THE VALVE BODY AND IS FLUSH
AGAINST THE O-RING. DO NOT USE THE REMAINING UNION NUT TO
DRAW TOGETHER ANY GAPS BETWEEN THE END CONNECTOR AND
THE VALVE BODY.
5
15853 Olden Street, Sylmar, CA
91342
PO Box 9203, Sylmar, CA 91392
(818) 364-1611
www.spearsmfg.com
© Copyright 2015 Spears® Manufacturing Company. All Rights Reserved.
Printed in the United States of America 03/15.
LE-3A-0713

