Exporting subtitle data to another format.
advertisement
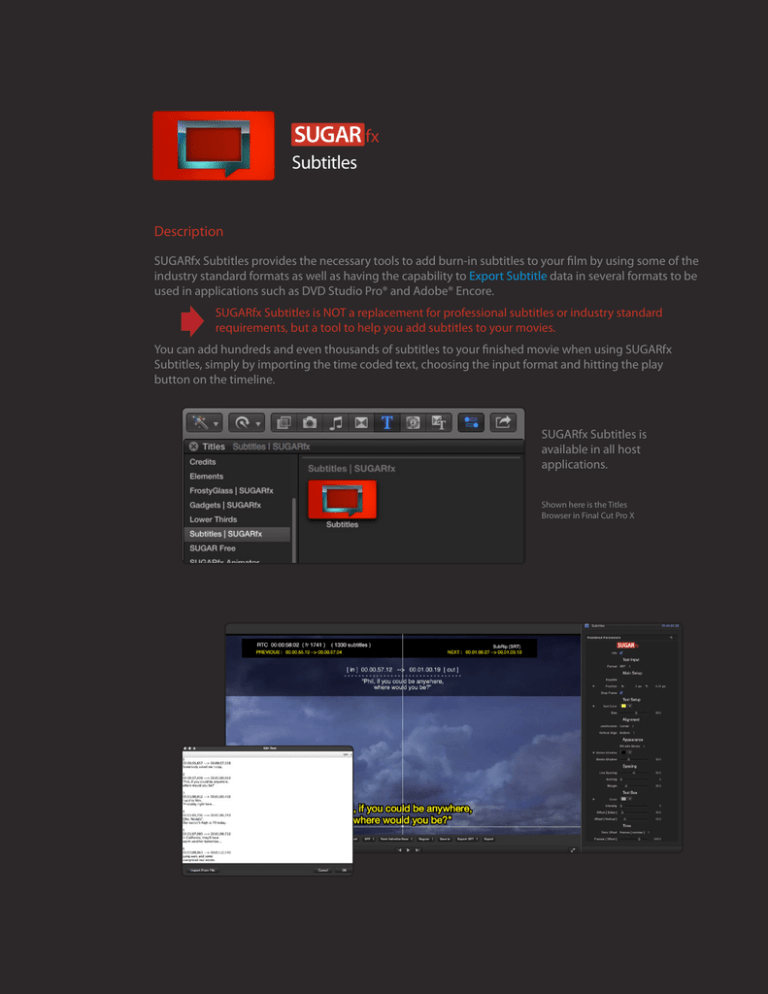
SUGAR fx Subtitles Description SUGARfx Subtitles provides the necessary tools to add burn-in subtitles to your film by using some of the industry standard formats as well as having the capability to Export Subtitle data in several formats to be used in applications such as DVD Studio Pro® and Adobe® Encore. SUGARfx Subtitles is NOT a replacement for professional subtitles or industry standard requirements, but a tool to help you add subtitles to your movies. You can add hundreds and even thousands of subtitles to your finished movie when using SUGARfx Subtitles, simply by importing the time coded text, choosing the input format and hitting the play button on the timeline. SUGARfx Subtitles is available in all host applications. Shown here is the Titles Browser in Final Cut Pro X Help ( the User Manual ) When clicking on the SUGARfx logo you will be directed to a help file. - You can also access the help file when using the FxFactory application, or download it directly from our web site. Parameters Thanks to the OSC functionality of FxFactory, Final Cut Pro X displays some of the most used parameters under the viewer window for quick and easy access, such as the Presets, the Info, input format, font and Export data commands. Presets : Create your own setups and save them for future use, or open a previously prepared setup. You can save presets and exchange them with your colleagues when using the same version of the plug-in and across all supported hosts. Info : The Info button is enabled by default. It provides information about the subtitle data encoded that is being displayed in the timeline and helps in the identification of possible typographical errors, time code miss match or misplacement of subtitles. When the Info button is on, the Canvas window or Viewer shows an overlay on top of the subtitle generator with the approximate Running Time Code (RTC), the current frame in time, the total number of subtitles decoded, the raw IN and OUT time code data for the previous, next and current subtitle, and the corresponding Subtitle text. Attention : The Running Time Code may not be completely accurate and show some discrepancies with the actual time code of the project. This is simply displayed in the info screen for reference and approximation. The actual time code of the timeline of the software should be the accurate reference for you. Edit Text : This is where the text can be typed, edited or imported. Make sure that the Format selection matches the format of the text that you are importing. You can import SubRip SRT, YouTube, Script File (used by Adobe Encore), Final Cut Pro XML Markers, Final Cut Pro 7 Marker Data and User Time Coded (SUGARfx) formatted text to be used with SUGARfx Subtitles, simply open the Text Editor and import the file from your computer. – See the addendum at the end of this file for more information. The User Time code format have to follow certain rules in order to be decoded correctly for accurate placement in the timeline. The format is very simple and easy to type. See the addendum at the end of this file: Text Preparation > User Time code Format for more detailed information. [ Markers ] Additional workflow options include the import of XML files created using the markers in Final Cut Pro X (10.0.7) and later. The markers need to be exported first, and then imported using the Text parameter. See the addendum at the end of this file: Markers > Using Final Cut Pro X for more information. Text Input Format : Select the subtitle text format you are using. –If the format selected does not match the format of the text imported, then the subtitles will not be decoded as expected and they simply wont be displayed. The default selection is UserTC (User Time code Format). There are 6 different import options available, SRT, YouTube generated subtitles (SBV), Script File (used in Adobe Encore), Final Cut Pro X XML exported Markers, FCP7 Markers List data and UserTC. Main Setup Keyable : Makes the background transparent and ready for compositing. Position : Sets the position of the subtitle text anywhere on screen. You can also use the OSC guides provided when the Info parameter is enabled. Drop Frame : By default the filter operates in Non Drop Frame (NDF), however if your project is set to Drop Frame, this button will adjust the processing and display of your subtitles accordingly. AR Correction : Parameter used in host applications that need to be reminded of the Aspect Ratio of the project. Use it only when the subtitles appear to be distorted when using non-square pixel projects. Text Setup Text Color : Color of the subtitles’ typeface. Size : Controls the size of the subtitles text. Alignment Justification : Drop down menu with the options to have the text Centered, Right or Left justified. Keep in mind that the point where the OSC guides cross each other is the anchor point or reference point for the justification. Left justified Center Right justified Vertical Align : The text can be aligned in 3 different ways (Center, Top and Bottom), depending how you want the text to be displayed when the subtitle is a multi-line subtitle. Keep in mind that the point where the OSC guides cross each other is the anchor point or reference point for the vertical alignment. Appearance Appearance : Drop down menu that provides 3 options to display the subtitle tex. These are Fill only, Fill with Stroke and Fill with Shadow. Note: Some fonts may cause undesirable spikes when using a Stroke. Suggestion: Change font or its weight. Stroke-Shadow : Color well that provides the color of the Stroke and the Shadow. Stroke-Shadow : Slider that controls the thickness of the Stroke when the stroke is enabled, or controls the shadow orientation when the shadow is selected. Spacing Lines : Slider that controls the separation or spacing between the lines of text. Use 50 as a default value for most typefaces. Kerning : Controls the letter separation of the subtitles text. Margin : Adjustment of the margin of the subtitles text. Leave this parameter as low as possible and only adjust it when using the Marker data from Final Cut Pro X or 7, or whenever there is a lot of text in the subtitles that goes beyond the side margins. Text Box Color : The color of the Text Box. Intensity : Controls the opacity of the text box. Offset [ sides ] : Adds an additional margin between the text and the border of the text box sideways. Offset [ vertical ] : Adds an additional margin between the text and the border of the text box in the vertical direction. Time Auto Duration : This parameter is available only when the Final Cut Pro X or 7 Markers import format has been selected. The lower the value the shorter the display duration. Since the markers can be created with or without duration, the Auto Duration parameter provides a calculation method to the markers that were created without duration, depending on the total number of characters in the corresponding subtitle text. A recommended value for latin characters is between 15 to 25. See the addendum at the end of this file: Markers > Using Final Cut Pro X for more information. Time Offset : Drop down menu that allows the selection between Frames or Timecode to be used as the unit for offseting the time of the subtitles. Frames [ Offset ] : Enter the number of frames that needs to be offset if the subtitles need to be adjusted only on a specific time in the timeline. The maximum value for this parameter is 900 frames. Timecode [ Offset ] : Enter the time code in the format : 00.00.00.00 that needs to be offset if the subtitles need to be adjusted only on a specific time in the timeline. Data Exchange Export : Drop down menu that allows the Export and conversion of the subtitle data to the selected format. The formats available for Export can be used in a variety of applications including Adobe® Encore and DVD Studio Pro®. Save to... : Use this path chooser to select the location where you want to save the exported file, and give it a name with the .txt extension. Export : Once you have selected the location to save, press this button to save the file. If this button is not pressed, the file will not be saved. (Sometimes the saving process may be a bit stubborn, therefore you may need to press this button a couple of times until you see the file saved to disk). Note: If you want to do additional exports, make sure that you DO NOT OVER-WRITE previously saved exports. To avoid over-writing, press the Save to... button again to create a new file name, and then press the Export button to save the new file with a different name. –Do this for every additional export. Subtitles in Adobe Premiere Pro CC This is how Subtitles looks in Adobe Premiere Pro CC. The functionality of the buttons and parameters is basically the same. Notice that the Export functions (Data Exchange) are located at the end of the list. Look for the Subtitles | SUGARfx category in your Effects list. The previous versions of the plugin may appear in this ist and you can easily recognize them because they will have the word (Obsolete). For any new projects, we recommend that you use the current version of Subtitles. The Canvas or Preview window should look exactly the same as it looks in any other host when the Info button is enabled. The Data Exchange section allows you to convert the current subtitle data and convert it to a format of your choice. The Export drop-down menu will give you the option to select the format for exporting the data. Support Our Technical support team is available to answer your questions via e-mail and should respond as soon as possible. (support@sugarfx.tv) Please visit our web site (http://www.sugarfx.tv) for possible answers to your technical support ­issues, or visit our YouTube channel at (http://www.youtube.com/sugarfxtv) where you may also find a tutorial that will help you find the answer to your question. About Decoding Data Decoding data can be tricky, and there are many variables that go into the preparation of the data, the decoding process, compatibility with the Operating System and its math calculations, the computer logic and other information that may be introduced accidentally by users, during the conversion of data, format updates, etc, and these may have an unexpected effect on the behavior of SUGARfx Subtitles during production. Knowing this, SUGARfx recommends that you try the plug in with a real job, in the environment that you are more familiar with and before you commit to a purchase. Also, check the current system and application requirements to avoid conflicts when updating any part of your configuration. Formats : If new formats become available or updated, please let us know what you need to use, and we will try to implement additional decoders to satisfy our customers’ needs. ADDENDUM - About the SubRip (SRT) format Widely used format : SUGARfx Subtitles is capable of importing standard SubRip (SRT) files. You can have your film’s subtitles produced in this format and import them using SUGARfx Subtitles. File extension : Since the file extension of the SubRip format is .SRT, you don’t need to change it to .TXT in order for SUGARfx Subtitles text import feature to be able to recognize it. Change the extension to .txt only if you need to open it in a text editor on the Mac OSX. Large amount of data : A commercial movie may have around 1200 subtitles, and a file of this magnitude can be imported in SUGARfx Subtitles. Decoding : SUGARfx Subtitles is NOW capable of decoding the styling tags that may be contained in the .srt subtitle format, such as the italic tags or other tags. The tags can be decoded and they will show up in the subtitles as they are supposed to appear. Tags : You can recognize the code for the opening and closing tags in the text as they are contained in triangular brackets that surround the subtitle text, for example the italic tag may look something like this: <i> -Hello </i> SubRip format : You can export your subtitle data to create SubRip formatted text using SUGARfx Subtitles. The SubRip format looks something like this, and we recommend that you do not try to type it because it may not be decoded properly. You must use a SubRip generator instead: Subtitle ID Subtitle Text ( one or two lines) 3 IN and OUT time code data 00:00:14,460 --> 00:00:20,170 SUGARfx Subtitles Pro is capable of displaying hundreds subtitles. Empty line separating subtitles 4 00:00:22,300 --> 00:00:30,000 <i>Enjoy it!.</i> Text with a Tag (supported feature) Note : There may be many sample movie subtitles in .SRT format available for download in the internet. ADDENDUM - Text Preparation > User Timecode Format In order to type your subtitles correctly, you need to know how SUGARfx Subtitles decodes and processes the User TC format text. SUGARfx Subtitles takes every line of the custom text as one subtitle data and decodes it, in other words the end of one line of text is defined by a single RETURN. There should be an empty line (no text at all) between subtitles. The text format is typed using TABs to separate the Subtitle ID, the time code IN and OUT, the main Subtitle text and a RETURN for the second line of the subtitle text (optional). The format should look something like this: 1 TAB00.00.01.00TAB00.00.06.00TAB Welcome to SUGARfx Subtitles. 2 TAB00.00.07.00TAB00.00.12.00TAB Use your own form... RETURN and place it ... 3 TAB00.00.15.00TAB00.00.20.00TAB Subtitles is capable... RETURN displaying... 4 TAB00.00.21.00TAB00.00.25.00TAB Enjoy it! Notice that the format used in the User TC format text contains accurate time code information. The time code should be typed using a period ( . ) to separate the hours, the minutes, the seconds and the frames –This is very important for the decodification process of the time code (Do not use any other characters such as colons ( : ) or commas ( , ). You can use your video editor time code information, such as Final Cut Pro X, to give you the correct timing for the IN and OUT points where the subtitle should appear. Should be typed as : 00.36.09.09 Keep in mind that the second line on a subtitle is Optional (using a RETURN) and it’s not required, unless you want to make two lines on one subtitle and break the paragraph in a specific word, or when the subtitle contains two people talking in the same subtitle time. Attention : The Presets saved when using SUGARfx Subtitles save the subtitle’s text and its parameter adjustments. ADDENDUM - Markers > Using Final Cut Pro X Final Cut Pro X is capable of exporting the marker data created in the timeline, therefore we have developed an import preset that decodes this data to use the marker’s time code and text information as a subtitle workflow creation. Workflow: Setup : Render your final movie or use a compound clip in order to have only one video clip in the timeline. Marker Creation : Hit play to listen to the movie audio, and when a subtitle is needed, press the keyboard combination Option+m to create a marker in the spot where the time line marker is positioned. –This is a regular marker–. Enter the subtitle text using the language keyboard of your choice. The subtitle text should correspond to the audio in this time code location. Regular Markers have no duration, and they will be decoded to use an automatic duration that can be set in the Auto Duration parameter. A marker that can be used for controlled duration is a Chapter Marker. This can be selected by pressing the top third icon when the marker editing box is displayed. The thumbnail pin provides a time code difference that will be decoded as the duration of the subtitle. Set the thumbnail pin ahead in the timeline where the subtitle should end. Export XML : You can export the Final Cut Pro XML file at any time to check your work. Go to the menu File > Export XML... and save it to your hard disk selecting the Basic or General metadata. Import Text : Apply the SUGARfx Subtitles to the video clip in your timeline and select the format [ Markers ] FCPX XML and import the file using the Edit Text button. – You will see that the markers in your timeline match the subtitles displayed in the screen. Changes : Do this process again if you need to make changes, add or delete subtitles. ADDENDUM Exporting subtitle data to another format. Workflow: Step 1 - Setup : Import or create your subtitles using any format or method of creation that contains timecode information. Make sure the correct input format is selected. Make sure that the imported subtitles are being decoded properly before moving forward, by sliding your playhead throughout the duration of the subtitles. If you see any anomalies, be prepared to fix the errors before exporting the subtitle data. Step 2 - Select Export format : Select the output format of your choice from the dropdown menu. Step 3 - Save to... : When you are finished editing or creating your subtitles, click on the button to Save to... a location in your hard drive. Here you can enter the name of the file you are about to export. –Make sure you enter the corresponding file extension ( .srt for SRT files, .txt for the others). Step 4 - Export SRT : Press the button to Export SRT data. You just need to do this once, and the file should be saved in the location you have selected in Step 3. Keep in mind that if you change your subtitle data and press the Export button again, the original file will be over-written and replaced with the new data. To create a new exported file, go back to step 2 and repeat the process. A Note about Automatic Duration: The XML Marker data from Final Cut Pro X may be using the Auto Duration feature, therefore you need to make sure that the duration of the subtitles is “legal” and do not overlap before doing the Export. (Refer to the Auto Duration parameter on page 5 for more information). TIP: For maximum versatility, try exporting the original data to the User Time Code format which is much easier and friendly to edit than the other formats. Import it, and when finished editing, simply choose the Export format of your choice and save it.
