Optics Activities LED Circuit: Making Light with Electronics
advertisement
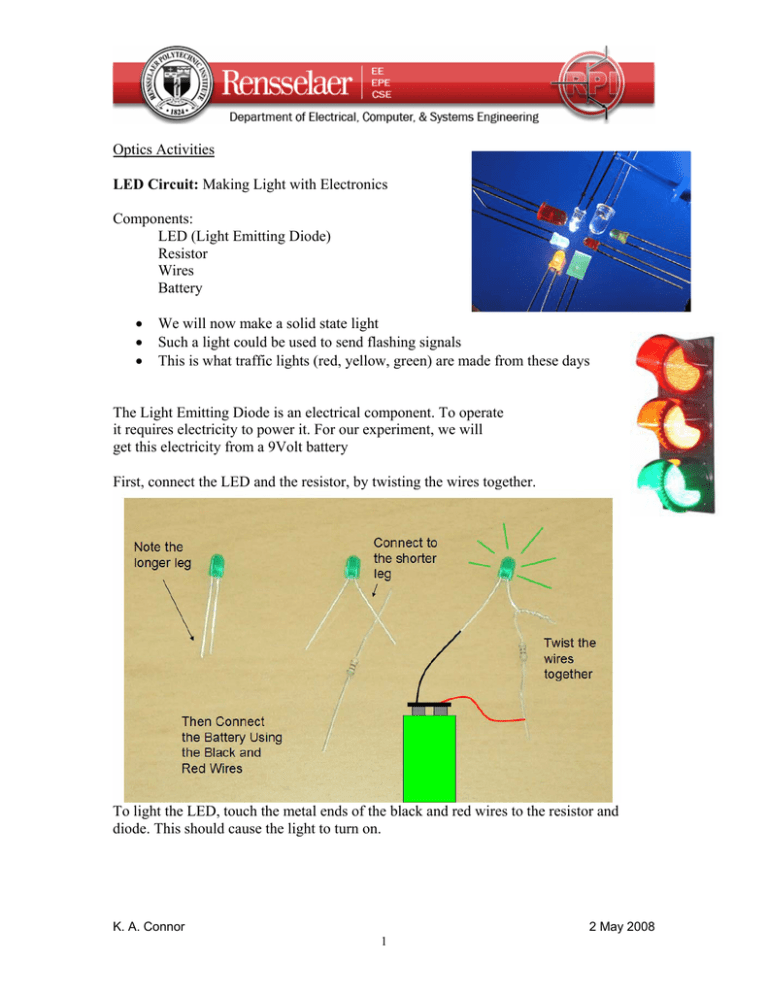
Optics Activities LED Circuit: Making Light with Electronics Components: LED (Light Emitting Diode) Resistor Wires Battery • • • We will now make a solid state light Such a light could be used to send flashing signals This is what traffic lights (red, yellow, green) are made from these days The Light Emitting Diode is an electrical component. To operate it requires electricity to power it. For our experiment, we will get this electricity from a 9Volt battery First, connect the LED and the resistor, by twisting the wires together. To light the LED, touch the metal ends of the black and red wires to the resistor and diode. This should cause the light to turn on. K. A. Connor 2 May 2008 1 Make a List of Some of the Things You Could Do or Make With LEDs: 1. Flashing On-Off Light that reminds us that some electrical device is on and working. 2. 3. 4. 5. Traffic Light K. A. Connor 2 May 2008 2 Using Light to Show Motion – Moving Magnet Makes Light If we drop a strong magnet down a pipe and wrap a coil of wire around the pipe, we will be able to generate electricity. This is the same principle used by the big electrical generators at places like Niagara Falls. (The water going over the falls causes the magnets to move). Drop the magnet down the plastic pipe and watch the LEDs light up as the magnet passes by. Try this with a copper pipe too. What do you observe that is different? K. A. Connor 2 May 2008 3 Mixing Colors – White light is made by mixing red, green and blue light. To see this, go to the web site http://www.omsi.edu/visit/tech/colormix.cfm where the following figure is found: Once at this web site, the slider controls at the lower left hand corner can be used to increase or decrease the amount of red, green or blue light in the figure. With all three at their maximum intensity, they combine to make white light. Use the slider controls to see what colors you can make with red plus green, red plus blue, blue plus green, and all three. K. A. Connor 2 May 2008 4 Optical Signals: Using light to control the operation of televisions, etc. and to send music through the air. • • • • Infrared Light – What is Infrared Light? It is light beyond red that is not visible to us. IR is given off by hot things. There is also ultraviolet light that is beyond blue. UV light gives us sun tans. Cannot be seen by humans Can be seen by digital camera Remote control sends light flashes to TV or any other device it is to control Pushing a button on a remote control causes a particular sequence of light flashes to be sent to the TV or other device that is being controlled. The flashes are like a secret code that only the TV can understand and that we cannot see. 1. Using any available remote control device and a video camera, aim the remote at the camera and observe the light flashes. Can you tell the difference between the flashes sent by different buttons? (No – only the main flash can be seen. The individual flashes occur too fast to be seen by humans but the TV can tell the difference.) 2. Using the same remote control device, aim the remote at the receiver circuit for the audio transmitter and receiver combination (diagram on the next page). The device that receives the IR signal is a photo diode (it looks like an LED). You should be able to hear the pulses of light given off by the remote. Can you describe what they sound like? K. A. Connor 2 May 2008 5 3. In the last step, you have tested the receiver. If you detected the sound produced by the remote, your receiver is working. Now you are to set up the music source and transmitter. Using a music source like an iPod, connect the input cable for the transmitter to the iPod. Making sure that the red LED on the transmitter is pointing directly at the photo diode receiver (looks like an LED) on the receiver, turn on the music signal from the iPod. You should be able to hear the music from the speaker connected to the receiver. a. Block the light from the transmitter to the receiver. The sound from the speaker should stop. b. Move the transmitter and receiver apart. The sound should become weaker. c. Aim the transmitter so it does not send a signal to the receiver. The sound should go away. d. Re-align the transmitter and receiver and cover the entire experiment (transmitter and receiver) with some kind of material that blocks the background light from the room or turn the room lights off. The sound should become stronger. This is because the photo diode senses the increase in light due to the signal from the transmitter. If the room is too bright, it has a hard time seeing the light. K. A. Connor 2 May 2008 6 Other Sources of Light: Observing the colors that make up light Light is made up of all the colors of the rainbow from blue to red. To be able to see the individual colors that make up sunlight, for example, we can use a simple device called a spectroscope. In the picture below, the spectroscope looks like a very small telescope. However, unlike a telescope, it has a small slit at one end that separates the colors into a display that looks like the visible spectrum below. 1. Before we use the spectroscope to look at the kind of light sources made by humans, we should first look at the light from the sun. Go to the nearest window and look out the window through the spectroscope. You should observe something like the picture above (just the colors, without all of the numbers). K. A. Connor 2 May 2008 7 2. Next, observe several artificial light sources – fluorescent lamps, the light from a computer monitor. Note that the light you observe will look different than sunlight because there are bright lines that stand out in the spectrum. An example is shown below, where a type of fluorescent lamp is seen to have many bright lines. The lamps in the classroom will probably not produce this same pattern. Observe at least two different light sources in the classroom and then show where you observe the brightest lines by sketching them on the spectra below. It is a good idea to turn off most other light sources in the room and to have all members of your group observe the light pattern before you sketch it. One of the light sources you can observe is the demonstration neon sign. This sign does not have any purpose except to show the different colors that can be created from electrical discharges of gases. Two different gases are used – neon (for the orange color) and argon (for the blue). You should see very different bright lines for these two gases. K. A. Connor 2 May 2008 8 Light Saber – Another discharge device that looks like the light saber from Star Wars In this device, a light beam is caused to move up a glass tube when the person holding the handle connects the two metal contacts with their thumb or finger To make this more interesting, and to show that we are all good electrical conductors, we will all hold hands and form a circle with the people at the end each making contact with one of the metal contacts. The length of the light beam is determined by how good the contact is, so having many people in the loop will probably make the beam rather short. Each student should, thus, try to turn the beam on by themselves and then see if it is longer or shorter. The red beam is neon and the blue beam is argon. Once the beam is as bright as possible, it should be observed through the spectroscope. K. A. Connor 2 May 2008 9
