INTRODUCTION
www.sonin.com
4 -in-1 Multi Function
Detector
Thank you for choosing a SONIN 4-IN-1 Multi Function Detector.
Your detector is recommended for INDOOR use only. To ensure
proper use of this product and to obtain optimum performance,
be sure to read this manual carefully before use.
DESCRIPTION OF PRODUCT
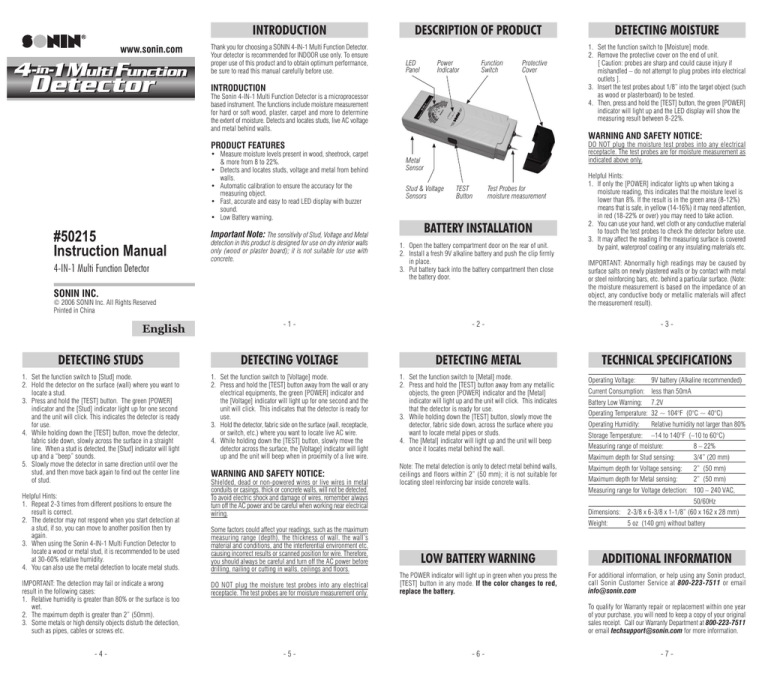
LED
Panel
Power
Indicator
Function
Switch
Protective
Cover
INTRODUCTION
The Sonin 4-IN-1 Multi Function Detector is a microprocessor
based instrument. The functions include moisture measurement
for hard or soft wood, plaster, carpet and more to determine
the extent of moisture. Detects and locates studs, live AC voltage
and metal behind walls.
#50215
Instruction Manual
4-IN-1 Multi Function Detector
Important Note: The sensitivity of Stud, Voltage and Metal
detection in this product is designed for use on dry interior walls
only (wood or plaster board); it is not suitable for use with
concrete.
DO NOT plug the moisture test probes into any electrical
receptacle. The test probes are for moisture measurement as
indicated above only.
Metal
Sensor
Stud & Voltage
Sensors
TEST
Button
Test Probes for
moisture measurement
BATTERY INSTALLATION
1. Open the battery compartment door on the rear of unit.
2. Install a fresh 9V alkaline battery and push the clip firmly
in place.
3. Put battery back into the battery compartment then close
the battery door.
SONIN INC.
© 2006 SONIN Inc. All Rights Reserved
Printed in China
English
-1-
1. Set the function switch to [Moisture] mode.
2. Remove the protective cover on the end of unit.
[ Caution: probes are sharp and could cause injury if
mishandled do not attempt to plug probes into electrical
outlets ].
3. Insert the test probes about 1/8 into the target object (such
as wood or plasterboard) to be tested.
4. Then, press and hold the [TEST] button, the green [POWER]
indicator will light up and the LED display will show the
measuring result between 8-22%.
WARNING AND SAFETY NOTICE:
PRODUCT FEATURES
Measure moisture levels present in wood, sheetrock, carpet
& more from 8 to 22%.
Detects and locates studs, voltage and metal from behind
walls.
Automatic calibration to ensure the accuracy for the
measuring object.
Fast, accurate and easy to read LED display with buzzer
sound.
Low Battery warning.
DETECTING MOISTURE
Helpful Hints:
1. If only the [POWER] indicator lights up when taking a
moisture reading, this indicates that the moisture level is
lower than 8%. If the result is in the green area (8-12%)
means that is safe, in yellow (14-16%) it may need attention,
in red (18-22% or over) you may need to take action.
2. You can use your hand, wet cloth or any conductive material
to touch the test probes to check the detector before use.
3. It may affect the reading if the measuring surface is covered
by paint, waterproof coating or any insulating materials etc.
IMPORTANT: Abnormally high readings may be caused by
surface salts on newly plastered walls or by contact with metal
or steel reinforcing bars, etc. behind a particular surface. (Note:
the moisture measurement is based on the impedance of an
object, any conductive body or metallic materials will affect
the measurement result).
-2-
-3-
TECHNICAL SPECIFICATIONS
DETECTING STUDS
DETECTING VOLTAGE
DETECTING METAL
1. Set the function switch to [Stud] mode.
2. Hold the detector on the surface (wall) where you want to
locate a stud.
3. Press and hold the [TEST] button. The green [POWER]
indicator and the [Stud] indicator light up for one second
and the unit will click. This indicates the detector is ready
for use.
4. While holding down the [TEST] button, move the detector,
fabric side down, slowly across the surface in a straight
line. When a stud is detected, the [Stud] indicator will light
up and a beep sounds.
5. Slowly move the detector in same direction until over the
stud, and then move back again to find out the center line
of stud.
1. Set the function switch to [Voltage] mode.
2. Press and hold the [TEST] button away from the wall or any
electrical equipments, the green [POWER] indicator and
the [Voltage] indicator will light up for one second and the
unit will click. This indicates that the detector is ready for
use.
3. Hold the detector, fabric side on the surface (wall, receptacle,
or switch, etc.) where you want to locate live AC wire.
4. While holding down the [TEST] button, slowly move the
detector across the surface, the [Voltage] indicator will light
up and the unit will beep when in proximity of a live wire.
1. Set the function switch to [Metal] mode.
2. Press and hold the [TEST] button away from any metallic
objects, the green [POWER] indicator and the [Metal]
indicator will light up and the unit will click. This indicates
that the detector is ready for use.
3. While holding down the [TEST] button, slowly move the
detector, fabric side down, across the surface where you
want to locate metal pipes or studs.
4. The [Metal] indicator will light up and the unit will beep
once it locates metal behind the wall.
Operating Voltage:
Note: The metal detection is only to detect metal behind walls,
ceilings and floors within 2 (50 mm); it is not suitable for
locating steel reinforcing bar inside concrete walls.
Helpful Hints:
1. Repeat 2-3 times from different positions to ensure the
result is correct.
2. The detector may not respond when you start detection at
a stud, if so, you can move to another position then try
again.
3. When using the Sonin 4-IN-1 Multi Function Detector to
locate a wood or metal stud, it is recommended to be used
at 30-60% relative humidity.
4. You can also use the metal detection to locate metal studs.
WARNING AND SAFETY NOTICE:
Shielded, dead or non-powered wires or live wires in metal
conduits or casings, thick or concrete walls, will not be detected.
To avoid electric shock and damage of wires, remember always
turn off the AC power and be careful when working near electrical
wiring.
Some factors could affect your readings, such as the maximum
measuring range (depth), the thickness of wall, the walls
material and conditions, and the interferential environment etc,
causing incorrect results or scanned position for wire. Therefore,
you should always be careful and turn off the AC power before
drilling, nailing or cutting in walls, ceilings and floors.
IMPORTANT: The detection may fail or indicate a wrong
result in the following cases:
1. Relative humidity is greater than 80% or the surface is too
wet.
2. The maximum depth is greater than 2 (50mm).
3. Some metals or high density objects disturb the detection,
such as pipes, cables or screws etc.
DO NOT plug the moisture test probes into any electrical
receptacle. The test probes are for moisture measurement only.
-4-
-5-
9V battery (Alkaline recommended)
Current Consumption: less than 50mA
Battery Low Warning:
7.2V
Operating Temperature: 32 ~ 104°F (0°C ~ 40°C)
Operating Humidity:
Relative humidity not larger than 80%
Storage Temperature:
14 to 140°F (10 to 60°C)
Measuring range of moisture:
8 22%
Maximum depth for Stud sensing:
3/4 (20 mm)
Maximum depth for Voltage sensing:
2 (50 mm)
Maximum depth for Metal sensing:
2 (50 mm)
Measuring range for Voltage detection: 100 240 VAC,
50/60Hz
Dimensions: 2-3/8 x 6-3/8 x 1-1/8 (60 x 162 x 28 mm)
Weight:
5 oz (140 gm) without battery
LOW BATTERY WARNING
ADDITIONAL INFORMATION
The POWER indicator will light up in green when you press the
[TEST] button in any mode. If the color changes to red,
replace the battery.
For additional information, or help using any Sonin product,
call Sonin Customer Service at 800-223-7511 or email
info@sonin.com
To qualify for Warranty repair or replacement within one year
of your purchase, you will need to keep a copy of your original
sales receipt. Call our Warranty Department at 800-223-7511
or email techsupport@sonin.com for more information.
-6-
-7-


