Installation Instructions - Stewart Warner Alemite Canada
advertisement
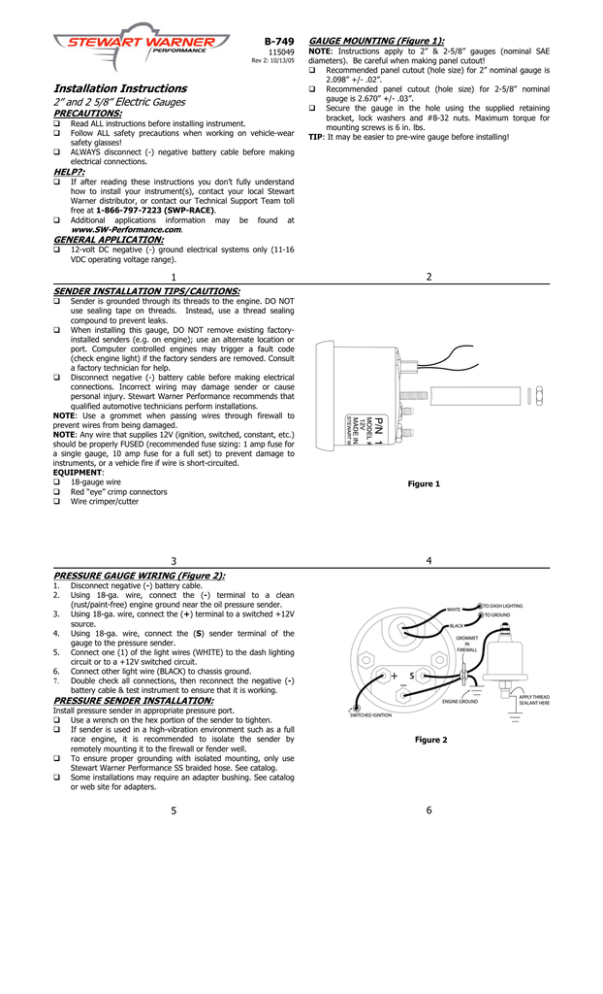
B-749 115049 Rev 2: 10/13/05 Installation Instructions 2” and 2 5/8” Electric Gauges PRECAUTIONS: Read ALL instructions before installing instrument. Follow ALL safety precautions when working on vehicle-wear safety glasses! ALWAYS disconnect (-) negative battery cable before making electrical connections. GAUGE MOUNTING (Figure 1): NOTE: Instructions apply to 2” & 2-5/8” gauges (nominal SAE diameters). Be careful when making panel cutout! Recommended panel cutout (hole size) for 2” nominal gauge is 2.098” +/- .02”. Recommended panel cutout (hole size) for 2-5/8” nominal gauge is 2.670” +/- .03”. Secure the gauge in the hole using the supplied retaining bracket, lock washers and #8-32 nuts. Maximum torque for mounting screws is 6 in. lbs. TIP: It may be easier to pre-wire gauge before installing! HELP?: If after reading these instructions you don’t fully understand how to install your instrument(s), contact your local Stewart Warner distributor, or contact our Technical Support Team toll free at 1-866-797-7223 (SWP-RACE). Additional applications information may be found at www.SW-Performance.com. GENERAL APPLICATION: 12-volt DC negative (-) ground electrical systems only (11-16 VDC operating voltage range). 1 2 SENDER INSTALLATION TIPS/CAUTIONS: Sender is grounded through its threads to the engine. DO NOT use sealing tape on threads. Instead, use a thread sealing compound to prevent leaks. When installing this gauge, DO NOT remove existing factoryinstalled senders (e.g. on engine); use an alternate location or port. Computer controlled engines may trigger a fault code (check engine light) if the factory senders are removed. Consult a factory technician for help. Disconnect negative (-) battery cable before making electrical connections. Incorrect wiring may damage sender or cause personal injury. Stewart Warner Performance recommends that qualified automotive technicians perform installations. NOTE: Use a grommet when passing wires through firewall to prevent wires from being damaged. NOTE: Any wire that supplies 12V (ignition, switched, constant, etc.) should be properly FUSED (recommended fuse sizing: 1 amp fuse for a single gauge, 10 amp fuse for a full set) to prevent damage to instruments, or a vehicle fire if wire is short-circuited. EQUIPMENT: 18-gauge wire Red “eye” crimp connectors Wire crimper/cutter 3 Figure 1 4 PRESSURE GAUGE WIRING (Figure 2): 1. 2. 3. 4. 5. 6. 7. Disconnect negative (-) battery cable. Using 18-ga. wire, connect the (-) terminal to a clean (rust/paint-free) engine ground near the oil pressure sender. Using 18-ga. wire, connect the (+) terminal to a switched +12V source. Using 18-ga. wire, connect the (S) sender terminal of the gauge to the pressure sender. Connect one (1) of the light wires (WHITE) to the dash lighting circuit or to a +12V switched circuit. Connect other light wire (BLACK) to chassis ground. Double check all connections, then reconnect the negative (-) battery cable & test instrument to ensure that it is working. PRESSURE SENDER INSTALLATION: Install pressure sender in appropriate pressure port. Use a wrench on the hex portion of the sender to tighten. If sender is used in a high-vibration environment such as a full race engine, it is recommended to isolate the sender by remotely mounting it to the firewall or fender well. To ensure proper grounding with isolated mounting, only use Stewart Warner Performance SS braided hose. See catalog. Some installations may require an adapter bushing. See catalog or web site for adapters. 5 Figure 2 6 TEMPERATURE GAUGE WIRING (Figure 3): 1. 2. 3. 4. 5. 6. 7. Disconnect negative (-) battery cable. Using 18-ga. wire, connect the (-) terminal to a clean (rust/paint-free) ground surface near the temperature sender. Using 18-ga. wire, connect the (+) terminal to a switched +12V source. Using 18-ga. wire, connect the (S) sender terminal of the gauge to the temperature sender. Connect one (1) of the light wires (WHITE) to the dash lighting circuit or to a +12V switched circuit. Connect other light wire (BLACK) to chassis ground. Double check all connections, then reconnect the negative (-) battery cable & test instrument to ensure that it is working. TEMPERATURE SENDER INSTALLATION: Install Temperature sender in appropriate water, engine oil, or transmission oil port. Use a wrench on the hex portion of the sender to tighten. When installing temperature sender, be sure there is sufficient clearance in the port so the sender is not damaged when it is tightened or by internal moving parts. If the sender is to be used in an oil pan where there is no port, drill a hole, braze the provided adapter into the oil pan, and install the sender in the adapter. Figure 3 8 7 FUEL LEVEL GAUGE WIRING (Figure 4): 1. 2. 3. 4. 5. 6. 7. Disconnect negative (-) battery cable. Using 18-ga. wire, connect the (-) terminal to a clean (rust/paint-free) fuel tank ground. Using 18 gauge wire, connect the (+) terminal to a switched +12V source. Using 18-gauge wire, connect the (S) sender terminal of the gauge to the fuel level sender. Connect one (1) of the light wires (WHITE) to the dash lighting circuit or to a +12V switched circuit. Connect other light wire (BLACK) to chassis ground. Double check all connections, then reconnect the negative (-) battery cable & test instrument to ensure that it is working. Sender Resistance (Ohms) Vehicles Empty Full 240 33 GM before ‘65 0 30 GM ‘65 to present 0 90 Ford and Chrysler vehicles 73 10 Ford Vehicles ‘87 to present 16 158 Stewart Warner Performance Figure 4 10 9 VOLTMETER WIRING (Figure 5): 1. 2. 3. 4. 5. Using 18-ga. wire, connect the (-) terminal to a clean (rust/paint-free) ground. Using 18 gauge wire, connect the (+) terminal to a switched +12V source; This is the voltage that the gauge will indicate. Connect one (1) of the light wires (WHITE) to the dash lighting circuit or to a +12V switched circuit. Connect other light wire (BLACK) to chassis ground. Double check all connections, then reconnect the negative (-) battery cable & test instrument to ensure that it is working. CLEANING DIRECTIONS: For proper cleaning of instrumentation/accessories, use a glass cleaner or mild detergent with a spray on and wipe method. WARRANTY INFORMATION: TWO (2) YEAR LIMITED WARRANTY. SWP products are warranted against defects in workmanship and materials for a period of two (2) years from the date of purchase. Proof-of-purchase is required; otherwise, the warranty period shall default to two (2) years from date-of-manufacture (as indicated by the date code on the product). See detailed Warranty Policy for other Terms & Conditions. STEWART WARNER PERFORMANCE 1-866-SWP-RACE (797-7223) www.stewartwarner.com Figure 5 11 12

