Oil Pressure Gauge - Faria Instruments
advertisement
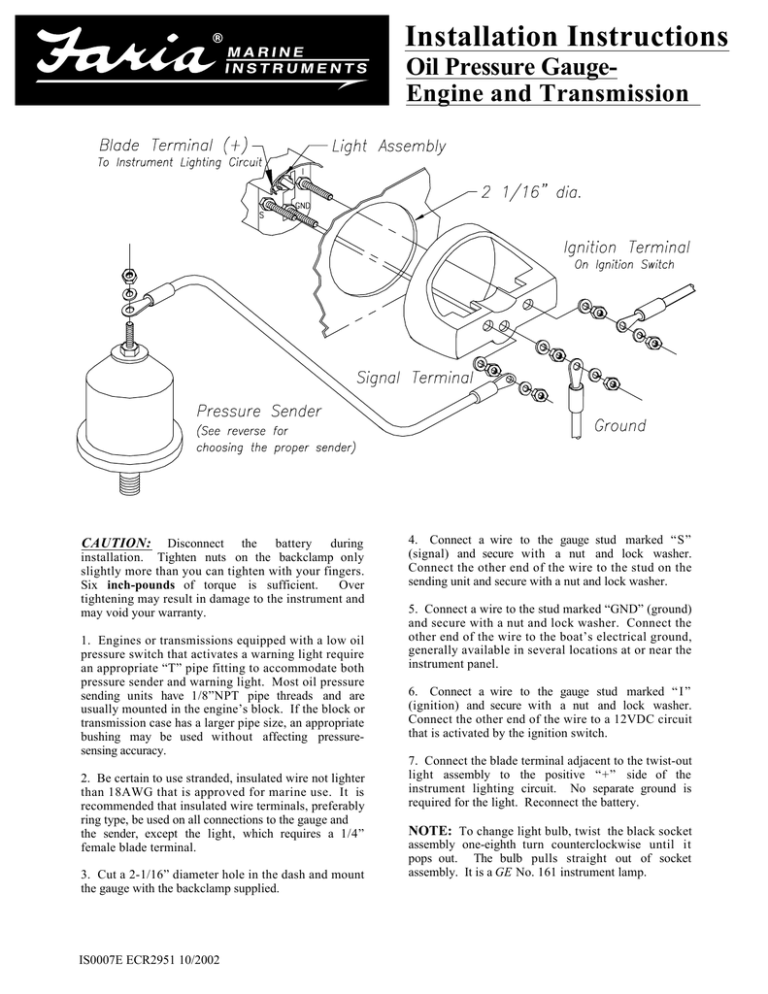
Installation Instructions Oil Pressure GaugeEngine and Transmission CAUTION: Disconnect the battery during installation. Tighten nuts on the backclamp only slightly more than you can tighten with your fingers. Six inch-pounds of torque is sufficient. Over tightening may result in damage to the instrument and may void your warranty. 1. Engines or transmissions equipped with a low oil pressure switch that activates a warning light require an appropriate “T” pipe fitting to accommodate both pressure sender and warning light. Most oil pressure sending units have 1/8”NPT pipe threads and are usually mounted in the engine’s block. If the block or transmission case has a larger pipe size, an appropriate bushing may be used without affecting pressuresensing accuracy. 2. Be certain to use stranded, insulated wire not lighter than 18AWG that is approved for marine use. It is recommended that insulated wire terminals, preferably ring type, be used on all connections to the gauge and the sender, except the light, which requires a 1/4” female blade terminal. 3. Cut a 2-1/16” diameter hole in the dash and mount the gauge with the backclamp supplied. IS0007E ECR2951 10/2002 4. Connect a wire to the gauge stud marked “S” (signal) and secure with a nut and lock washer. Connect the other end of the wire to the stud on the sending unit and secure with a nut and lock washer. 5. Connect a wire to the stud marked “GND” (ground) and secure with a nut and lock washer. Connect the other end of the wire to the boat’s electrical ground, generally available in several locations at or near the instrument panel. 6. Connect a wire to the gauge stud marked “ I ” (ignition) and secure with a nut and lock washer. Connect the other end of the wire to a 12VDC circuit that is activated by the ignition switch. 7. Connect the blade terminal adjacent to the twist-out light assembly to the positive “+” side of the instrument lighting circuit. No separate ground is required for the light. Reconnect the battery. NOTE: To change light bulb, twist the black socket assembly one-eighth turn counterclockwise until it pops out. The bulb pulls straight out of socket assembly. It is a GE No. 161 instrument lamp. Choosing the Proper Sender Senders are designated by the following descriptions and must be selected in combinations of one each from A, B, & C. (For example: Single station, American resistance, Standard ground) A Station a B Resistanceb C Ground c Single Dual American European Standard Floating Notes: a. Station: It is the sender that is unique in a dual station application. The gauge is the same in either single or dual applications. b. Resistance: Choose your sender to electrically match your gauge not just the manufacturer. Some sender manufacturers make both resistance types; and, some instrument manufacturers may use either resistance type depending on the gauge. There is usually no visual way alone to determine the resistance type. c. Ground: Standard ground is the most common having battery negative (-) connected directly to the engine block. Sending units may have one (1) terminal (signal). In a floating ground system, the battery negative is not connected to the engine block so merely threading in the sender does not supply ground. Floating ground senders will have two (2) terminals (signal & ground). Both sender terminals may be wired to the appropriate gauge terminal or the sender’s ground may be wired directly to the battery negative. A floating ground sender may be used in a standard ground system but not vice versa. For technical assistance, contact Faria® Marine Instruments Customer Service between 8:30 a.m. and 5:00 p.m. Eastern time weekdays at (860) 848-9271 or (800) 473-2742. IS0007E ECR2951 10/2002
