ALUM-A-POLE SCAFFOLDING SYSTEM SET
advertisement

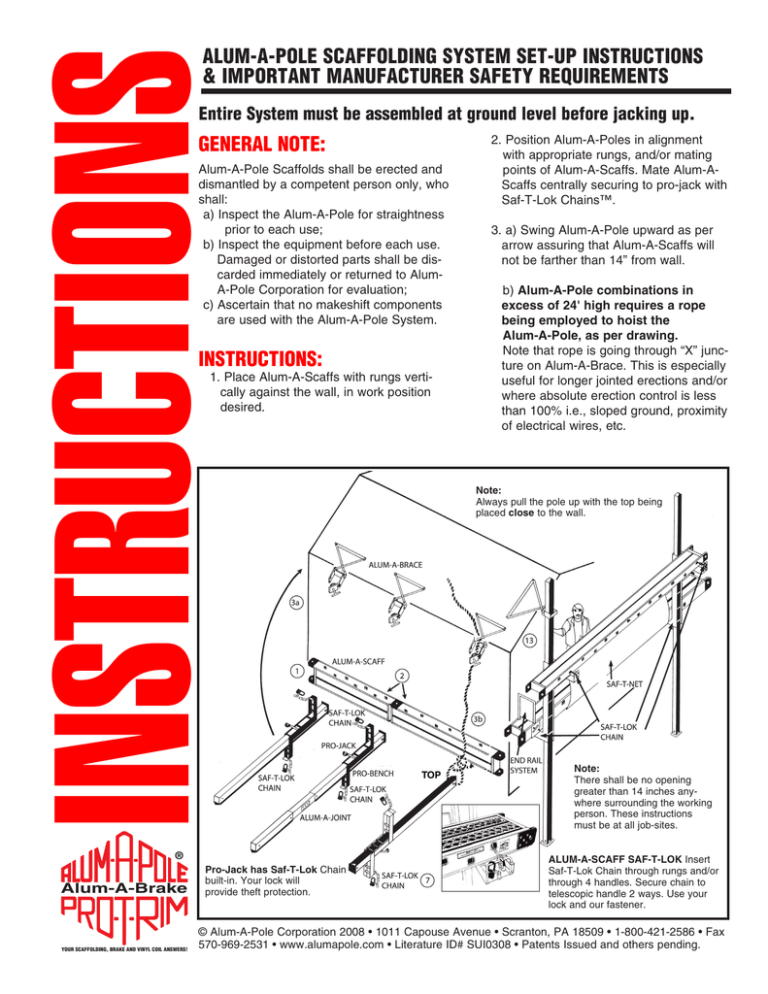
INSTRUCTIONS ALUM-A-POLE SCAFFOLDING SYSTEM SET-UP INSTRUCTIONS & IMPORTANT MANUFACTURER SAFETY REQUIREMENTS Entire System must be assembled at ground level before jacking up. GENERAL NOTE: Alum-A-Pole Scaffolds shall be erected and dismantled by a competent person only, who shall: a) Inspect the Alum-A-Pole for straightness prior to each use; b) Inspect the equipment before each use. Damaged or distorted parts shall be discarded immediately or returned to AlumA-Pole Corporation for evaluation; c) Ascertain that no makeshift components are used with the Alum-A-Pole System. INSTRUCTIONS: 1. Place Alum-A-Scaffs with rungs vertically against the wall, in work position desired. ® Alum-A-Brake YOUR SCAFFOLDING, BRAKE AND VINYL COIL ANSWERS! Pro-Jack has Saf-T-Lok Chain built-in. Your lock will provide theft protection. 2. Position Alum-A-Poles in alignment with appropriate rungs, and/or mating points of Alum-A-Scaffs. Mate Alum-AScaffs centrally securing to pro-jack with Saf-T-Lok Chains™. 3. a) Swing Alum-A-Pole upward as per arrow assuring that Alum-A-Scaffs will not be farther than 14” from wall. b) Alum-A-Pole combinations in excess of 24' high requires a rope being employed to hoist the Alum-A-Pole, as per drawing. Note that rope is going through “X” juncture on Alum-A-Brace. This is especially useful for longer jointed erections and/or where absolute erection control is less than 100% i.e., sloped ground, proximity of electrical wires, etc. Note: Always pull the pole up with the top being placed close to the wall. Note: There shall be no opening greater than 14 inches anywhere surrounding the working person. These instructions must be at all job-sites. ALUM-A-SCAFF SAF-T-LOK Insert Saf-T-Lok Chain through rungs and/or through 4 handles. Secure chain to telescopic handle 2 ways. Use your lock and our fastener. © Alum-A-Pole Corporation 2008 • 1011 Capouse Avenue • Scranton, PA 18509 • 1-800-421-2586 • Fax 570-969-2531 • www.alumapole.com • Literature ID# SUI0308 • Patents Issued and others pending. INSTRUCTIONS ALUM-A-POLE SCAFFOLDING SYSTEM SET-UP INSTRUCTIONS & IMPORTANT MANUFACTURER SAFETY REQUIREMENTS 4. Secure Alum-A-Brace to Alum-A-Poles. Alum-A-Brace must be secured to structure with Alum-A-Screws™ or 3” type AB screws, or the equivalent in holding power. A minimum of 4 Alum-A-Screws must be used with each Alum-A-Brace. a) Up to 24’, one roof or wall brace is required; b) Above 24’, in height intermediate braces are required, with a maximum of 16’ vertical brace spacing anywhere on the pole or poles. c) A competent person shall ascertain that the braces are fastened to solid material having the holding power of 1/2” plywood at least. This equates to a minimum of 5ft./lbs. of torque on secured brace screw head. Do not secure Alum-A-Braces more than 16’ vertically apart when working over a 24’ shoulder working height. Alum-A-Poles braced properly may be used to a maximum shoulder working height of 50’. 5. The easiest way to install a brace is first securing the brace to the pole. Then push the pole out to a plumb position. Being vertical is very important. Finally, fasten brace to structure with screws. 6. Passing an Alum-A-Brace is accomplished by the worker assuming a prone position on the Alum-A-Scaff both to release and reattach brace, after passing the released brace with the Pro-Jack. No work load is permitted during this process. Alum-A-Brake 14. Saf-T-Lok Chains must be used at all heights. 15. Pro-Jack pumping handles must be in uppermost position before descending. 16. Do not raise any one pump-jack more than 15° higher than the adjacent pumpjack. This is for erection purposes only. All work must be done on a horizontal plane. 17. All Alum-A-Poles shall bear on adequate firm foundations. When working on soil, 2 plates of 1’X1’X3/4” plywood shall be nailed together forming a sill plate. The Mud Sill, that comes with Alum-A-Pole, shall be spiked to the sill plate. 18. Do not extend access ladder more than 36” above standing platform. 19. Always cordon off area below working area, unless there will be absolutely no one at lower levels. 20. If the Alum-A-Pole Scaffolding System is used in the absence of a wall, then a four-sided guardrail system must be installed. 21. Do not exceed maximum allowable load of 500 lbs. (consisting of 2-man/400 lbs. and 100 lbs. for box of siding and tools). 22. Never throw or drop any equipment to the ground. 8. Install Simm’s Saf-T-Net™ System as per attached pictorial literature. Access above ground level is via a ladder. An opening in the Simm’s Saf-T-Net is made to accommodate this ladder. This opening must be closed after access to the working platform has been completed. 23. Do not work when weather threatens safety. 10. Do not install Alum-A-Scaff standing platform more than 14” from wall. There shall be no opening greater than 14” anywhere surrounding the working person. 11. Do not stand on the Alum-A-Scaff workbench. YOUR SCAFFOLDING, BRAKE AND VINYL COIL ANSWERS! 13. The Simm’s Saf-T-Rail or Saf-T-Net System must be installed at all heights. 7. Secure Alum-A-Scaffs to Pro-Jacks and Pro-Benches with Saf-T-Lok Chains. 9. Do not intermix other manufacturer’s products with Alum-A-Pole Scaffolding System. Wooden poles may not be used with any Alum-A-Pole products. ® 12. Secure all materials, tools, etc., to workbench. 24. Apply 2-3 drops of 3 in 1 oil or equivalent once a month to bushings on crank assembly on the jack. See label on jack. 25. Alum-A-Pole products are sold with no liability for improper use. Knowledge in the proper use of our system is not implied by purchase. Persons purchasing the Alum-A-Pole Scaffolding System must abide by all regulations pertaining to its use. 26. Follow all instructions on each individual product. 27. Follow all local and other government regulations.

