Tel-Lynx Guardian Plus Start Up Guide
Thank you for purchasing the Guardian Plus! Your box should contain a Start Up Guide, Reference Guide, power
supply, 4-wire telephone cable, USB cable, L1/L2 splitter, and Tel-Lynx unit.
Please read through these instructions before you begin
set up. Any time you press f at the dial tone, you'll hear
instructions on your telephone's handset or speaker phone. You
don't have to wait for Tel-Lynx to finish speaking to take action.
Also, caller ID service is not required to use Tel-Lynx, but if
you don't have it, every caller will be asked to say their name
every time they call in.
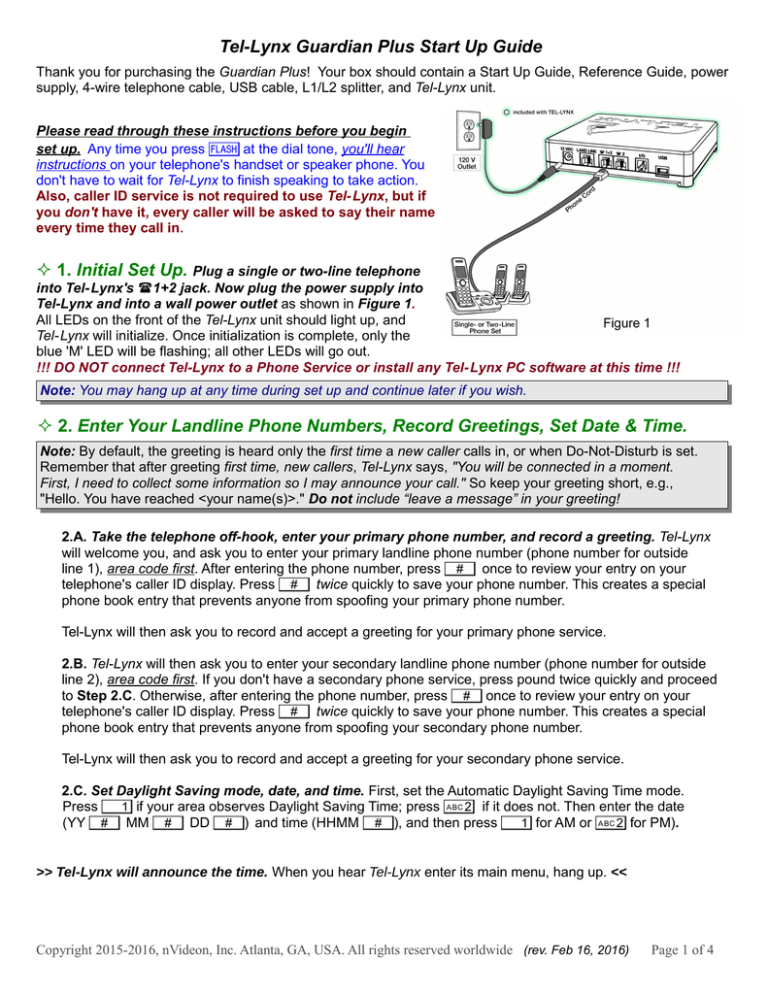
1. Initial Set Up. Plug a single or two-line telephone
into Tel-Lynx's (1+2 jack. Now plug the power supply into
Tel-Lynx and into a wall power outlet as shown in Figure 1.
All LEDs on the front of the Tel-Lynx unit should light up, and
Tel-Lynx will initialize. Once initialization is complete, only the
blue 'M' LED will be flashing; all other LEDs will go out.
!!! DO NOT connect Tel-Lynx to a Phone Service or install any Tel-Lynx PC software at this time !!!
Note: You may hang up at any time during set up and continue later if you wish.
2. Enter Your Landline Phone Numbers, Record Greetings, Set Date & Time.
Note: By default, the greeting is heard only the first time a new caller calls in, or when Do-Not-Disturb is set.
Remember that after greeting first time, new callers, Tel-Lynx says, "You will be connected in a moment.
First, I need to collect some information so I may announce your call." So keep your greeting short, e.g.,
"Hello. You have reached <your name(s)>." Do not include “leave a message” in your greeting!
2.A. Take the telephone off-hook, enter your primary phone number, and record a greeting. Tel-Lynx
will welcome you, and ask you to enter your primary landline phone number (phone number for outside
line 1), area code first. After entering the phone number, press # once to review your entry on your
telephone's caller ID display. Press # twice quickly to save your phone number. This creates a special
phone book entry that prevents anyone from spoofing your primary phone number.
Tel-Lynx will then ask you to record and accept a greeting for your primary phone service.
2.B. Tel-Lynx will then ask you to enter your secondary landline phone number (phone number for outside
line 2), area code first. If you don't have a secondary phone service, press pound twice quickly and proceed
to Step 2.C. Otherwise, after entering the phone number, press # once to review your entry on your
telephone's caller ID display. Press # twice quickly to save your phone number. This creates a special
phone book entry that prevents anyone from spoofing your secondary phone number.
Tel-Lynx will then ask you to record and accept a greeting for your secondary phone service.
2.C. Set Daylight Saving mode, date, and time. First, set the Automatic Daylight Saving Time mode.
Press 1 if your area observes Daylight Saving Time; press 2 if it does not. Then enter the date
(YY # MM # DD #) and time (HHMM #), and then press 1 for AM or 2 for PM).
>> Tel-Lynx will announce the time. When you hear Tel-Lynx enter its main menu, hang up. <<
Copyright 2015-2016, nVideon, Inc. Atlanta, GA, USA. All rights reserved worldwide (rev. Feb 16, 2016)
Page 1 of 4
3. Connect Your Phone Service.
Connect your Tel-Lynx unit between your phone service on outside line 1
and your telephone(s).
3.A. If both of your phone services are provided by your local
telephone company, use the provided telephone cord to
connect Tel-Lynx's LANDLINE jack to a wall jack providing
both phone services (See Figure 2). The LEDs for outside
line 1 and outside line 2 will now be dimly lit, indicating that
your phone services are connected and ready for use. Skip to
Step 3.C.
3.B. If one or both of your phone services are provided by a
stand-alone phone system such as cable phone service,
AT&T U- verse, Ooma®Telo, magicJack, Verizon Wireless
Home Service, AT&T Wireless Home Service,
Straight Talk® Home Phone Service, or another VoIP
or wireless home service, plug the provided L1/L2 Splitter
into the LANDLINE jack on Tel-Lynx. Then plug your primary
phone service into the L1 jack (outside line 1) on the
splitter and your secondary phone service into the L2 jack
(outside line 2) on the splitter (See Figure 3). The LEDs
for outside line 1 and outside line 2 will now be dimly lit,
indicating that your phone services are connected and
ready for use.
3.C.
Be sure to disconnect your telephone(s)
from all other wall jacks. You can leave a corded
telephone with its ringer off connected to a wall jack
for emergencies. If you have a second single-line
telephone set, you can attach it to Tel-Lynx's (2 jack
(inside line 2).
4. Calibrating the Landline(s)
At the dial tone, press f 7 1 2 3 4,
then press 8 7. Tel-Lynx will respond by saying “Please wait” several
times. Then it will say “Updated”. If you ever change landline phone services, you should perform this calibration
again. This ensures that Tel-Lynx performs the best landline echo cancellation possible.
5. Congratulations!
You're ready to start making and taking calls.
Tel-Lynx is now set up in direct dialing mode, without Dial-By-Name or Distinctive Ringing. To make a call, pick
up a telephone handset that’s connected to Tel-Lynx, and dial at the dial tone as usual. Calls placed on inside line
1 will, by default, go out on outside line 1. Calls placed on inside line 2 will, by default, go out on outside line 2. If
the the default outside line is in use, the call will be placed on the other outside line. You can select which line a
call will be placed on by pressing #, then the line number (1 or 2) at the dial tone before dialing the
phone number.
Copyright 2015-2016, nVideon, Inc. Atlanta, GA, USA. All rights reserved worldwide (rev. Feb 16, 2016)
Page 2 of 4
6. Answering Calls.
Calls that come in on either outside line will ring both inside lines by default. This behavior can be changed by
adding users to Tel-Lynx and assigning users to a particular outside line. See the Tel-Lynx User's Guide at
www.tel-lynx.com/manuals, Tel-Lynx Main Menu, Set Up Users and Voice Mail for more details.
Tel-Lynx maintains two lists of qualified callers: the "phone book", and the "new call list". By default, a caller in the
phone book gets right through, and when you answer, you're talking directly to them. When a caller not in the
phone book or new call list calls in, they go through a one-time qualification process where they must press a key,
record their name, and select the type of phone they're calling from (home, mobile, work, etc.). If qualified, they're
placed on the new call list and they're allowed through.
In the default announcement mode, calls from everyone on the new call list are announced, and you may further
screen their call. You'll hear the caller's name, and then you'll be asked to press 1 to connect or press 2 to
send the call to voice mail. You can also block the caller without having to speak with them.
You can easily move new callers to the phone book. At the dial tone, press f 3 1 to access new
callers. When you find the new caller you want to move to the phone book, press 1 and follow Tel-Lynx's
directions. New callers are kept in chronological order, making it easy to access the most recent calls first.
You can set the caller announcement mode to: 1) announce no callers, 2) announce only callers on the new
call list you have yet to speak with, 3) announce all callers on the new call list (default), or 4) announce all callers.
To change this mode, at the dial tone, press f 7 1 2 3 4, then 1 9 7.
Note: In any announcement mode, if you answer and immediately press f, you'll hear the caller announced
and have the option to further screen their call.
7. Voice Mail.
Tel-Lynx's voice mail (recommended), do one of the following:
F To1)use
With existing phone company voice mail: disable it, or add a user to Tel-Lynx. To add a user, take
your telephone off-hook, press f 7 1 2 3 4 to enter set up, and then press
3 1 1 and follow Tel-Lynx's directions. You will record and confirm the user's voice tag (say their
name), and then enter their name using the telephone keypad (see Step 9). Then hang up.
2) With an existing answering machine: disable it, or set its ring delay higher than Tel-Lynx's ring delay
(default 6 rings).
to use your phone company-provided voice mail or your existing answering machine,
F Tosetcontinue
Tel-Lynx's voice mail ring delay (default 6 rings) to a longer delay than your phone company's voice mail
(or answering machine). Take your telephone off-hook and press f 7 1 2 3 4 to enter
set up. Then press 3 3, enter the desired ring delay time, and then press #. Tel-Lynx will confirm
the number of rings you set, and then you can hang up. When using your existing answering machine, you
must set Tel-Lynx's caller announcement mode to announce no callers (See Step 6 above).
8. Setting up the Tel-Lynx Phone Book.
You can either let callers call in and get qualified on their first call, or you can pre-qualify them by entering
them into Tel-Lynx's phone book. To import and manage contacts using a PC, download the PC server software at
www.tel-lynx.com/software. Download the instructions at www.tel-lynx.com/manuals, User's Guide,
Managing Tel-Lynx's Phone Book.
If you want to add contacts using your telephone, at the dial tone, press f 3 2 and follow the
instructions (see instructions for entering names in Step 9). Always include the area code when entering phone
numbers into Tel-Lynx's phone book, even if you don't normally dial the area code for that number. For
international numbers, enter '011' and then the phone number.
You can enter doctors' office and pharmacy numbers, emergency weather notification numbers, etc., into
your Tel-Lynx phone book so their automated calls will get through. At the dial tone, press f 3 2 and
follow Tel-Lynx's instructions to add a contact. Set the contact type to Normal (or Emergency for emergency
weather notification calls). If set to Normal, now press 1 2 # 8 to set the person normally called to
“Anyone Only”. Now hang up.
Copyright 2015-2016, nVideon, Inc. Atlanta, GA, USA. All rights reserved worldwide (rev. Feb 16, 2016)
Page 3 of 4
9. Entering Names Using Your Telephone.
To enter the name of a user or a phone book contact, for each letter in the name, repeatedly press a key the
number of times that correspond to the position of the letter on the key.
For example, press 2 once for A, twice quickly for B, three times quickly for C, and four times quickly for
2. After you pause, Tel-Lynx will translate the key press(es) into the letter, and when you hear the name of the
letter you just entered, you can continue. Press # to view your entry on the caller ID screen; press # #
to confirm; press * to delete the last character you entered.
10. Security Code for Set Up.
Your default security code is 1 2 3 4. You can change it in the Set Up Menu (at the dial tone,
press f 7 1 2 3 4 6). Then enter your new 4-digit security code. Then press # to
see your code on the caller ID screen, and press # twice quickly to commit your new code. Write down the
new security code and keep it in a safe place. If you lose it, you must use a PC to perform a password reset.
11. Advanced Features.
For Dial-By-Name, Speed Dialing, Distinctive Ringing, Call Forwarding to Mobiles, Skype, and other advanced
features, see the Tel-Lynx Advanced Set Up Guide at www.tel-lynx.com/manuals.
Download the PC Software: www.tel-lynx.com/software .
See the Tel-Lynx User’s Guide: www.tel-lynx.com/manuals for important safety and user information.
Sign Up for News & Software Updates: www.tel-lynx.com/updates
Contact Us: www.tel-lynx.com/contact We want to address any questions or feedback!
!!! Please contact us if you have any problems or need help with these instructions !!!
Copyright 2015-2016, nVideon, Inc. Atlanta, GA, USA. All rights reserved worldwide (rev. Feb 16, 2016)
Page 4 of 4

