Bizarre Tesla Coil
MENU
HOME
CATEGORIES
INDEX
WHAT'S NEW
FAQS
LINKS
CONTACT
SUBMIT
SITE HISTORY
CREDITS
AWARDS
LINK TO
DISCLAIMER
Construction of a Tesla coil
This is an article that appeared in Experimental Electricity for Boys by Willard Doan,
published in 1959. It is a fairly simple project, however some of the materials may no
longer be readily available, and the next best substitution will need to be found.
WARNING! This project involves high voltage electricity, and is therefore very
dangerous, so use extreme caution. This is part of a series of three pages, which also
includes companion articles on building a secondary coil and a leyden jar. All text and
illustrations in this article are by Willard Doan. Links to the illustrations are listed at
the end of this page. I am not expert in building these things, so I probably won't be
much help answering your questions. This article is here primarily for historical
reasons. Sorry this doesn't include metric dimensions, but this is an old book from the
U.S., after all!
A TRANSFORMER, which will demonstrate one method of generating high
frequencies and some of their interesting characteristics may be very easily and
inexpensively made. This particular type of transformer is known as the Tesla coil after
its inventor, Nikola Tesla. Unlike low-frequency transformers, it has an air core, and no
iron is used in it construction
A short explanation of how the Tesla Coil converts the low-frequency ac into
high-frequency ac is first necessary.
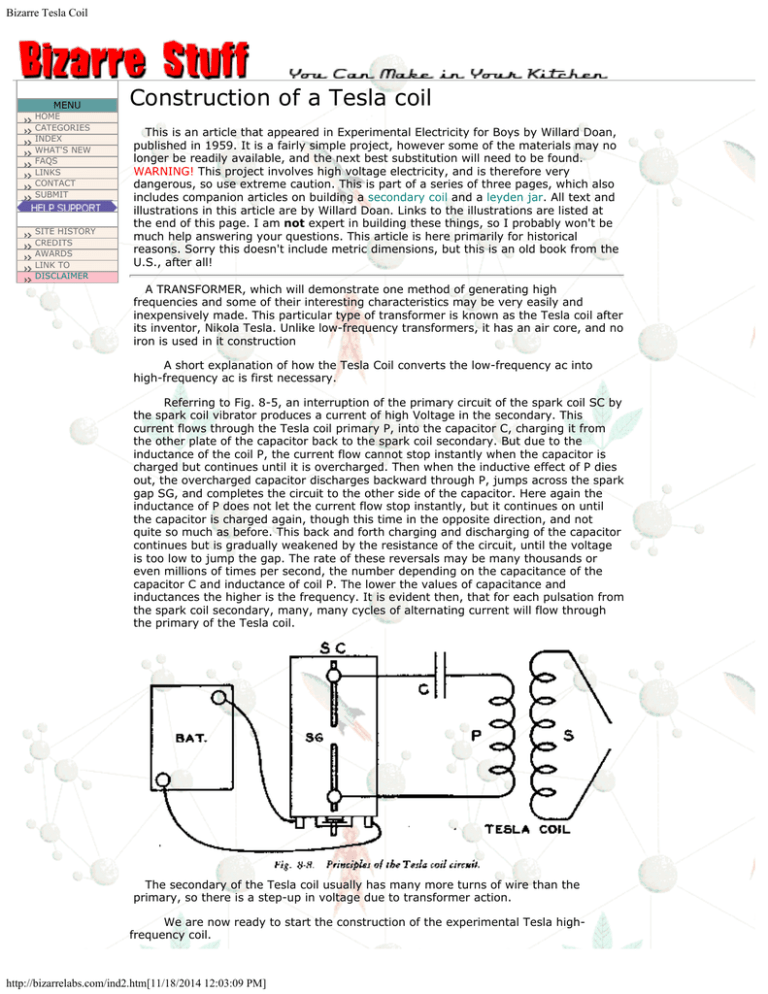
Referring to Fig. 8-5, an interruption of the primary circuit of the spark coil SC by
the spark coil vibrator produces a current of high Voltage in the secondary. This
current flows through the Tesla coil primary P, into the capacitor C, charging it from
the other plate of the capacitor back to the spark coil secondary. But due to the
inductance of the coil P, the current flow cannot stop instantly when the capacitor is
charged but continues until it is overcharged. Then when the inductive effect of P dies
out, the overcharged capacitor discharges backward through P, jumps across the spark
gap SG, and completes the circuit to the other side of the capacitor. Here again the
inductance of P does not let the current flow stop instantly, but it continues on until
the capacitor is charged again, though this time in the opposite direction, and not
quite so much as before. This back and forth charging and discharging of the capacitor
continues but is gradually weakened by the resistance of the circuit, until the voltage
is too low to jump the gap. The rate of these reversals may be many thousands or
even millions of times per second, the number depending on the capacitance of the
capacitor C and inductance of coil P. The lower the values of capacitance and
inductances the higher is the frequency. It is evident then, that for each pulsation from
the spark coil secondary, many, many cycles of alternating current will flow through
the primary of the Tesla coil.
The secondary of the Tesla coil usually has many more turns of wire than the
primary, so there is a step-up in voltage due to transformer action.
We are now ready to start the construction of the experimental Tesla highfrequency coil.
http://bizarrelabs.com/ind2.htm[11/18/2014 12:03:09 PM]
Bizarre Tesla Coil
Materials
one cardboard mailing tube, 12 inches long, 2 inches outside diameter
500 feet or 1/4 pound of No. 29 enameled copper magnet wire
20 feet No. 10 enameled copper magnet wire
one sheet of bakelite, hard-rubber, lucite, or wood, 8 by 9 inches, 1/8 inch thick
piece of soft wood, 3 by 6 by 3/4 inches
one sheet of "Empire" cloth, 12 by 48 inches
two 8-32 brass machine screws, 1 1/4 inches long
four 8-32 brass nuts
4 washers to fit 8-32 screws
two small battery clips
paraffin wax
model-maker's or radio service cement
We shall begin by constructing the secondary winding. It may be wound on a
cardboard mailing tube, 2 inches outside diameter and 12 inches long. Soak the tube
thoroughly in hot paraffin until it is impregnated with the wax.
Wind on this tube one layer of No. 29 enameled magnet wire, leaving about 3/16
inch of the tube uncovered by the wire at each end. Fasten the ends of the wire by
threading them through two small holes punched through the tube at each end,
leaving several inches for connections.
With a coping saw, cut two disks out of soft wood to fit in the ends of the tube.
Smooth with a file, then soak them in melted paraffin. Drill a hole in the center of each
disk for an 8-32 machine screw 1 1/4 inches long. Insert the screws in the disks and
tighten a nut on each one.
Cement a disk in one end of the secondary coil with the head of the terminal
screw inward and attach the coil to the screw. Do not mount the other disk until after
the secondary coil has been assembled inside the primary coil.
Over the secondary winding wrap 6 or more layers of "Empire" cloth or paper to
insulate it from the primary. These may be fastened in place with cellulose tape or by
cement.
The construction of the primary coil comes next. The frame for it is illustrated in
Fig. 8-9. It may be made of any good insulating material, such as 1/8-inch thick
bakelite, hard rubber, Lucite, or even paraffined wood. The pieces are cut and drilled
as in the illustration, but are not to be assembled yet. Assembling must be done in
conjunction with the forming of the primary coil.
http://bizarrelabs.com/ind2.htm[11/18/2014 12:03:09 PM]
Bizarre Tesla Coil
This coil consists of 14 turns of No. 10 enameled or bare copper wire. Before
beginning to assemble the coil and frame, form the coil to approximately the proper
size, which is 4 3/4 inches in diameter. Next, thread it into the supporting strips,
starting in a hole at one end of one strip after another. Screw the coil clown until it has
passed through all the holes of all the strips. Separate the strips until they are
arranged at approximately 90-degree intervals around the coil.
When this operation is completed, it will usually be found that the coil is not the
right size. Adjust the coil for size as follows: first stand it on one end. If it is too small,
take strip No. 1, and continuing around and around the coil, slide the top end of each
strip about one half inch toward the free end of the wire. This gradually threads in
more wire, increasing the diameter of the turns.
When the proper size has been obtained, turn the coil over and adjust the other
end the same way. It should be evident that the wire should not be cut off until the
coil is the correct size. If the coil is too large at the start, the supporting strips should
be slid in the opposite direction. If both coils are made to the sizes suggested, about
20 feet of wire will be required for the primary coil and 500 feet for the secondary coil.
If the secondary coil happens to be slightly larger in diameter than that
suggested, make the primary inside diameter at least 2 3/4 inches larger than the
secondary. This is to lessen the danger of the secondary discharge jumping into the
primary circuit and causing damage.
After the primary coil has been properly sized, the end pieces of the frame may
be slipped into place. The size given in Fig. 8-9 for these end pieces is for a primary
coil 4 3/4 inches inside diameter. If a larger coil is made, the end pieces must be
proportionately larger. If there is much variation in dimensions from those given for
either the primary or secondary coils, some experimenting with the number of turns in
the primary will be required for best results.
After the primary coil is completed and the frame assembled, slip the secondary
coil through the holes in the ends of the frame, centering it so it projects equally from
each end of the primary coil. Slip the remaining end disk in the secondary coil form
and connect the end of the coil to the terminal screw. Cement the coil in place and
secure all the joints in the frame with service cement. The finished coil is shown in Fig.
8-10.
In operation, the Tesla coil is connected as shown in Fig. 8-1 1 The spark coil
described in Chap. 7 will excite it. Use either a 6-volt storage battery or a transformer
capable of supplying 8 to 12 volts and about 4 amperes for power. The higher a-c
voltage is required because of the inductance of the spark-coil primary. Most electrical
equipment having inductive coils and constructed to operate on either ac or dc
requires a higher voltage on ac than on dc to obtain the same results, because of the
inductive reactance of the coils.
http://bizarrelabs.com/ind2.htm[11/18/2014 12:03:09 PM]
Bizarre Tesla Coil
The spark gap is formed by attaching two pieces of wire to the spark-coil secondary
terminals. The best adjustment is usually the longest gap that will allow a steady
spark. The Leyden jar capacitor is described in Chap 2. Use short pieces of electric
light cord for connections. They should be as short as possible. Two small battery clips
may be purchased from an auto parts store and fastened to two of the connections.
They may be clipped to various points on the primary of the Tesla coil until the best
secondary discharge is obtained. Do not under any circumstances touch the primary
circuit of the Tesla coil while the current is turned on, as severe shock and injury may
result.
EXPERIMENTS WITH THE TESLA COIL
Some spectacular experiments may be performed with this Tesla coil in a darkened
room. A burned-out fluorescent light tube held in one hand will light when the highfrequency spark jumps to one end of it. A 300- to 500-watt incandescent light bulb
produces a very beautiful effect when held by the glass and placed so the spark jumps
to the base of the bulb. Small neon bulbs light with their characteristic rose color when
the spark is attracted. These experiments are performed using only one terminal of
the Tesla coil secondary.
If two stiff wires are connected to the secondary terminals of the Tesla coil and
bent so they are parallel to each other for a distance of 3 or 4 inches, but separated
slightly farther than the spark can jump, the area between them will be filled with
innumerable tendrils of violet light. A wheel or cone of light tendrils may be formed by
bending the end of one wire into a circleabout 3 or 4 inches in diameter, and pointing
the end of the wire attached to the other secondary terminal at the center of the
formed circle. A very interesting experiment may be performed as follows: take a glass
jar like that used for the Leyden jar and put a coating of tinfoil on the inside as was
done in constructing the Leyden jar. This tinfoil coating is connected to one secondary
terminal of the Tesla coil. A very fine wire is formed into letters and stuck to the
outside of the jar. When this wire is connected to the other secondary terminal of the
Tesla coil, the letters will glow with a weird violet light.
All these experiments must be performed in a dark room. It may be necessary to
shield the spark gap with a small wooden or cardboard box making sure it is not set
afire by the spark. Many more interesting experiments may be devised, taking great
care to avoid shocks and burns. Keep your face away from any object connected to
either coil.
The frequency of the voltage in the Tesla coil will probably be in the
neighborhood of 2000 kilocycles (2 million cycles). While the voltage is high, the
current is low, and since high-frequency currents travel almost entirely at the surface
of a conductor, the current does not produce much of a shock when passing through
the body. However it will burn the skin at the point where the spark strikes it. This
may be avoided by holding a piece of metal in the hand and letting the spark jump to
it.
Care should be taken that the operation of the coil does not interfere with nearby
radio receivers. It might be well to operate the coil only for short periods at a time,
and not too frequently.
TOP
| HOME
| INDEX | CATEGORIES
http://bizarrelabs.com
© 1997-114 Brian CarusellaAll rights reserved.
Quotes and images not my own remain in the
copyright of the originator or else in the public
domain.
Last updated Dec 30, 2008
http://bizarrelabs.com/ind2.htm[11/18/2014 12:03:09 PM]


