Installation Instructions for the
18PA1 Terminal Block
Issue 2
81031
WARNING
PERSONAL INJURY
DO NOT USE these products as safety or emergency stop
devices or in any other application where failure of the product
could result in personal injury.
Failure to comply with these instructions could result in
death or serious injury.
MOUNTING
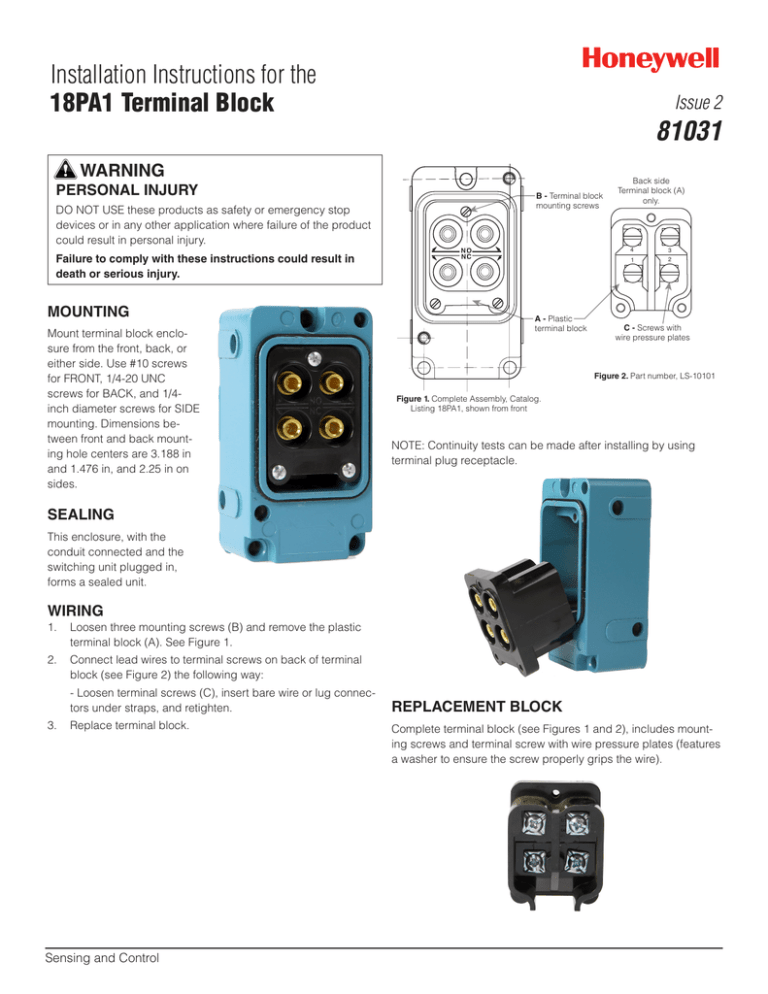
Mount terminal block enclosure from the front, back, or
either side. Use #10 screws
for FRONT, 1/4-20 UNC
screws for BACK, and 1/4inch diameter screws for SIDE
mounting. Dimensions between front and back mounting hole centers are 3.188 in
and 1.476 in, and 2.25 in on
sides.
B - Terminal block
mounting screws
NO
NC
A - Plastic
terminal block
Back side
Terminal block (A)
only.
4
3
1
2
C - Screws with
wire pressure plates
Figure 2. Part number, LS-10101
Figure 1. Complete Assembly, Catalog.
Listing 18PA1, shown from front
NOTE: Continuity tests can be made after installing by using
terminal plug receptacle.
SEALING
This enclosure, with the
conduit connected and the
switching unit plugged in,
forms a sealed unit.
WIRING
1. Loosen three mounting screws (B) and remove the plastic
terminal block (A). See Figure 1.
2. Connect lead wires to terminal screws on back of terminal
block (see Figure 2) the following way:
- Loosen terminal screws (C), insert bare wire or lug connectors under straps, and retighten.
3. Replace terminal block.
Sensing and Control
REPLACEMENT BLOCK
Complete terminal block (see Figures 1 and 2), includes mounting screws and terminal screw with wire pressure plates (features
a washer to ensure the screw properly grips the wire).
18PA1 Terminal Block
ISSUE 2
81031
VERSATILITY OF MOUNTING
MICRO SWITCH™ 201LS1 limit switch mounted on the 18PA1. A variety of actuators are available for plug-in LS switches.
Installation and mounting options allow for 24 possible arrangements.
Mounted from front,
actuator to front.
Mounted from front, actuator
to back, roller reversed
WARRANTY/REMEDY
Honeywell warrants goods of its manufacture as being free of
defective materials and faulty workmanship. Honeywell’s standard product warranty applies unless agreed to otherwise by
Honeywell in writing; please refer to your order acknowledgement
or consult your local sales office for specific warranty details. If
warranted goods are returned to Honeywell during the period of
coverage, Honeywell will repair or replace, at its option, without
charge those items it finds defective. The foregoing is buyer’s
sole remedy and is in lieu of all other warranties, expressed
or implied, including those of merchantability and fitness for
a particular purpose. In no event shall Honeywell be liable for
consequential, special, or indirect damages.
Mounted on right side,
actuator to left.
Honeywell serves its customers through a worldwide network of
sales offices, representatives and distributors. For application
assistance, current specifications, pricing or name of the nearest
Authorized Distributor, contact your local sales office or:
E-mail: info.sc@honeywell.com
Internet: sensing.honeywell.com
Phone and Fax:
USA/Canada +1-800-537-6945
International +1-815-235-6847; +1-815-235-6545 Fax
While we provide application assistance personally, through our
literature and the Honeywell web site, it is up to the customer to
determine the suitability of the product in the application.
Specifications may change without notice. The information we
supply is believed to be accurate and reliable as of this printing.
However, we assume no responsibility for its use.
Sensing and Control
Honeywell
1985 Douglas Drive North
Golden Valley, MN 55422
honeywell.com
Mounted on left side,
actuator to right.
PK 81031-2-EN IL50 GLO Printed in USA.
July 2013
© 2013 Honeywell International Inc. All rights reserved.


