Installation Instructions
FOR FFPT6 SERIES FURNITURE FEED POKE-THROUGHS
Catalog Numbers: FFPT6-ALM, FFPT6-BLK, FFPT6-BRS
WARNING
CAUTION
RISK OF SHOCK, DISCONNECT POWER
BEFORE INSTALLATION.
Floor Box should be installed by a qualified electrician
in accordance with national and local electrical codes.
IMPORTANT: Read all instructions before installing poke-through or cover.
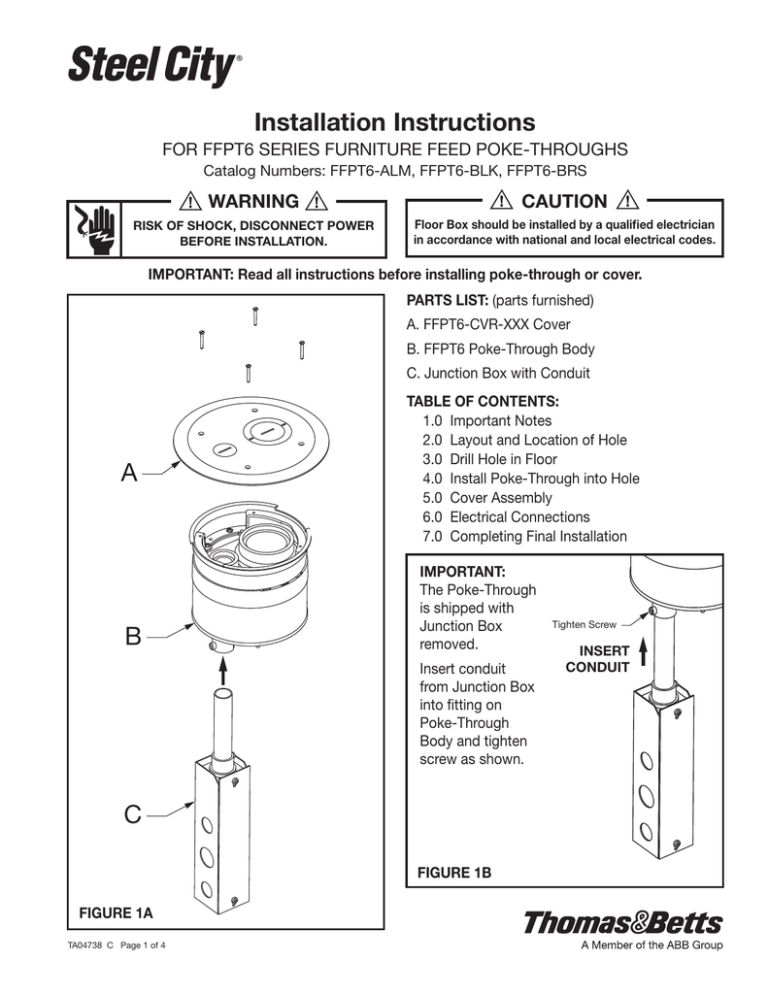
PARTS LIST: (parts furnished)
A. FFPT6-CVR-XXX Cover
B. FFPT6 Poke-Through Body
C. Junction Box with Conduit
A
B
TABLE OF CONTENTS:
1.0 Important Notes
2.0 Layout and Location of Hole
3.0 Drill Hole in Floor
4.0 Install Poke-Through into Hole
5.0 Cover Assembly
6.0 Electrical Connections
7.0 Completing Final Installation
IMPORTANT:
The Poke-Through
is shipped with
Junction Box
removed.
Insert conduit
from Junction Box
into fitting on
Poke-Through
Body and tighten
screw as shown.
C
FIGURE 1B
FIGURE 1A
TA04738 C Page 1 of 4
Tighten Screw
INSERT
CONDUIT
1.0 IMPORTANT NOTES:
2.0 LAYOUT AND LOCATION OF HOLE:
1.1 See product category “Outlet boxes and fittings”
classified for fire resistance in the current “Underwriters
Laboratories, Inc.” “Fire resistance Directory” for the fire
resistance classification of the Thomas & Betts
Poke-Through System. Suitable for use in air handling
spaces in accordance with the National Electrical Code.
1.2 POKE-THROUGH BODY IS ONLY TO BE USED WITH
A THOMAS & BETTS COVER LISTED FOR USE WITH
THIS UNIT. The system is designed to maintain the
hourly rating of concrete floors having a fire rating of 1,
1-1/2 and 2 hours, only when installed in accordance
with these instructions.
2.1 See SPACING in Step 1.5.
NOTE: Be certain to drill the holes at least 6” away from
any wall or pillar so it leaves enough room for the
installation of the Poke-Through and Cover.
24” Mimimum
Center to Center
1.3 TO MAINTAIN FIRE RESISTANCE CLASSIFICATION
RATING, a complete Thomas & Betts Poke-Through
including the Poke-Through Body and Poke-Through
Cover must be installed.
1.4 CONCRETE THICKNESS Min/Max:
1-HOUR RATED FLOOR: 2-1/4” min over top of deck (or
3” thick reinforced concrete slab) to a maximum of 7-1/2”.
2-HOUR RATED FLOOR: 3-1/4” min over top of deck
(or 4” thick reinforced concrete slab) to a maximum of
7-1/2”.
1.5 SPACING: Minimum of 2 ft. on center and not more than
one device per 65 sq. ft. of floor area in each span
(See Figure 2).
1.6 INSTALLATION: Mount in a 6” diameter core-drilled
hole in accordance with these instructions.
FIGURE 2
3.0 Drill Hole in Floor:
3.1 Install or cut hole from Carpet, Wood, Tile or Linoleum
Floor. Use template provided with cover instructions.
(Poke-Through may be installed directly on concrete
floor if no finished floor is planned).
3.2 Core Drill a 6” Diameter Hole. Actual hole size may be
6-1/8” diameter due to drill bit and jobsite construction
tolerance (See Figure 3).
1.7 FLOOR COVERINGS: When installed in accordance
with these instructions, this Poke-Though is fire rated for
carpet and wood covered concrete floors, tile floor
coverings up to 3/4” maximum thickness, and linoleum
floor coverings up to a maximum of 1/8” thickness.
Poke-Through may be installed directly on concrete
when no floor covering is planned.
Finished Floor
See Step 3.1
1.8 MAXIMUM CAPACITY OF COPPER CONDUCTORS
IN POWER AND DATA THROUGH-HOLES.
Maximum
Cross Sectional
Area of Copper
in each through-hole
POWER
(3/4” through-hole)
*Data
(2” through-hole)
0.0815
sq. in.
0.0960
sq. in.
* Power conductors may be substituted for Data as long
as cross-sectional area is not exceeded.
Copper Cross Sectional Area of
Commonly used Conductors.
SIZE
AWG
SOLID or STRANDED
(SQ. IN.)
#24
0.00032
#23
0.00040
#22
0.00050
#14
0.00323
#12
0.00512
#10
0.00815
#8
0.01296
TA04738 C Page 2 of 4
Poke-Through
may be installed
directly on concrete
floor.
FIGURE 3
Concrete
See Step 3.2
4.0 Install Poke-Through into Hole:
4.1 IMPORTANT: Power and Data Through-Holes must span
ACROSS Corrugation in the Deck to maintain fire
classification. Poke-Through cannot be rotated after
inserting into hole.
4.2 Figure 4 shows CORRECT alignment of Power and Data
Through-Holes ACROSS Corrugation in Deck.
Figure 5 shows INCORRECT alignment of Power and
Data Through-Holes.
4.3 Locate Poke-Through over hole (according to notes 4.1
and 4.2) insert and push down until TOP RIM contacts
the concrete floor (See Figures 6 and 7).
(6) Screws
Deck
Junction
Box
Power and
Data
Through-Holes
CORRECT
Alignment
Across
Corrugation
FIGURE 4
Junction
Box
Position Poke-Through
over Hole
Junction Box
Covers
Deck
Power and
Data
Through-Holes
INCORRECT
Alignment
FIGURE 5
2”
Through-Hole
Data
Push Poke-Through
until TOP RIM contacts
concrete floor
3/4”
Through-Hole
Power
FIGURE 6
FIGURE 7
TA04738 C Page 3 of 4
5.0 Cover Assembly:
1-1/4” Plug
5.1 ABANDONMENT/TEMORARY COVER PT6-AC (sold
separately). Install to protect poke-through and devices
UNTIL AFTER construction debris is cleared. Remove and
install FFPT6 cover to activate Poke-Through (See Figure 8).
3/4” Plug
2” Reducer
5.2 FFPT6-CVR-XXX COVER. Install per instructions
furnished with cover (See Figure 8).
6.0 Remove Plugs:
6.1 Remove 3/4” power plug and combination 1-1/4” plug and
2” reducer from cover (See Figure 9).
7.0 Completing Final Installation:
7.1 Install ¾” conduit and steel fitting (conduit fittings NOT
furnished but are REQUIRED) on top of FFPT6 cover. Feed
power wires through ¾” conduit, through poke through and
into junction box. Make connections in junction box as
required by local and national electrical codes. Refer to
conductor cross section chart (Section 1.8) to determine
maximum quantity of wires allowed. (See Figure 10). Use
thread sealer on all plugs and fittings to block water entry.
7.2 Install 1-1/4” or 2” steel conduit fittings (conduit fittings NOT
furnished but are REQUIRED) into top and bottom data
openings on poke through. Data wires must be fed through
the larger 1-1/4” or 2” steel conduit fittings. Additionally,
conduit may be used to route data wires. Refer to conductor
cross section chart (Section 1.8) to determine maximum
quantity of wires allowed. (See Figure 10). Use thread sealer
on all plugs and fittings to block water entry.
IMPORTANT: Steel Conduit Fittings are required on
Data openings to maintain UL fire rating. Steel Conduit
Fittings and conduit are required on power opening to
maintain UL Fire Rating. (See Section 1.4 for fire rating).
FIGURE 9
ALTERNATE
Conduit and
Steel Fitting
1-1/4” or 2”
(If Required)
3/4” Conduit
3/4” Steel Conduit
Fitting
Data Wires
Steel Conduit Fitting
1-1/4” or 2” REQUIRED
(Not Supplied)
Conduit and steel conduit fittings are NOT furnished with
the FFPT6 poke through EXCEPT for that used to connect
Junction Box to bottom of poke through. Conduit is NOT
REQUIRED for data, but may be used if needed for job
requirements. (See Figure 10).
PT6-AC
Cover
FFPT6-CVR-XXX
Cover
Junction Box
FIGURE 8
FIGURE 10
Data Wires
ALTERNATE
Conduit and
Steel Fitting
1-1/4” or 2”
(If Required)
WARRANTY: Thomas & Betts sells this product with the understanding that the user will perform all necessary tests to determine the suitability of
this product for the user's intended application. Thomas & Betts warrants that this product will be free from defects in materials or workmanship
for a period of two (2) years following the date of purchase. Upon prompt notification of any warranted defect, Thomas & Betts will, at its option,
repair or replace the defective product. Misuse, misapplication or modification of Thomas & Betts Products immediately voids all warranties.
Limitations and Exclusions: THE ABOVE WARRANTY IS THE SOLE WARRANTY CONCERNING THIS PRODUCT, AND IS IN LIEU OF ALL
OTHER WARRANTIES EXPRESS OR IMPLIED, INCLUDING BUT NOT LIMITED TO ANY IMPLIED WARRANTY OF MERCHANTABILITY OR
FITNESS FOR A PARTICULAR PURPOSE, WHICH ARE SPECIFICALLY DISCLAIMED. LIABILITY FOR BREACH OF THE ABOVE
WARRANTY IS LIMITED TO COST OF REPAIR OR REPLACEMENT OF THE PRODUCT, AND UNDER NO CIRCUMSTANCES WILL THOMAS
& BETTS BE LIABLE FOR ANY INDIRECT, SPECIAL, INCIDENTAL OR CONSEQUENTIAL DAMAGES.
Thomas & Betts Corporation
Memphis, Tennessee
www.tnb.com
© 2016 Thomas & Betts. All Rights Reserved.
TA04738 C Page 4 of 4


