D Series Maintenance Manual
Date: January, 2010
Page:
3C2-4
MAINTENANCE
EXTERIOR CLEANING
Regular washing to remove accumulated dust and dirt
is recommended. Do not use alkaline cleaners on
aluminum parts; corrosion could result. Use only mild
detergent and a soft brush. Do not use abrasive cleaners,
polish, or steel wool, which can remove the protective
coating and may scratch and discolor the finish.
New Finishes
The exterior of the coach requires special attention
during the first 60 days after it is painted. During this time,
the paint is still curing and hardening.
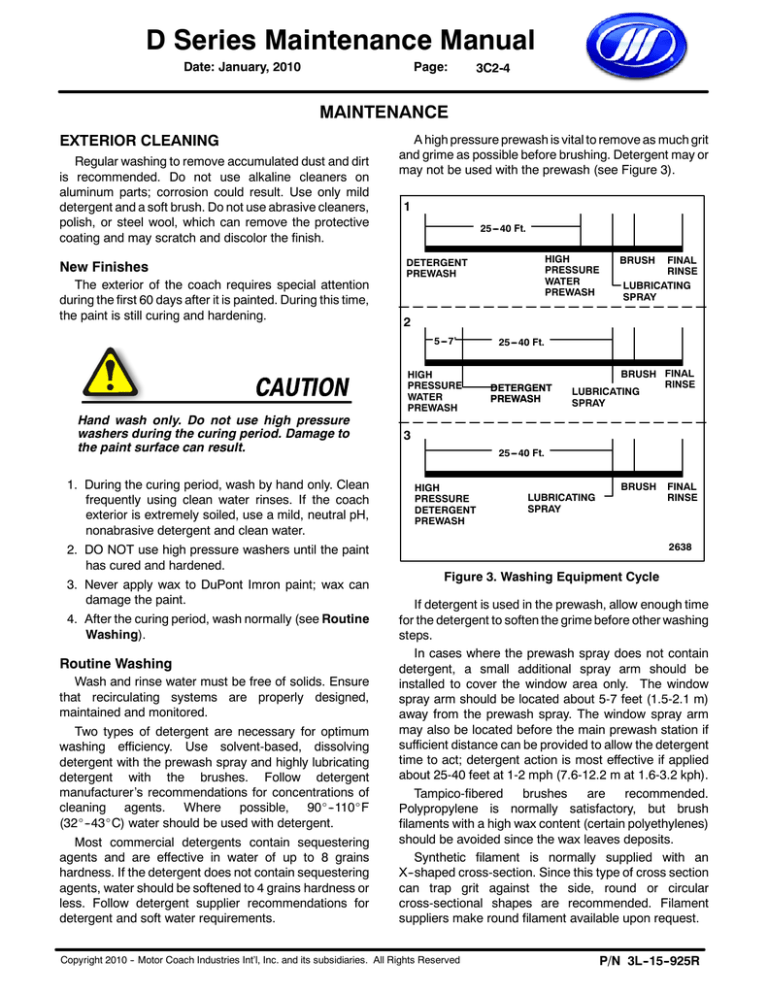
A high pressure prewash is vital to remove as much grit
and grime as possible before brushing. Detergent may or
may not be used with the prewash (see Figure 3).
1
25---40 Ft.
1. During the curing period, wash by hand only. Clean
frequently using clean water rinses. If the coach
exterior is extremely soiled, use a mild, neutral pH,
nonabrasive detergent and clean water.
2. DO NOT use high pressure washers until the paint
has cured and hardened.
3. Never apply wax to DuPont Imron paint; wax can
damage the paint.
4. After the curing period, wash normally (see Routine
Washing).
Routine Washing
Wash and rinse water must be free of solids. Ensure
that recirculating systems are properly designed,
maintained and monitored.
Two types of detergent are necessary for optimum
washing efficiency. Use solvent-based, dissolving
detergent with the prewash spray and highly lubricating
detergent with the brushes. Follow detergent
manufacturer’s recommendations for concentrations of
cleaning agents. Where possible, 90_--110_F
(32_--43_C) water should be used with detergent.
Most commercial detergents contain sequestering
agents and are effective in water of up to 8 grains
hardness. If the detergent does not contain sequestering
agents, water should be softened to 4 grains hardness or
less. Follow detergent supplier recommendations for
detergent and soft water requirements.
FINAL
RINSE
LUBRICATING
SPRAY
BRUSH
2
5---7’
Hand wash only. Do not use high pressure
washers during the curing period. Damage to
the paint surface can result.
HIGH
PRESSURE
WATER
PREWASH
DETERGENT
PREWASH
HIGH
PRESSURE
WATER
PREWASH
25---40 Ft.
DETERGENT
PREWASH
BRUSH FINAL
RINSE
LUBRICATING
SPRAY
3
25---40 Ft.
HIGH
PRESSURE
DETERGENT
PREWASH
LUBRICATING
SPRAY
BRUSH
FINAL
RINSE
2638
Figure 3. Washing Equipment Cycle
If detergent is used in the prewash, allow enough time
for the detergent to soften the grime before other washing
steps.
In cases where the prewash spray does not contain
detergent, a small additional spray arm should be
installed to cover the window area only. The window
spray arm should be located about 5-7 feet (1.5-2.1 m)
away from the prewash spray. The window spray arm
may also be located before the main prewash station if
sufficient distance can be provided to allow the detergent
time to act; detergent action is most effective if applied
about 25-40 feet at 1-2 mph (7.6-12.2 m at 1.6-3.2 kph).
Tampico-fibered
brushes
are
recommended.
Polypropylene is normally satisfactory, but brush
filaments with a high wax content (certain polyethylenes)
should be avoided since the wax leaves deposits.
Synthetic filament is normally supplied with an
X--shaped cross-section. Since this type of cross section
can trap grit against the side, round or circular
cross-sectional shapes are recommended. Filament
suppliers make round filament available upon request.
Copyright 2010 -- Motor Coach Industries Int’l, Inc. and its subsidiaries. All Rights Reserved
P/N 3L--15--925R
D Series Maintenance Manual
Date: January, 2010
Many washers are designed with more than one set of
side brushes. Since abrasion occurs when brushes
contact the coach, it is important to minimize the
exposure of windows to brush contact. One set of
brushes should be deactivated from the side washing
function. Where two sets of side brushes are deemed
necessary, it is especially important that the brushes be
properly adjusted and maintained to minimize abrasion.
Brush pressure should be as low as possible. Do not
allow more than 6 inches of filament to overlap the coach
as the brush turns. The coach should travel through the
prewash, wash and rinse at 1-2 mph (1.6-3.2 kph). Never
stop the coach while it is in contact with the brushes.
Many washers include a rinse spray to clean grit from
the brush. This should be retained and its position
optimized. The final rinse should be high pressure and
high volume, with a minimum delivery of 125 GPM.
Cleaning Magnesium Chloride and Calcium
Chloride
When operating in areas where snow is present, extra
care in cleaning must be taken. Ice and snow treatments
like calcium chloride add a more severe degree of
corrosion if left unchecked.
When it comes to maintenance, washing vehicles to try
to keep the chemicals off the metal is important. There is
no clear answer to the question of what washing
strategies are best. Pressure washing may only push the
chemical mixture further into tiny cracks and crevices. In
addition, the new chlorides tend to stick to surfaces more
than traditional road salt, and may need physical action to
get them off rather than just spraying them with wash
water. Keep in mind that more cleaning liquid is not
necessarily better--in some cases, an over--concentration
of washing compound may actually attack some of the
plastics that are there to provide corrosion resistance.
Electrical connectors and systems must be inspected
weekly. Foam socket inserts that slide over the pins in
seven--way connector sockets, go into the base to seal
out moisture, and are effective to prevent corrosion. Any
time a tractor or trailer is repaired, use a heat shrink
terminal that seals out moisture. The old nylon and PVC
terminals are unsealed, easily allowing contaminants
inside.
Brakes need special attention when inspection and
routine maintenance are done to inspect for corrosion.
Using gladhand seals with dust flaps, which keep
contaminants out of the air system when the trailer is
unthethered, is recommended. It is very easy for
Page:
3C2-5
rainwater to become contaminated with the chlorides on
the trailer surfaces and creep into the air system.
Corrosive material can get inside the air lines and air
tanks. It is more critical than ever to maintain the air driers
and keep water drained from the air system.
CORROSION PREVENTION
The entire underside of the coach is sprayed with a
heavy application of tectyl undercoating. All fasteners are
corrosion resistant.
The coach operating environment determines the
amount of dirt and corrosion that will accumulate over any
given period. Corrosion can be controlled by preventive
maintenance. As part of regular service, inspect all coach
structures that are likely to corrode.
Road splash affects the body and causes moisture, dirt
and road salt to accumulate in crevices and on flanges
causing corrosion. Wash frequently, depending on
operating conditions. Wash daily when the coach is
exposed to road salt.
IMPORTANT: Failure to properly maintain the
body surfaces and structural components of the
coach affects the coach warranty.
Certain areas of the coach are more susceptible to
corrosion than others and must be inspected more
frequently.
Preventive Maintenance: Seasonal Inspection
Before and after the winter, thoroughly inspect the
coach exterior body and understructure for corrosion.
1. Wash the coach body, undercarriage, and cavities to
remove all accumulated dirt and salt.
2. Inspect for signs of corrosion or bare metal (see
Exterior Body Inspection, Understructure
Inspection).
Exterior Body Inspection
1. Remove the bumpers. Clean thoroughly and remove
corrosion; apply paint as required.
2. Remove the sash and belt moldings from the coach
body (see Figure 4), Remove accumulated dirt and
inspect sealant between sidewall panels and lower
body panels for signs of decay and cracks. Apply
Sikaflex sealant as required. Inspect for loose rivets
and replace as necessary. Reinstall moldings.
3. Loosen the rub rail molding and clean behind it.
Inspect for corrosion. Clean thoroughly and remove
corrosion; apply paint as required. Reinstall rub rail.
Copyright 2010 -- Motor Coach Industries Int’l, Inc. and its subsidiaries. All Rights Reserved
P/N 3L--15--925R
D Series Maintenance Manual
Date: January, 2010
Page:
3C2-6
5. Remove the fenders (see Figure 6). Clean
thoroughly and remove corrosion; apply paint as
required. Reinstall the fenders.
Figure 4. Molding and Rub Rail Inspection
4. Inspect the entrance doors and moldings (see
Figure 5). Clean thoroughly and remove corrosion;
apply paint as required.
Figure 6. Fender Inspection
6. Inspect all panels, seams and fasteners. Clean
thoroughly and remove corrosion; apply paint as
required.
7. Inspect the window sashes, frames and moldings
(see Figure 7). Clean thoroughly and remove
corrosion; apply paint as required.
Figure 7. Window Frame and Molding Inspection
Figure 5. Entrance Doors Inspection
8. Inspect the drip moldings (see Figure 8), roof cap,
and panel seams. Check for loose rivets. Replace as
required.
Copyright 2010 -- Motor Coach Industries Int’l, Inc. and its subsidiaries. All Rights Reserved
P/N 3L--15--925R
D Series Maintenance Manual
Date: January, 2010
Page:
3C2-7
Baggage Compartment Floor Inspection
1. Clean thoroughly and remove corrosion from
baggage compartment floors, flanges, bulkheads,
beams and fasteners (see Figure 9).
2. Apply undercoat as required.
D00167
Figure 8. Drip Molding Inspection
Understructure Inspection
Any damaged paint, undercoating or corrosion must
be repaired immediately as follows:
1. Remove dirt, grease and oil (See Surface
Preparation).
2. Remove corrosion and loose Tectyl coating with a
wire brush or by other means such as sandblasting.
Figure 9. Baggage Compartment Floor Inspection
Rear Bogie Area Inspection
1. Clean thoroughly and remove corrosion from
flanges, seams, bulkheads, the bogie, all air lines
and components, electrical harnesses, connectors,
and fasteners (see Figure 10).
2. Replace corroded lines, connectors and fasteners.
3. Apply undercoat as required.
Sandblasting can be used for cleaning
bulkheads, brackets and other structural
members. Do not sandblast exterior side
paneling. Do not sandblast excessively.
Follow
safe
shop
practices
when
sandblasting. Wear hearing protection, a face
shield, gloves, protective clothing and
respiration equipment.
D00168
Figure 10. Rear Bogie Area Inspection
Copyright 2010 -- Motor Coach Industries Int’l, Inc. and its subsidiaries. All Rights Reserved
P/N 3L--15--925R
D Series Maintenance Manual
Date: January, 2010
Engine / Tire Compartments Inspection
1. Clean thoroughly and remove corrosion from
flanges, seams, bulkheads, the engine and tire
compartments, all air lines and components,
electrical harnesses, connectors, and fasteners.
2. Replace corroded lines, connectors, and fasteners.
3. Apply undercoat as required.
STRUCTURAL WELDING
NOTE: Refer to the welding Caution in the
introductory pages of this manual before starting any
welding operation.
NOTE: Refer to Specifications: Welding Rod
Applications. Welding must conform to American
Welding Society specification D1.1 Structural Welding
Code -- Steel.
The frame structures are welded steel. The
high-strength Corten steel front and rear bogie
assemblies are jig welded to ensure proper alignment of
the main radius rod attaching points.
All of the lower frame components, including truss
frames, are manufactured from stainless steel.
PANEL REPLACEMENT
Metal or fiberglass body panel replacement requires
removal of rivets, metal screws or capscrews. Aluminum
rivets can be removed by drilling out the rivet with a drill
slightly smaller than the body of the rivet. When drilling out
pop rivets, always push out the stem first.
Page:
3C2-8
NOTE: Only drill 4 or 5 holes at one time. Do not drill
all the holes and then rivet. Prior to riveting, ensure
correct alignment.
Hand-operated guns and lazy tongs for pulling Cherry
rivets, Imex rivets, and Pop rivets are available from MCI.
Contact MCI Service Parts for information.
NOTE: Most panel repairs or replacements will
require a sealant. Refer to the Parts Manual for
appropriate materials.
Fiberglass Panel Repairs
Fiberglass repair generally consists of reinforcing
cracked or broken areas. Application of fiberglass to the
back or underside of a damaged panel may allow it to be
refinished and painted. Large holes, torn sections, and
separated joints require layed-up cloth and resin repair.
Small exterior depressions, scratches or pits can be
repaired using body putty.
Always use rubber gloves and a mask when
working with resins. If resin contacts skin,
wipe with denatured alcohol or clean thinner.
Protective hand creams are available and their
use is recommended.
3. Drill holes through the panel from the underside of
the channel.
If disc grinding or sanding, wear a respirator
and goggles. Resin dust is combustible; do
not use an electric sander. To sand resin, use a
low- speed, air- driven sander with water flush
attachment; a dry sander with a vacuum bag
attachment may also be used.
The following tools and materials will assist in making
repairs. Hacksaw blade, assorted files, emery paper or
cloth (No. 150 grit or finer), scissors or tin snips, wax
paper or cellophane sheets, small 3 inch (76.2 mm)
grooved roller, paint brush, putty knife, acetone and one
or more heat lamps. For best results the ambient
temperature should be 70-75_F (21-24_C) when making
repairs.
1. Remove all loose particles or damaged material
using a power sander or rasp. Where necessary,
sand paint away.
2. Grind or file the damaged area to form a V--shaped
notch at the broken or cracked portion. Sides of the
notch should have a shallow pitch for maximum
bonding area.
NOTE: Existing holes in the roof bow channel may
be used as a template.
NOTE: Roughening the surface improves adhesion
of resin.
If replacement of fiberglass roof or front lower cap
panels is required, fit the old panel to the underside of the
new panel and mark the locations of rivet holes.
1. If the roof bow channels are bent or damaged, they
should be repaired or replaced in order to match the
contours of the fiberglass panel. Some areas may
require shims. Mark the location and thickness of
each shim.
2. Remove the panel and sand the marked areas to
roughen the mounting surfaces. Apply Dolphinite
sealer to the channel mounting surface and the
sanded area. Clamp the panels and shims in place.
Inspect the panel for proper fit.
Copyright 2010 -- Motor Coach Industries Int’l, Inc. and its subsidiaries. All Rights Reserved
P/N 3L--15--925R

