®
16
Multimeter with Temperature
Calibration Information
WWarning
To avoid electrical shock, remove test leads and any input signals from the Meter before opening the case.
Caution
This Meter contains parts that can be damaged by static discharge. Follow the standard practices for handling
static sensitive devices.
Introduction
The 16 Calibration Information instruction sheet provides the
information necessary to calibrate and verify the Fluke
Model 16 Multimeter with Temperature (hereafter known as
the Meter). This instruction sheet provides the following
information:
•
Product specifications
•
Disassembly and reassembly
•
Performance test procedures
•
Calibration procedures and adjustments
•
Replacement parts
See the instruction sheet for operating instructions.
Service
The Meter is warranted to be free from defects in material
and workmanship for one year. The complete warranty
statement is in the Meter’s instruction sheet.
To contact Fluke, call one of the following telephone
numbers:
USA and Canada: 1-888-99-FLUKE (1-888-993-5853)
Europe: +31-402-678-200
Japan: +81-3-3434-0181
Singapore: +65-738-5655
Anywhere in the world: +1-425-356-5500
Or, visit Fluke’s Web stie at www.fluke.com.
Specifications
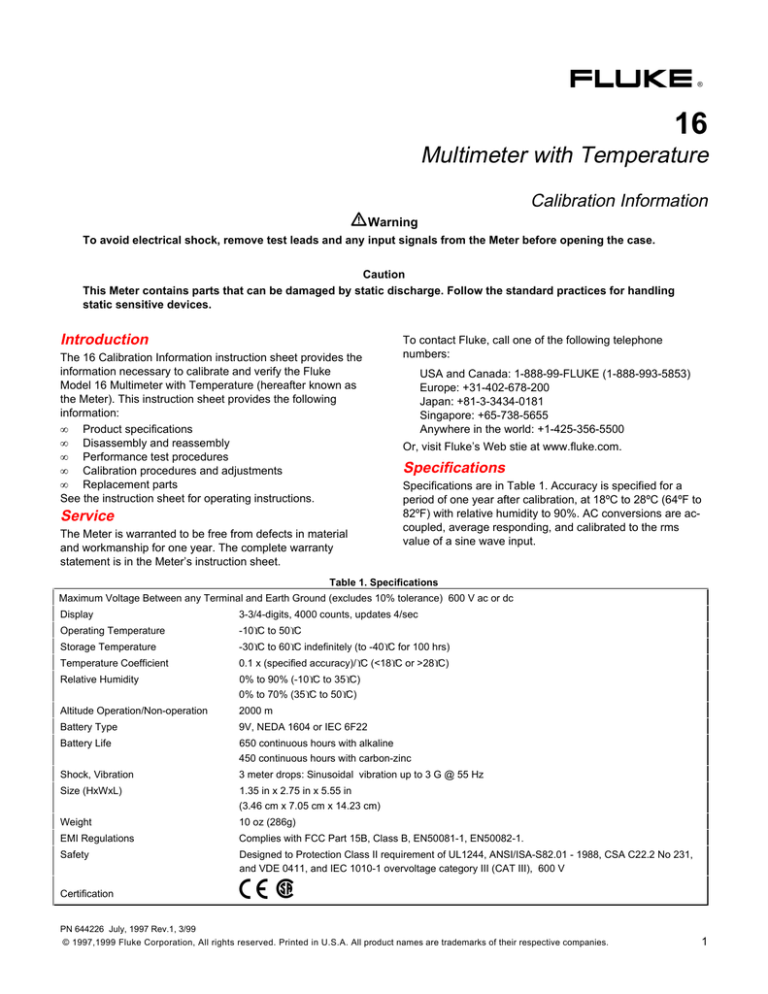
Specifications are in Table 1. Accuracy is specified for a
period of one year after calibration, at 18ºC to 28ºC (64ºF to
82ºF) with relative humidity to 90%. AC conversions are accoupled, average responding, and calibrated to the rms
value of a sine wave input.
Table 1. Specifications
Maximum Voltage Between any Terminal and Earth Ground (excludes 10% tolerance) 600 V ac or dc
Display
3-3/4-digits, 4000 counts, updates 4/sec
Operating Temperature
-10°C to 50°C
Storage Temperature
-30°C to 60°C indefinitely (to -40°C for 100 hrs)
Temperature Coefficient
0.1 x (specified accuracy)/°C (<18°C or >28°C)
Relative Humidity
0% to 90% (-10°C to 35°C)
0% to 70% (35°C to 50°C)
Altitude Operation/Non-operation
2000 m
Battery Type
9V, NEDA 1604 or IEC 6F22
Battery Life
650 continuous hours with alkaline
450 continuous hours with carbon-zinc
Shock, Vibration
3 meter drops: Sinusoidal vibration up to 3 G @ 55 Hz
Size (HxWxL)
1.35 in x 2.75 in x 5.55 in
(3.46 cm x 7.05 cm x 14.23 cm)
Weight
10 oz (286g)
EMI Regulations
Complies with FCC Part 15B, Class B, EN50081-1, EN50082-1.
Safety
Designed to Protection Class II requirement of UL1244, ANSI/ISA-S82.01 - 1988, CSA C22.2 No 231,
and VDE 0411, and IEC 1010-1 overvoltage category III (CAT III), 600 V
Certification
P$
PN 644226 July, 1997 Rev.1, 3/99
© 1997,1999 Fluke Corporation, All rights reserved. Printed in U.S.A. All product names are trademarks of their respective companies.
1
16
Multimeter with Temperature
Accuracy specifications are given as follows: ±([% of reading] + [number of least significant digits]).
Table 1. Specifications (cont)
Function
Range
1
Resolution
Accuracy
4000 mV
1 mV
±(1.9%+3)
4.000 V
0.001 V
±(1.9%+3)
40.00 V
0.01 V
±(1.9%+3)
300.0 V
0.1 V
NA
400.0 V
0.1 V
±(1.9%+3)
600.0 V
1V
±(1.9%+3)
4000 mV
1 mV
±(0.9%+2)
4.000 V
0.001 V
±(0.9%+2)
40.00 V
0.01 V
±(0.9%+1)
300.0 V
0.1 V
NA
400.0 V
0.1 V
±(0.9%+1)
600 V
1V
±(0.9%+1)
400.0Ω
0.1Ω
±(0.9%+2)
4.000 kΩ
0.001 kΩ
±(0.9%+1)
40.00 kΩ
0.01 kΩ
±(0.9%+1)
400.0 kΩ
0.1 kΩ
±(0.9%+1)
4.000 MΩ
0.001 MΩ
±(0.9%+1)
40.00 MΩ
0.01 MΩ
±(1.5%+3)
1.000 µF
0.001 µF
±(1.9%+2)
10.00 µF
0.01 µF
±(1.9%+2)
100.0 µF
0.1 µF
±(1.9%+2)
1000 µF
1 µF
±(1.9%+2)
10000 µF
10 µF
±(10%+90)
typical
µ[
0 to 200 µA
0.1 µA
±(1% + 2 counts)
µ\
0 to 200 µA
0.1 µA
±2% + 3 counts)
-10°C to 400°C
14°F to 75°F
±(1% + 0.8°C)
±(1% + 1.5°F)
-40°C to -10°C
-40°F to 14°F
0.1°C
0.2°F
0.1°C
0.2°F
2.000 V
0.001 V
f
(50 to 400 Hz)
1
E
J
K
(50 to 400 Hz)
3
Temperature
(Type K Thermocouple)
C2
2
±(5% + 1.5°C)
Typical
±(5% + 3.3°F) Typical
±(0.9%+2)
1.
The 4000 mV range can be entered only in the manual range mode. Use the 4000 mV range with accessories.
2.
The beeper is guaranteed to come on at <25Ω and turn off at >250Ω. The Meter detects opens or shorts of 250 µs or
longer.
3.
Error does not include Type K Thermocouple errors.
Specifications
Table 1. Specifications (cont)
Function
Overload
1
Protection
f
E
J
L2
1.
2.
Input Impedance
(Nominal)
2
Common Mode
Rejection Ratio 2
(1 kΩ Unbalanced)
600 V dc
>5 MΩ <100 pF
Automatic Selection
and LoZ = >2 kΩ
<200 pF
3
(ac coupled)
600 V dc
>10 MΩ <100 pF
Automatic Selection
and LoZ = >2 kΩ
3
<200 pF
>100 dB at dc, 50 Hz or
60 Hz
Open Circuit Test
Voltage
Full Scale Voltage
To 4.0 MΩ
40 MΩ
2
Normal Mode
2
Rejection
>60 dB at dc 50 Hz or
60 Hz
<450 mV dc
>50 dB at 50 Hz or 60
Hz
Short Circuit
Current
<500 µA
600 V dc
<1.5 V dc
<1.5 V dc
600 V dc
2.4-3.0 V dc
2.400 V dc
0.95 mA (typical)
Burden Voltage
Common Mode Rejection
Ratio
Normal Mode
Rejection
µ[
600 V rms or dc
<5 mV/µA
>100 dB @ dc 50 Hz or 60
Hz
µ\
600 V rms or dc
<5 mV/µA
>60 dB at dc, 50 Hz or
60 Hz
>50 dB @ 50 Hz or
60 Hz
.
3 x 10⁶ V Hz maximum.
~2 kΩ input impedance up to 50 V. Impedance increases with input voltage to >300 kΩ at 600 V.
MIN MAX Recording Accuracy and Response Time
Specified accuracy of the measurement function ±12 digits in dc for changes >200 ms in duration
(±40 digits in ac). Typical 100 ms response to 80%.
Example 1: this would mean ±1.2° when recording temperature.
Example 2: This would mean ±12 µA when recording µA or ±12 A if used with a dc amp probe.
MIN MAX Recording with Elapsed Time
Elapsed Time: 0 to 100 hours (99.59)
Resolution: 1 minute
Accuracy: 0.3% typical
Continuity Capture
Detects opens or shorts of 250 µs or longer.
3
16
Multimeter with Temperature
Disassembly and Reassembly
Referring to Figure 1, disassemble the Meter as follows. A
Phillips-head screwdriver and small flat-blade screwdriver
are required.
1.
Remove the test leads and set the rotary knob to OFF.
2.
Remove the Phillips-head screws from the case bottom.
3.
Separate the case top from the case bottom.
4.
To replace the battery: lift the battery from the case
bottom and insert a new 9V battery. Be sure the positive
and negative battery posts are oriented correctly.
5.
To remove the pca: insert a small, flat-blade
screwdriver between the edge of the case top and the
pca where shown in Figure 2. Gently unsnap a side of
the case top from the pca. Repeat on the other side of
the pca. Unsnap the case from the top of the pca last.
Lift the pca from the case top by its edges. If the
elastomeric contact strips for the switch assembly and
LCD are stuck to the pca, remove them without touching
the conductive edges.
Cleaning
W Warning
To avoid electrical shock, remove test leads
and any input signals before cleaning.
To clean the case, wipe it with a cloth lightly dampened with
water and a mild detergent. Do not use abrasives, solvents,
or alcohol.
Recommended Test Equipment
A list of recommended equipment for the performance test
and calibration adjustment procedure is shown in Table 2.
Table 2. Recommended Equipment
Equipment
7.
To reinsert the pca: Place the pca over the four screw
posts in the case top, then press gently on the center of
the pca while using the small flat-edge screwdriver to
shoehorn the pca under the snap on a side of the case
top. Repeat on the other side and the top.
8.
To remove the switch support, use a small, flat-blade
screwdriver to gently unsnap the sides and top of the
switch support from the snaps shown in Figure 2.
9.
The LCD, switch assembly, and elastomeric contact
strips for the LCD and switch assembly are accessible
and can be replaced as needed. Do not allow the LCD
to get wet. Before installing a new LCD, make sure that
all connector contact points are clean.
Caution
Do not touch the conductive edges of the
elastomeric strips or the contacts on the switch
assembly. If they are contaminated, clean them
with isopropyl alcohol.
9.
4
Reassembling the Meter is the reverse of disassembling
it. After the Meter is reassembled, execute the
Performance Test to confirm that the Meter is working
properly.
Recommended
Model
AC/DC Calibrator
DC Voltage: 0 to
600 V
Accuracy: ±0.25%
AC Voltage: 0 to
600 V
Accuracy: ±0.5%
Frequency: 50 to
400 Hz
5700A, or 5500A
Decade Resistor
Resistance: 1.0 to
40 MΩ
Accuracy: ±0.25%
Fluke 5500A
Decade
Capacitor
Capacitance: 0 to
1.000 µF
Accuracy: ±0.5%
Fluke 5500A
Note
Before reinserting the pca, make sure that the
rotary knob is in the OFF position.
Minimum
Specification
Thermocouple
Wire K-Type
---
Fluke 80 PK-1
Temperature
Probe
Accuracy: Certified
to ±0.2°C ambient
Fluke 80T-150U
Mercury
Thermometer
0.02°C resolution
Princo Model ASTM
56C
Princo Model ASTM
56F
Flask with cap
0.05°F resolution
---
Dewar Flask
Recommended Test Equipment
Decal
Case, Top
LCD
Conn.
Elastomeric
Conn.
Elastomeric
LCD to PCA
Switch Assembly
Actuator, Switch
Support, Switch Assembly
Battery
Shock Absorber
Main PCA
Case, Bottom
Shield, Bottom
Screw, THD Form, PH.P.STL,
5-14 x .750
Foot
ig3f.eps
Figure 1. Model 16 Disassembled Unit
5
16
Multimeter with Temperature
3
2
Snap
Snaps
Snap
1
ig2f.eps
Figure 2. Removing and Reinserting the Printed Circuit Assembly
6
Performance Test
Performance Test
7.
Set the 5700A using the input voltage shown in Table
4. The reading on the display should be within the
values shown in Table 4.
8.
Repeat step 3 to verify that the ice bath temperature is
at 0.0°C ±0.3°C.
W Warning
To avoid electric shock, do not execute the
performance tests procedures unless the
Meter is fully assembled.
To ensure that the Meter is working properly and performs
to specifications, use the following procedures. If the Meter
fails this test, it needs calibration adjustment or repair.
Multimeter
Note
The following performance test is for all functions
except for temperature. Temperature performance
test follows this procedure.
1.
Referring to Table 3, put the Meter in the function and
range shown for Test 1.
2.
Apply the input from the appropriate source to the [+]
and COM jacks on the Meter. The reading on the
display should be within the MINIMUM and MAXIMUM
values shown in Table 3.
3.
Test the remaining functions and ranges. Repeat steps
1 and 2 for test numbers 2 through 41.
Calibration Adjustments
Perform the following calibration adjustment procedures if
the Meter fails the performance test.
Initial Steps
1.
Remove any input signals to the Meter.
2.
Remove the four screws on the back and separate the
case bottom and case top.
Notice that when you do so the battery remains in the
case top and power to the Meter is disconnected.
Note
To avoid stretching or bending the battery
contacts, connect leads to the base of the
contacts as shown in Figure 4.
3.
Observing correct polarity, connect a 9 V battery to the
battery contacts using easy hook jumpers or alligator
clip leads (see Figure 4).
Temperature
Note
Multimeter
Note
The performance test for the other functions must
be done before this test is done.
The following calibration adjustment
procedure is for all functions except for
temperature. Temperature calibration
adjustment follows this procedure.
1.
Connect the equipment as shown in Figure 3.
2.
Insert a mercury thermometer to the same depth as the
thermocouple wire to verify that the ice bath
temperature is 0.0°C.
1.
3.
Short (or apply 0.0 mV) to the copper wires at the
5700A Calibrator.
Set the calibrator for 0 V dc. Put the Meter in the 4.000
V dc range.
2.
4.
Verify that the Meter reads 0.0°C ±0.8°C.
Connect the calibrator to the [+] and COM jacks on the
Meter.
5.
If this test fails, reposition the thermocouple wires and
mercury thermometer in the ice bath and repeat steps
3 and 4. If the Meter continues to fail, use steps 6
through 8 to verify the temperature performance tests.
3.
Apply an input of +4.000 V dc ±0.25%
6.
Remove the short applied in step 3.
The Meter display should read between 3.997-4.003 V.
If it does not, adjust R4 as described in step 4 (see
Figure 4).
4.
Adjust R4 (see Figure 4) so that the Meter display
reads between 3.997 and 4.003 V.
5.
Proceed to adjust the Temperature function.
7
16
Multimeter with Temperature
Table 3. Performance Tests
Meter Range
Test No.
1.
2.
3.
4.
Input To Meter
Switch
Position
Display
Minimum
Display
Maximum
0.003
0.000
Center
0V
4.000 V ac
1
0.040
0.000
Center
0V
4.000 V ac, MIN MAX
2
0.013
0.007
Center
10 mV, 50 Hz
4.000 V ac
3
0.013
0.007
Center
10 mV, 400 Hz
4.000 V ac
4
3.570
3.430
Right
3.5 V, 50 Hz
4.000 V ac
5
3.570
3.430
Center
3.5 V, 400 Hz
4.000 V ac
6
35.70
34.30
Center
35 V, 50 Hz
40.00 V ac
7
35.70
34.30
Right
35 V, 400 Hz
40.00 V ac
8
357.0
343.0
Right
350 V, 80 Hz
400.0 V ac
91
614
586
Center
600 V, 400 Hz
600 V ac
10
-0.012
0.012
11
4.000 V dc, MIN MAX
0V
Center
4.000 V dc
0V
Center
-0.002
0.002
12
13
40.00 V dc
+20 mV dc
Center
00.01
00.03
Center
-000.3
-000.1
14
400.0 V dc
-200 mV dc
15
4.000 V dc
+3.5 V
Center
+3.466
+3.534
-35.33
-34.67
16
40.00 V dc
-35 V dc
Center
17
400.0 V dc
+100 V dc
Center
+99.0
+101.0
-606
-594
18
600 V dc
-600 V dc
Center
0.2
Right
-0.2
200 µA dc
0.0 µA, dc
19
9.7
10.3
10.0 µA, dc
Right
20
200 µA dc
-10.3
-9.7
-10.0 µA, dc
Right
21
200 µA dc
202.2
Right
197.8
200 µA dc
200.0 µA, dc
22
-197.8
Right
-202.2
200 µA dc
-200.0 µA, dc
23
41.1
Right
38.9
200 µA ac
40.0 µA, 50 Hz
24
41.1
38.9
200 µA ac
40.0 µA, 400 Hz
Right
25
195.7
204.3
200.0 µA, 50 Hz
Right
26
200 µA ac
195.7
204.3
200.0 µA, 400 Hz
Right
27
200 µA ac
1.980
+2 V dc2
Right
2.020
28
Continuity
3.3973
Right
3.4633
292
Continuity, Automatic Selection
+3.43 V dc2
Right
Continuity, Automatic Selection
302
-0.5 V dc2
-0.5073
-0.4933
Right
400.0 Ω
31
0.0 Ω
0.0
0.2
Right
400.0 Ω
32
1.0 Ω
0.8
1.2
Right
400.0 Ω
33
350.0 Ω
346.6
353.4
Right
4.000 kΩ
34
1.0 kΩ
0.990
1.010
Right
40.00 kΩ
35
35 kΩ
34.67
35.33
Right
400.0 kΩ
36
100 kΩ
99.0
101.0
Right
4.000 MΩ
37
2.9 MΩ
2.873
2.927
Right
40.00 MΩ
38
35 MΩ
34.44
35.56
Right
Ω, Automatic Selection
39
1.96 V dc
1.9403
1.9803
Right
1.000 µF
404
0.0 µF
-0.001 µF
0.001 µF
Right
1.000 µF
0.95 µF
0.930 µF
0.970 µF
414
In the Automatic Selection mode, the Meter uses a low-impedance thermistor (~2.5k for circuit protection and load testing
(referred to as low-Z input circuitry). When using the 5100B, 5500A, or 5700A to drive the Meter with high voltages, avoid an
overload/current limit condition by gradually stepping the voltage up (waiting two seconds between each step) from 90.0 V,
120.0 V, 180.0 V, and 350.0 V at 80 Hz each step.
Calibrator 50Ω divider override.
The dc volts annunciator must be on.
Conducting performance tests of the 400 Ω, 4 kΩ, 40 kΩ, and 1 µF ranges (tests no. 22, 23, 24, 25, 26, 31, and 32) verifies
that the discrete and integrated circuitry needed to support the other capacitance ranges are working within specifications.
Therefore, the tests indirectly verify that the Meter will meet specification in the 10 µF, 100 µF, 1000 µF, and 10,000 µF
ranges.
Table 4. Temperature Performance Tests
Input Voltage
0.0
0.919 mV
4.095 mV
8
Display Readings
°C
0.0 ± 0.8
23.0 ± 1.0
100.0 ± 1.8
°F
32.0 ± 1.5
73.4 ± 2.2
212.0 ± 3.6
Calibration Adjustments
Temperature
+
AK-80
5700A
Red
Yellow
Copper
+
Ice Bath
0
Banana
Plug
ig6f.eps
Figure 3. Performance Test for Temperature
Clip to Base Contacts
+
+
Input Receptacles
+
Adjust R4 for 3.997-4.003V DC
_
9V
BATTERY
ig1f.eps
Figure 4. Calibration Adjustment for DC Voltage
9
16
Multimeter with Temperature
Temperature
4.
Connect the other end of the thermocouple wire to the
Meter using a Fluke 80AK Adapter Plug (see Figure 6).
Allow the instrument reading to settle.
5.
Adjust R38 so that the Meter display has the same
reading of the ice bath temperature.
Note
Adjust DC voltage (R4) before adjusting
temperature (R38).
The following describes three temperature calibration
procedures:
•
Calibrating at room temperature. Use this procedure if
it is not necessary to optimize the Meter’s performance.
•
Calibrating in an ice bath. Use this procedure to
optimize the Meter’s performance at around 0.0°C.
•
Calibrating in a lag bath. Use this procedure to
optimize the Meter’s performance at room temperature.
Room Temperature Calibration
Lag Bath Calibration
The following adjustment optimizes the Meter’s
performance at room temperature using a specific
thermocouple.
1.
Put the Meter in the temperature function and °C
mode.
2.
Insert a thermocouple in a lag bath (see Figure 6).
3.
Insert a mercury thermometer to the same depth as the
thermocouple wire to verify that the lag bath
temperature is at room temperature
4.
Connect the other end of the thermocouple wire to the
Meter using an 80AK Adapter Plug(see Figure 6).
Allow the instrument reading to settle.
5.
Adjust R38 so that the Meter display has the same
reading of the lag bath thermometer.
The following procedure allows you to make the calibration
adjustment at room temperature.
1.
Allow the Meter to stabilize at room temperature. After
the temperature stabilizes, do not touch the COM jack.
2.
Turn to temperature function and °C mode.
3.
Observing the correct polarity, connect a copper short
across the input jacks of the Meter (see Figure 5).
4.
Using a temperature probe with the appropriate Meter
(Fluke 45 or equivalent), measure the temperature of
the COM input jack (see Figure 5). Be sure to place the
probe on the COM closest to the pca.
5.
Adjust R38 so the Meter display is the same as the
temperature probe reading.
Ice Bath Calibration
The following procedure optimizes the Meter’s performance
near 0°C (32°F) using a specific thermocouple.
1.
Put the Meter in the temperature function and °C
mode.
2.
Insert a thermocouple in an ice bath (see
Figure 6).
3.
Insert a mercury thermometer to the same depth as the
thermocouple wire to verify that the ice bath
temperature is 0.0°C .
10
Replacement Parts
Replacement parts are listed in Table 4 and shown in
Figure 1.
Table 4. Replacement Parts
Parts
Part No.
Window decal
Case, top
LCD
Connection elastomeric
Connection Elastomeric LCD to PCA
Switch assembly
Actuator, Switch
Support, Switch Assembly
Battery
Case, Bottom assembly
Screw, THD Form, PH.P.STL, 5014 x .750
Foot
617974
617966
643541
867242
867247
618022
203445
879031
696534
618097
832246
885884
Replacement Parts
45
V
1000V
750V
DUAL DISPLAY MULTIMETER
10A
mV
FUSED
MAX
!
CAL
ENABLE
100
mA
COM
500mA
F 250V
ALL INPUTS
1kV MAX
V
A
V
A
REL
FREQ
AUTO
COMP
HI
LO
dB
2ND
REF#
REF
HOLD
MN MX
RATE
THRESH
ADDR
BAUD
LOCAL
POWER
80T-150U
Clip to Base Contacts
+
+
+
_
9V
BATTERY
R38
ig4f.eps
Figure 5. Calibration Adjustment for Temperature Using the 80T-150U
Thermometer
Ice or Lag Bath
Clip to Base Contacts
+
80AK +
+
R38
+
_
9V
BATTERY
Thermocouple
ig5f.eps
Figure 6. Calibration Adjustment for Temperature Using an Ice or Lag Bath
11
16
Multimeter with Temperature
12
