Tile Conduit Penetration Flashing | QMCPT
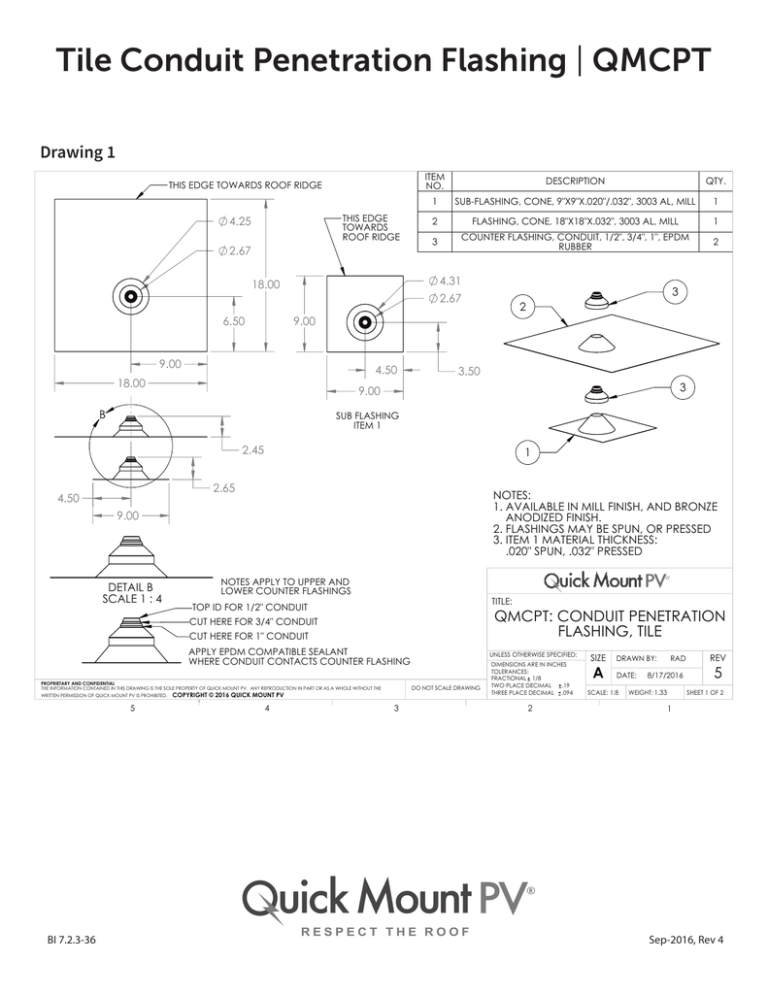
Drawing 1
THIS EDGE TOWARDS ROOF RIDGE
THIS EDGE
TOWARDS
ROOF RIDGE
4.25
2.67
ITEM
NO.
DESCRIPTION
QTY.
1
SUB-FLASHING, CONE, 9"X9"X.020"/.032", 3003 AL, MILL
1
2
FLASHING, CONE, 18"X18"X.032", 3003 AL, MILL
1
3
COUNTER FLASHING, CONDUIT, 1/2", 3/4", 1", EPDM
RUBBER
2
4.31
18.00
2.67
9.00
6.50
9.00
4.50
18.00
3.50
3
9.00
B
SUB FLASHING
ITEM 1
2.45
1
2.65
4.50
NOTES:
1. AVAILABLE IN MILL FINISH, AND BRONZE
ANODIZED FINISH.
2. FLASHINGS MAY BE SPUN, OR PRESSED
3. ITEM 1 MATERIAL THICKNESS:
.020" SPUN, .032" PRESSED
9.00
DETAIL B
SCALE 1 : 4
NOTES APPLY TO UPPER AND
LOWER COUNTER FLASHINGS
TITLE:
TOP ID FOR 1/2" CONDUIT
CUT HERE FOR 3/4" CONDUIT
QMCPT: CONDUIT PENETRATION
FLASHING, TILE
CUT HERE FOR 1" CONDUIT
APPLY EPDM COMPATIBLE SEALANT
WHERE CONDUIT CONTACTS COUNTER FLASHING
PROPRIETARY AND CONFIDENTIAL
THE INFORMATION CONTAINED IN THIS DRAWING IS THE SOLE PROPERTY OF QUICK MOUNT PV. ANY REPRODUCTION IN PART OR AS A WHOLE WITHOUT THE
WRITTEN PERMISSION OF QUICK MOUNT PV IS PROHIBITED.
5
BI 7.2.3-36
3
2
DO NOT SCALE DRAWING
COPYRIGHT © 2016 QUICK MOUNT PV
4
UNLESS OTHERWISE SPECIFIED:
3
DIMENSIONS ARE IN INCHES
TOLERANCES:
FRACTIONAL 1/8
TWO PLACE DECIMAL
.19
THREE PLACE DECIMAL .094
2
SIZE
A
DRAWN BY:
DATE:
SCALE: 1:8
RAD
8/17/2016
WEIGHT: 1.33
REV
5
SHEET 1 OF 2
1
Sep-2016, Rev 4
Tile Conduit Penetration Flashing Installation Instructions
Installation Tools Required: tape measure, drill with paddle bit, caulking gun and sealant compatible with roofing material, hook
blade, hammer, roofing nails, whisk broom, roofing bar, grinder with diamond blade.
1
Drill your conduit hole next to the rafter so you
can secure the conduit below the roof surface
(see Drawing 2). For 1/2" conduit, drill a 7/8"
hole; for 3/4" conduit, drill a 1" hole; for 1"
conduit, drill a 1-1/4" hole.
4
Under the top layer of felt, secure the subflashing
with 2 roofing nails at the top corner of the
subflashing. Apply sealant over the nail heads.
7
Slide the collar over the conduit all the way down
to the flashing.
BI 7.2.3-36
2
Apply sealant compatible with the roofing
material on the underside of the subflashing in
and upside down U.
5
Cut the EPDM collar to appropriate conduit size
(see Drawing 1, Detail B on cover).
8
With a diamond blade on a grinder or skill-saw, cut
tile to allow conduit to pass through. Place cut tile
back in position.
3
Clear away any dust and debris and install
subflashing. Waterproof at underlayment level
according to roofing manufacturer instructions
and Tile Roofing Institute Guidelines.
6
Apply a bead of sealant compatible with both the
roofing material and EPDM rubber to both the
flashing and the conduit in the location of the
EPDM collars final position.
9
Bend the flashing to follow the contour of the tiles.
Place flashing over conduit and tuck it up under
the next course of tiles.
Sep-2016, Rev 4
10
11
Your conduit penetration flashing is
now complete and ready for additional
electrical work.
Be sure to secure
conduit to rafters below the roof surface
per local building codes and NEC code
requirements.
All roofing manufacturers’ written
instructions must also be followed Please
consult the roof manufacturer's specs
and instructions prior to touching the
roof.
Apply a bead of sealant compatible with the EPDM Slide the appropriately cut collar over the conduit
rubber to both the flashing and the conduit in the all the way down to the flashing.
location of the EPDM collars final position.
WARNING: Quick Mount PV products are NOT designed and should NOT be used to anchor fall protection equipment.
BI 7.2.3-36
Sep-2016, Rev 4
Tile Conduit Penetration Flashing | QMCPT
Drawing 2
UPPER AND LOWER COUNTER FLASHINGS
TRIMMED FOR EMT CONDUIT (1/2", 3/4", 1")
18"x18" SPUN CONE FLASHING
9"x9" SPUN CONE SUB FLASHING
EMT CONDUIT (NOT INCLUDED)
SECURE CONDUIT TO RAFTER PER LOCAL
BUILDING CODE. (CLIPS NOT INCLUDED)
TITLE:
QMCPT: CONDUIT PENETRATION
FLASHING, TILE
UNLESS OTHERWISE SPECIFIED:
PROPRIETARY AND CONFIDENTIAL
THE INFORMATION CONTAINED IN THIS DRAWING IS THE SOLE PROPERTY OF QUICK MOUNT PV. ANY REPRODUCTION IN PART OR AS A WHOLE WITHOUT THE
WRITTEN PERMISSION OF QUICK MOUNT PV IS PROHIBITED.
5
BI 7.2.3-36
DO NOT SCALE DRAWING
COPYRIGHT © 2016 QUICK MOUNT PV
4
3
DIMENSIONS ARE IN INCHES
TOLERANCES:
FRACTIONAL 1/8
TWO PLACE DECIMAL
.19
THREE PLACE DECIMAL .094
SIZE
A
DRAWN BY:
DATE:
SCALE: 1:8
2
RAD
8/17/2016
WEIGHT: NA
REV
5
SHEET 2 OF 2
1
925-478-8269 | www.quickmountpv.com | info@quickmountpv.com
2700 Mitchell Dr. | Walnut Creek, CA 94598
Sep-2016, Rev 4
©2016 by Quick Mount PV. All rights reserved.


