Altech L Series DC Circuit Breaker Wiring Guide
advertisement
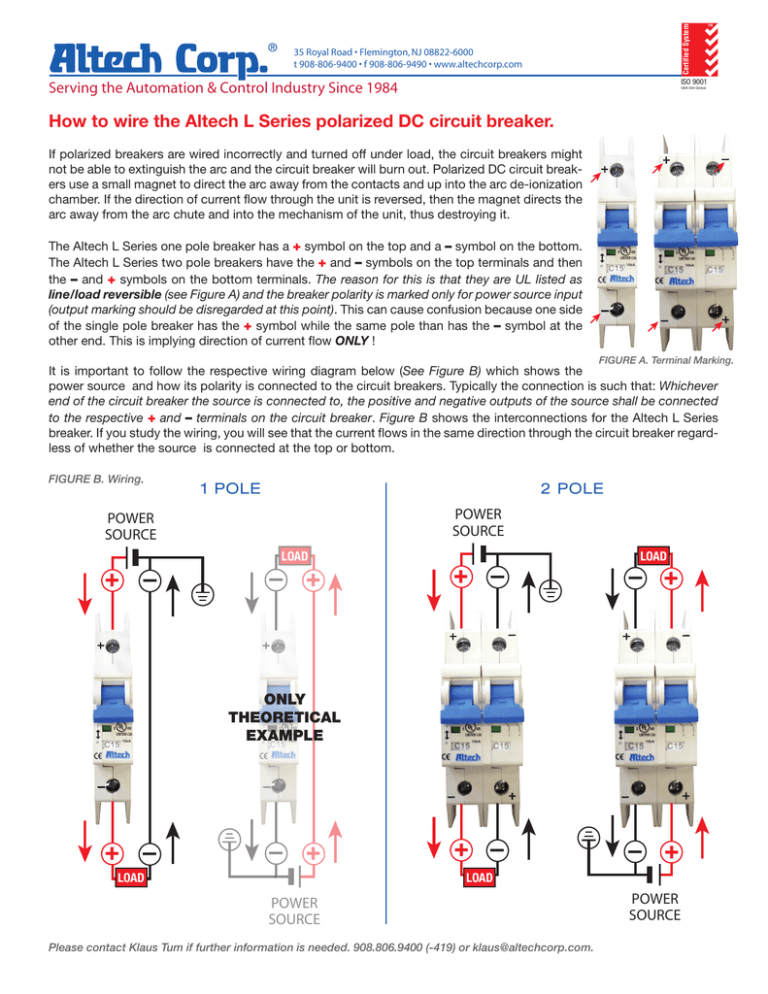
Certified System 35 Royal Road • Flemington, NJ 08822-6000 t 908-806-9400 • f 908-806-9490 • www.altechcorp.com TM ISO 9001 Serving the Automation & Control Industry Since 1984 QMI-SAI Global How to wire the Altech L Series polarized DC circuit breaker. If polarized breakers are wired incorrectly and turned off under load, the circuit breakers might not be able to extinguish the arc and the circuit breaker will burn out. Polarized DC circuit breakers use a small magnet to direct the arc away from the contacts and up into the arc de-ionization chamber. If the direction of current flow through the unit is reversed, then the magnet directs the arc away from the arc chute and into the mechanism of the unit, thus destroying it. The Altech L Series one pole breaker has a + symbol on the top and a – symbol on the bottom. The Altech L Series two pole breakers have the + and – symbols on the top terminals and then the – and + symbols on the bottom terminals. The reason for this is that they are UL listed as line/load reversible (see Figure A) and the breaker polarity is marked only for power source input (output marking should be disregarded at this point). This can cause confusion because one side of the single pole breaker has the + symbol while the same pole than has the – symbol at the other end. This is implying direction of current flow ONLY ! FIGURE A. Terminal Marking. It is important to follow the respective wiring diagram below (See Figure B) which shows the power source and how its polarity is connected to the circuit breakers. Typically the connection is such that: Whichever end of the circuit breaker the source is connected to, the positive and negative outputs of the source shall be connected to the respective + and – terminals on the circuit breaker. Figure B shows the interconnections for the Altech L Series breaker. If you study the wiring, you will see that the current flows in the same direction through the circuit breaker regardless of whether the source is connected at the top or bottom. 1 POLE 2 POLE POWER SOURCE POWER SOURCE LOAD – + – + FIGURE B. Wiring. LOAD – + – + ONLY THEORETICAL EXAMPLE + – LOAD – + + – – + LOAD POWER SOURCE Please contact Klaus Tum if further information is needed. 908.806.9400 (-419) or klaus@altechcorp.com. POWER SOURCE

