®
reStore Stucco
Corner Bead Repair
Detail No.: 72.20.20
Date: September 2014
Notes:
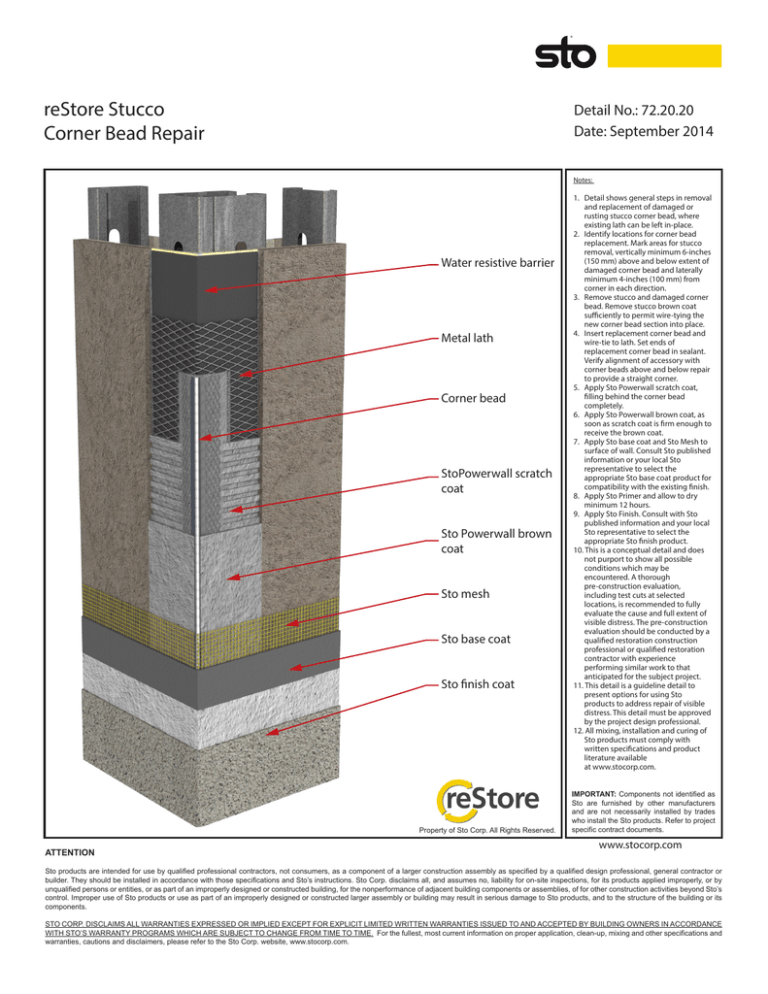
Water resistive barrier
Metal lath
Corner bead
StoPowerwall scratch
coat
Sto Powerwall brown
coat
Sto mesh
Sto base coat
Sto finish coat
Property of Sto Corp. All Rights Reserved.
ATTENTION
1. Detail shows general steps in removal
and replacement of damaged or
rusting stucco corner bead, where
existing lath can be left in-place.
2. Identify locations for corner bead
replacement. Mark areas for stucco
removal, vertically minimum 6-inches
(150 mm) above and below extent of
damaged corner bead and laterally
minimum 4-inches (100 mm) from
corner in each direction.
3. Remove stucco and damaged corner
bead. Remove stucco brown coat
sufficiently to permit wire-tying the
new corner bead section into place.
4. Insert replacement corner bead and
wire-tie to lath. Set ends of
replacement corner bead in sealant.
Verify alignment of accessory with
corner beads above and below repair
to provide a straight corner.
5. Apply Sto Powerwall scratch coat,
filling behind the corner bead
completely.
6. Apply Sto Powerwall brown coat, as
soon as scratch coat is firm enough to
receive the brown coat.
7. Apply Sto base coat and Sto Mesh to
surface of wall. Consult Sto published
information or your local Sto
representative to select the
appropriate Sto base coat product for
compatibility with the existing finish.
8. Apply Sto Primer and allow to dry
minimum 12 hours.
9. Apply Sto Finish. Consult with Sto
published information and your local
Sto representative to select the
appropriate Sto finish product.
10. This is a conceptual detail and does
not purport to show all possible
conditions which may be
encountered. A thorough
pre-construction evaluation,
including test cuts at selected
locations, is recommended to fully
evaluate the cause and full extent of
visible distress. The pre-construction
evaluation should be conducted by a
qualified restoration construction
professional or qualified restoration
contractor with experience
performing similar work to that
anticipated for the subject project.
11. This detail is a guideline detail to
present options for using Sto
products to address repair of visible
distress. This detail must be approved
by the project design professional.
12. All mixing, installation and curing of
Sto products must comply with
written specifications and product
literature available
at www.stocorp.com.
IMPORTANT: Components not identified as
Sto are furnished by other manufacturers
and are not necessarily installed by trades
who install the Sto products. Refer to project
specific contract documents.
www.stocorp.com
Sto products are intended for use by qualified professional contractors, not consumers, as a component of a larger construction assembly as specified by a qualified design professional, general contractor or
builder. They should be installed in accordance with those specifications and Sto’s instructions. Sto Corp. disclaims all, and assumes no, liability for on-site inspections, for its products applied improperly, or by
unqualified persons or entities, or as part of an improperly designed or constructed building, for the nonperformance of adjacent building components or assemblies, of for other construction activities beyond Sto’s
control. Improper use of Sto products or use as part of an improperly designed or constructed larger assembly or building may result in serious damage to Sto products, and to the structure of the building or its
components.
STO CORP. DISCLAIMS ALL WARRANTIES EXPRESSED OR IMPLIED EXCEPT FOR EXPLICIT LIMITED WRITTEN WARRANTIES ISSUED TO AND ACCEPTED BY BUILDING OWNERS IN ACCORDANCE
WITH STO’S WARRANTY PROGRAMS WHICH ARE SUBJECT TO CHANGE FROM TIME TO TIME. For the fullest, most current information on proper application, clean-up, mixing and other specifications and
warranties, cautions and disclaimers, please refer to the Sto Corp. website, www.stocorp.com.

