Fillet Weld Design for Skewed T-Joints: Part 1
advertisement

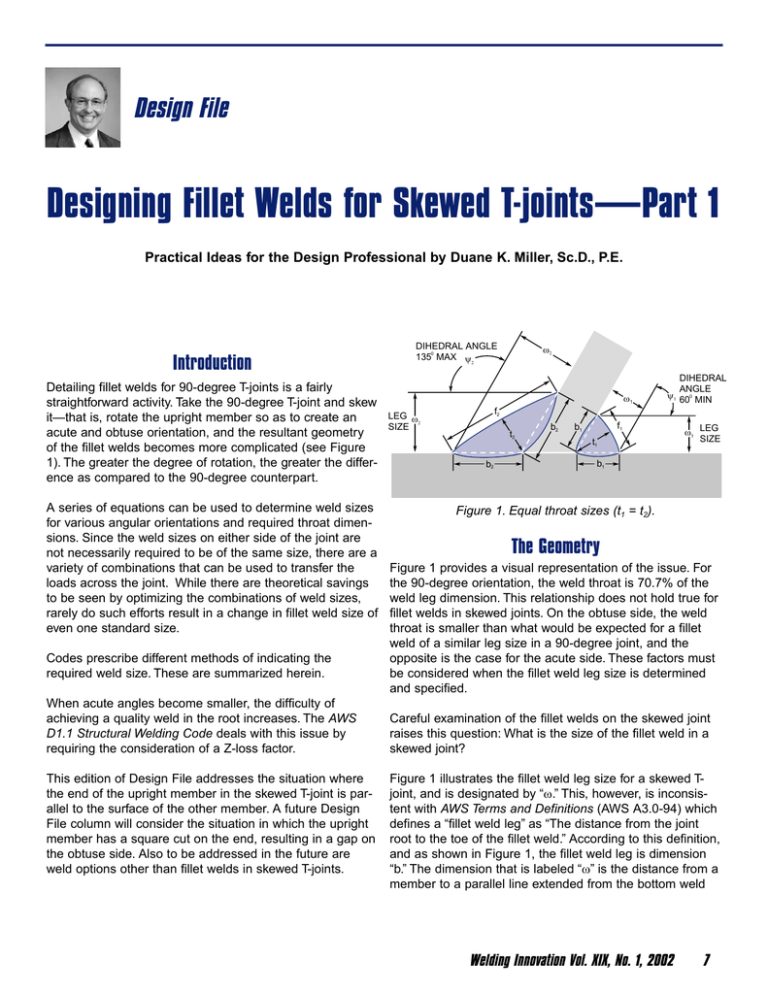
Design File Designing Fillet Welds for Skewed T-joints—Part 1 Practical Ideas for the Design Professional by Duane K. Miller, Sc.D., P.E. Introduction Detailing fillet welds for 90-degree T-joints is a fairly straightforward activity. Take the 90-degree T-joint and skew it—that is, rotate the upright member so as to create an acute and obtuse orientation, and the resultant geometry of the fillet welds becomes more complicated (see Figure 1). The greater the degree of rotation, the greater the difference as compared to the 90-degree counterpart. A series of equations can be used to determine weld sizes for various angular orientations and required throat dimensions. Since the weld sizes on either side of the joint are not necessarily required to be of the same size, there are a variety of combinations that can be used to transfer the loads across the joint. While there are theoretical savings to be seen by optimizing the combinations of weld sizes, rarely do such efforts result in a change in fillet weld size of even one standard size. Codes prescribe different methods of indicating the required weld size. These are summarized herein. When acute angles become smaller, the difficulty of achieving a quality weld in the root increases. The AWS D1.1 Structural Welding Code deals with this issue by requiring the consideration of a Z-loss factor. This edition of Design File addresses the situation where the end of the upright member in the skewed T-joint is parallel to the surface of the other member. A future Design File column will consider the situation in which the upright member has a square cut on the end, resulting in a gap on the obtuse side. Also to be addressed in the future are weld options other than fillet welds in skewed T-joints. DIHEDRAL ANGLE 0 135 MAX ψ2 ω2 ω1 DIHEDRAL ANGLE ψ1 600 MIN f2 LEG ω 2 SIZE t2 b2 b2 f1 b1 t1 ω1 LEG SIZE b1 Figure 1. Equal throat sizes (t1 = t2). The Geometry Figure 1 provides a visual representation of the issue. For the 90-degree orientation, the weld throat is 70.7% of the weld leg dimension. This relationship does not hold true for fillet welds in skewed joints. On the obtuse side, the weld throat is smaller than what would be expected for a fillet weld of a similar leg size in a 90-degree joint, and the opposite is the case for the acute side. These factors must be considered when the fillet weld leg size is determined and specified. Careful examination of the fillet welds on the skewed joint raises this question: What is the size of the fillet weld in a skewed joint? Figure 1 illustrates the fillet weld leg size for a skewed Tjoint, and is designated by “ω.” This, however, is inconsistent with AWS Terms and Definitions (AWS A3.0-94) which defines a “fillet weld leg” as “The distance from the joint root to the toe of the fillet weld.” According to this definition, and as shown in Figure 1, the fillet weld leg is dimension “b.” The dimension that is labeled “ω” is the distance from a member to a parallel line extended from the bottom weld Welding Innovation Vol. XIX, No. 1, 2002 7 toe. While not technically correct according to AWS A3.0, it is the dimension and terminology used when fillet welds in skewed joints are discussed in the AWS D1.1 Structural Welding Code, as well as other AWS publications (i.e., The Welding Handbook, ninth edition, volume 1). Such terminology will be used here. ω2 ω1 b t2 b t1 This raises an additional question: What would a weld inspector actually measure when dealing with a fillet weld b b in a skewed T-joint? Conventional fillet weld gauges could be used to measure the obtuse side’s fillet weld leg dimension “ω” as shown in Figure 1. Dimension “b” would be diffiFigure 2. Equal fillet weld leg sizes (ω1 = ω2). cult to measure directly since the location of the weld root cannot be easily determined. Welds on the acute side are impossible to measure using conventional fillet weld gauges. The face dimension “f,” however, offers an easy throat sizes. This dimension “tT” is then inserted into the folalternative: when this dimension is known for the weld size lowing equations to determine the two throats “t1” and “t2.” and the dihedral angle, the welder and inspector can easily ψ1 determine what the actual size is by using a pair of cos 2 dividers. Alternately, a series of simple gauges of various (5) t1 = t T ψ1 ψ2 widths could be made to directly compare the requirements cos + cos 2 2 to the actual weld size. Thus, dimension “f” may be important for controlling weld sizes in skewed T-joints. ( ) ( ) ( ) ψ2 ( ) ( ) ( ) cos When sizing a fillet weld for 90-degree T-joints or skewed T2 (6) t2 = t T joints, the starting point is to determine the required throat ψ1 ψ2 cos + cos size needed to resist the applied loads. From the throat 2 2 dimension, the fillet weld leg size can be determined. Three options will be considered: Equations 1 – 4 can be used to find the corresponding fillet weld leg size, face dimension, “b” dimension, and crossWhere the throat size is the same on either side of the sectional area. These calculations will be made using the joint (see Figure 1) applicable throat dimension “t” determined from equations To determine the required fillet weld size for a given throat, 5 and 6, not the total throat dimension “tT” used in equathe following relationship can be used: tions 5 and 6. ω = 2 t sin ψ ( ) 2 (1) The width of the face of the weld (“f”) can be found from this equation: ψ f = 2 t tan (2) ( ) 2 Dimension “b,” that is, the ‘true’ fillet leg size, can be found from this relationship: t b= cos ψ ( ) (3) 2 Finally, the cross-sectional area of the weld metal can be determined from the following: A = t2 tan ψ ( ) 2 (4) Where the leg size is the same on both sides (see Figure 2) If the designer decides to make both welds with the same leg size (as is illustrated in figure 2), the first required step is to determine the composite total dimension of the two Where a minimum quantity of weld metal is used (see Figure 3) Even a casual review of Figure 1 shows that, when fillet weld leg sizes are specified to be of the same size on either side of the skewed T-joint, the use of weld metal is as efficient as could be. Minimum weld metal can be obtained by taking advantage of the more favorable condition that results on the acute side where a greater weld throat can be obtained for the same quantity of metal that would be placed on the obtuse side. To minimize the volume of weld metal used in the combination of the two welds, the following equations may be used once the total throat dimension “tT” is known: t1 = tT 1 + tan2 ψ1 ( ) 2 t2 = tT 1 + tan2 ψ2 ( ) 2 8 Welding Innovation Vol. XIX, No. 1, 2002 (7) (8) Although the preceding calculations are not particularly difficult, Table 1 has been provided to simplify the process. Columns A and B are used to determine fillet weld leg sizes and face widths for various dihedral angles. To obtain the required fillet weld size, the calculated throat is multiplied by the factor in Column A. Face widths can be found following the same procedure. b1 t1 t2 b2 b1 b2 If the same leg size is desired on either side of the joint, columns C-E are used. In this case the total weld throat “tT” is used, as opposed to what was done with columns A and B. Figure 3. Minimum weld volume. Influence of Dihedral Angle For the minimum weld volume, columns F–H can be used. Again, the total weld throat “tT” is used. As will be discussed below, for dihedral angles of 30–60 degrees, the D1.1 Code requries the application of a Z-loss factor. Thus, the values in Table 1 that apply to dihedral angles where this applies are shown in blue numbers to remind the user to incorporate this factor into the weld throat sizes. AWS D1.1 Structural Welding Code–Steel provides for five groupings of skewed T-joints, depending on the range of sizes of the dihedral angle: a) Obtuse angles greater than 100 degrees, b) angles of 80–100 degrees, c) acute angles of 60–80 degrees, d) acute angles of 30–60 degrees, and e) acute angles of less than 30 degrees. Each is dealt with in a slightly different manner. Table 1. Leg & Face Dimensions Same Leg Size Minimum Weld Volume Multipy by t Multipy by tT Multipy by tT Dihedral Angle Ψ phi1 deg 30 35 40 45 50 55 60 65 70 75 80 85 90 95 100 105 110 115 120 125 130 135 140 145 150 A B leg size face width 0.517 0.601 0.684 0.765 0.845 0.923 1.00 1.07 1.15 1.22 1.29 1.35 1.41 1.47 1.53 1.59 1.64 1.69 1.73 1.77 1.81 1.85 1.88 1.91 1.93 0.536 0.630 0.728 0.828 0.932 1.04 1.15 1.27 1.40 1.53 1.68 1.83 2.00 2.18 2.38 2.60 2.85 3.14 3.46 3.84 4.28 4.82 5.48 6.33 7.44 C throat 0.788 0.760 0.733 0.707 0.682 0.657 0.634 0.611 0.588 0.566 0.544 0.522 0.500 0.478 0.456 0.434 0.412 0.389 0.366 0.343 0.318 0.293 0.267 0.240 0.212 D E leg size face width 0.408 0.457 0.501 0.541 0.576 0.607 0.634 0.656 0.674 0.689 0.699 0.705 0.707 0.705 0.699 0.689 0.675 0.656 0.634 0.608 0.577 0.542 0.502 0.458 0.409 0.422 0.479 0.533 0.585 0.635 0.684 0.731 0.778 0.823 0.868 0.912 0.956 0.999 1.043 1.087 1.131 1.175 1.221 1.267 1.314 1.363 1.413 1.465 1.519 1.576 F throat 0.933 0.910 0.883 0.854 0.822 0.787 0.750 0.712 0.671 0.630 0.587 0.544 0.500 0.457 0.414 0.371 0.329 0.289 0.250 0.214 0.179 0.147 0.117 0.091 0.067 G H leg size face width 0.483 0.547 0.604 0.653 0.694 0.726 0.750 0.764 0.770 0.766 0.755 0.735 0.707 0.673 0.633 0.589 0.540 0.488 0.434 0.379 0.324 0.271 0.221 0.173 0.130 0.536 0.630 0.728 0.828 0.932 1.04 1.15 1.27 1.40 1.53 1.68 1.83 2.00 2.18 2.38 2.60 2.85 3.14 3.46 3.84 4.28 4.82 5.48 6.33 7.44 Blue numbers indicate that Z-loss factors must be considered. Welding Innovation Vol. XIX, No. 1, 2002 9 Obtuse angles greater than 100 degrees For this category, contract drawings should show the required effective throat. Shop drawings are to show the required leg dimension, calculated with equation 1, or by using columns C or D of Table 1 (AWS D1.1-2002, para 2.2.5.2, 2.3.3.2). ω Z Angles of 80–100 degrees For this group, shop drawings are required to show the fillet leg size (AWS D1.1-2002, para 2.2.5.2). While not specifically stated in the code, the assumption is that contract drawings also show this dimension. Angles of 60–80 degrees For this category, contract drawings should show the required effective throat. Shop drawings are to show the required leg dimension (AWS D1.1-2002, para 2.2.5.2, 2.3.3.2) ψ1 ω t Figure 4. Z-loss. Acute angles less than 30 degrees The D1.1 code says that welds in joints with dihedral angles of less than 30 degrees “shall not be considered as effective in transmitting applied forces …” and then goes Angles of 30–60 degrees on to discuss a single exception related to tubular strucContract drawings are to show the effective throat. Shop tures. In that exception, with qualification of the welding drawings are required to “show the required leg dimensions procedure specification, such welds may be used for transto satisfy the required effective throat, increased by the Zferring applied stresses. For plate (e.g., non-tubular) appliloss allowance ... ” (AWS D1.1-2002, para 2.2.5.2, 2.3.3.3). cations, such an option is not presented in the code. The Z-loss factor is used to account for the likely incidence of poor quality welding in the root of a joint with a small The practical application of this principle is that when welds included angle. The amount of poor quality weld in the root are placed on the acute side, no capacity is assigned to of the joint is a function of the dihedral angle, the welding the weld. Rather, the full load is assumed to be transferred process, and the position of welding. Table 2.2 of D1.1 with the weld on the obtuse side. summarizes this data as contained below: Practical Considerations Table 2. Z-loss dimension. Position of Welding V or OH Dihedral Angle Ψ Position of Welding H or F Process Z (in.) Z (mm) Process Z (in.) Z (mm) 60 > Ψ > 45o SMAW 1/8 FCAW-S 1/8 FCAW-G 1/8 GMAW N/A 3 3 3 N/A SMAW 1/8 FCAW-S 0 FCAW-G 0 GMAW 0 3 0 0 0 45 > Ψ > 30 SMAW 1/4 FCAW-S 1/4 FCAW-G 3/8 GMAW N/A 6 6 10 N/A SMAW FCAW-S FCAW-G GMAW 6 3 6 6 o o o 1/4 1/8 1/4 1/4 Once the Z-loss dimension has been determined, it is added to the required throat dimension. Even though part of the weld in the root is considered to be of such poor quality as to be incapable of transferring stress, the resultant weld will contain sufficient quality weld metal to permit the transfer of imposed loads. Figure 4 illustrates this concept. The data in Table 1 that applies to dihedral angles of 30–60 degrees has been shown in blue numbers because these values must be modified to account for the Z-loss factors. Such a modification has not been done for the data in the Table. 10 Welding Innovation Vol. XIX, No. 1, 2002 The most straightforward, and easiest, approach to determining the required weld size is to assume two welds with equal throat dimensions will be used, calculate the required weld throat dimension, and then calculate the required fillet weld leg size, using either equation 1 or Table 1, columns A and B. Simple? Yes. Best? Let’s see. The optimizing method that uses equations 6 and 7 will result in reduced weld metal volumes. But, reduced how much? The significance increases with greater rotations from the 90-degree T-joint orientation. For angles of 80, 70, and 60 degrees, the differences in weld volume are approximately 3, 12 and 25%. However, note that these differences are functions of the leg size squared. Accordingly, the change in leg size is approximately 1, 6, and 13%. In practical terms, for dihedral angles between 60 and 120 degrees, there will not be a standard fillet weld leg size until the welds become quite large. In the case of a 70degree dihedral angle, for example, and assuming a 1/8 in. increment for standard sizing of fillet welds over 1 in. leg size, the leg size would need to be 2 in. before the optimized weld size would result in a smaller weld. For a 2 mm standard size, this would equal a 34 mm fillet. For angles less than 60 degrees, there can be significant differences in weld volume. These are situations where the Z-loss factor must be considered as well. Thus, for angles of 30–60 degrees, optimization of weld size makes sense, and the Z-loss factors can be considered at the same time. wide without electrode manipulation (weaving). On the acute side, the ratio is less than 1:2 for angles of 62 degrees. This can lead to width-to-depth ratio cracking. It must be recognized that other code provisions may further affect these results. For example, when optimized for minimum weld volume, welds on the obtuse side may be smaller than minimum fillet weld sizes as contained in Table 5.8 of D1.1. The calculated sizes, if less than these minimums, must be increased to comply with this requirement. When determining fillet weld details for skewed T-joints with dihedral angles from 60–120 degrees, it rarely matters which method of proportioning of weld sizes is used. Using equal throat dimensions is a straightforward method, similar to what is typically done for fillet welds on either side of a 90-degree T-joint. Unless the weld size is large, optimizing it will probably not result in a smaller specified weld size. There does not appear to be any intrinsic value in having welds on opposite sides of the skewed T-joint be of the same size. If this approach is used, the resultant weld volumes will fall somewhere between the results for the same sized throat and the optimized sizes. After the welds are detailed, the joint must be welded. Practical considerations apply here too. It must be recognized that the ratio of the face width “f” to the throat dimension “t” constitutes the equivalent of a width-to-depth ratio for the root pass. On the obtuse side, this ratio is large, exceeding 1:6 for dihedral angle of 106 degrees or more. It is very difficult to get a single weld bead to “wash” out this Recommendations For fillet welds on skewed T-joints with dihedral angles from 30–60 degrees, the Z-loss factor must be considered. Based on the specific dihedral angle, the welding process, and the position of welding, the Z-loss factor can be determined, and this dimension added to the required weld throat dimension. It is important to consider how these dimensions should be communicated between the designer, fabricator, welder and inspector. The face dimension is a practical means of verifying that the proper weld size has been achieved. Opportunities Lincoln Electric Technical Programs Welding Technology Workshop June 10-14, 2002 July 29 – August 2, 2002 The purpose of this program is to introduce or enhance knowledge of current thinking in arc welding safety, theory, processes, and practices. The course is designed primarily for welding instructors, supervisors and professional welders. Fee: $395. Welding of Aluminum Alloys, Theory and Practice October 15-18, 2002 Designed for engineers, technologists, technicians and welders who are already familiar with basic welding processes, this technical training program provides equal amounts of classroom time and hands-on welding. Fee: $595. Space is limited, so register early to avoid disappointment. For full details, see www.lincolnelectric.com/knowledge/training/seminars/ Or call 216/383-2240, or write to Registrar, Professional Programs, The Lincoln Electric Company, 22801 St. Clair Avenue, Cleveland, OH 44117-1199. Welding Innovation Vol. XIX, No. 1, 2002 11


