6th–8th qualitatively
9th–12th qualitatively or
quantitatively
Asking questions and defining problems
o Ask questions that arise from careful observation of phenomena, or unexpected
results, to clarify and/or seek additional information.
Constructing explanations and designing solutions
o Make a quantitative and/or qualitative claim regarding the relationship between
dependent and independent variables.
o Apply scientific ideas, principles, and/or evidence to provide an explanation of
phenomena.
15 minutes to prep (the time it takes to black out depends on your classroom)
One class period to explore
Additional time can be used to review and discuss phenomenon
At a minimum, a working camera with a flash you can turn off (for example, a cell
phone camera). Preferably a camera that allows you to increase the exposure time as
well, such as a digital SLR.
A tripod for larger cameras so that you can achieve longer exposure times.
Inova Microlights, which are available for under $10 and very durable. They are
available in a variety of colors and have three settings; the “dim” function is the one
that we will use.
http://www.niteize.com/product/INOVA-Microlight.asp
Incandescent holiday lights of any length and color. LED strings will work as well but
they will look like they “blink.”
© 2014 Exploratorium, all rights reserved
Matte objects in the secondary pigments (red, green, and blue), as pure as possible.
You can also try the primary pigments (cyan, yellow, and magenta). For this activity
any colored LED will work.
Optional additional materials to determine the blink rate: solar cell, speaker and Audacity (free
sound editing software: http://audacity.sourceforge.net/download/)
When the lights are out (or in low ligiht), our eyes’ pupils open to allow in more light to
improve our ability to see. Similarly, the shutter of a camera can be set to stay open for
longer than normal in order to allow it to take pictures in low light—this allows the camera to
collect more light and still produce a recognizable picture. If the shutter is left open for longer
than normal with the lights on, the picture will be overexposed and look washed out.
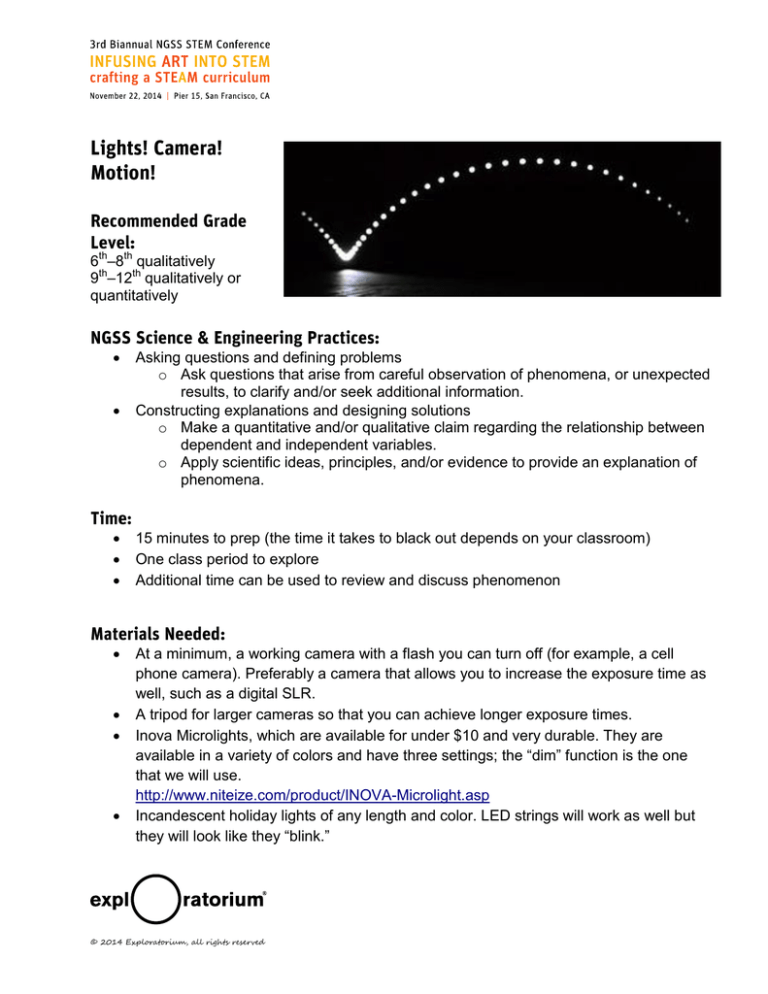
“Blinky Lights” are actually Inova Microlights made of LEDs that turn on and off 100 or 200
times a second when set to “dim.” This allows motion to be captured as a series of “blinks” in
a darkened room with prolonged exposure times. Strings of holiday lights can also be moved
to produce motion pictures of standing waves.
With the Inova Microlight set to “dim” (two clicks), stand in a darkened room and move it in
front of your face. Due to persistence of vision you will see a trail of blinks showing the
motion you made. The distance between the blinks reveals how quickly the object moved
and will change as the speed of the object changes. Try different kinds of motion such as
moving at a constant velocity, accelerating, or moving in a circle.
Assign different motions to model using the blinky lights to different groups. Each group can
take pictures individually using their own cameras or take turns in front of the whole class
with a teacher-operated camera. Either way, the results can be shared with the class and
students can answer questions about what they observe.
Attach the lights to a bicycle wheel at the center and the outer rim and then spin the
wheel. Notice that as the wheel turns, the distance between the lights is greater at the
outer rim than the center because it is traveling faster.
With the lights still attached, try rolling the bike wheel across the ground, too.
© 2014 Exploratorium, all rights reserved
These lights can be attached to projectiles and thrown to show a parabolic path or the
change in speed of an object as it is pulled down from rest due to gravity.
Attach the blinky lights to a hula hoop and ask a student to hula hoop. Notice that the
distance between the blinks will change as the speed of the hoop changes (they will
move faster farther away from the body).
Attach the lights to a piece of string or other simple pendulum and allow the pendulum
to swing. Students can notice a difference in speed as the pendulum swings down.
Model different types of motion such as constant velocity and acceleration using
different kinds of toy cars.
Follow Paul Doherty’s explanation (see link below) to determine the blink rate for your lights.
Older models blink at approximately 100 Hz while newer models blink at approximately 200
Hz.
A meter stick can be placed alongside a toy car moving at constant speed or one that can
accelerate. By counting the number of blinks per distance and knowing the blink rate,
students can calculate the speed or acceleration of the car. A flash can be used to illuminate
the meter stick or object for a single moment and allow you to make more accurate
measurements.
Use matte objects in the primary and secondary pigments to explore reflected colors. Matte
objects produce better results than shiny ones; also try to get as close to the pure colors as
possible. The room must still be blacked out for this or the white light will allow other colors
than the LED color to reflect.
Draw colored spots in the primary pigments (cyan, yellow, and magenta) on a white piece of
paper and they should appear to be their normal color in white light. In a blacked out room,
now shine only a red LED on the card—the red spot will reflect red while the others reflect
nothing and so they will appear black. The white paper would appear red because white
reflects any and all colors shone on it. Try a blue light and green light in turn and you will see
the colors labeled below. (Note: B=Blue, R=Red, G=Green and K=Black)
© 2014 Exploratorium, all rights reserved
In the photographs with prolonged exposure times, you are able to capture a period of time in
the photograph instead of a single instant. Allowing students to see multiple moments in one
image helps them to analyze motion that may normally be too difficult for them to observe
and quantify.
The reflected color experiments allow students to see single colors applied to an object at a
time. They will be able to investigate which colors of light are reflected and which are
absorbed, which is called color subtraction.
Challenge students to create different models of motion or to analyze
photos they did not help create. Based on their initial observations they
should be able to determine a lot about an object’s unknown motion. For
example, referring to the picture at right, how do you think this image could
be created with the Blinky Lights? Try to be as specific as possible.
Paul Doherty’s page on Blinky Light Motion:
http://www.exo.net/~pauld/activities/motion/BlinkyLight/BlinkyLights.html
My Flickr page with multiple class photos: https://www.flickr.com/photos/30394012@N05/
My Educators page with electronic versions of all of today’s materials:
https://sites.google.com/a/pleasantonusd.net/barnettdreyfuss/educators
© 2014 Exploratorium, all rights reserved


