to - AH Lighting
advertisement
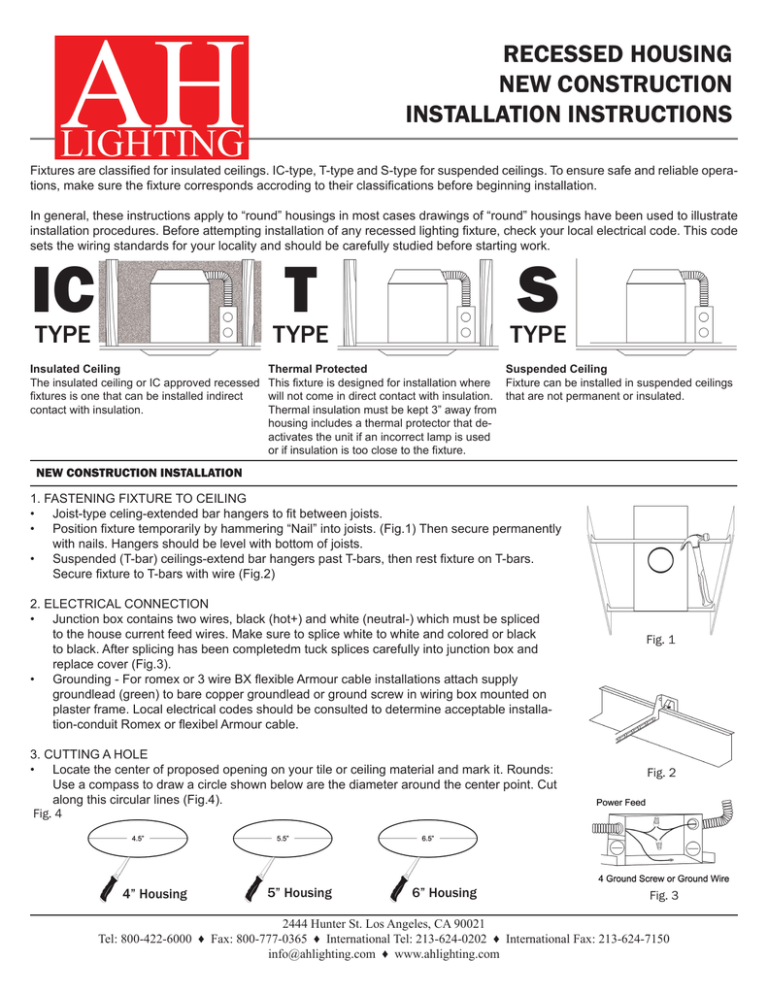
RECESSED HOUSING NEW CONSTRUCTION INSTALLATION INSTRUCTIONS Fixtures are classified for insulated ceilings. IC-type, T-type and S-type for suspended ceilings. To ensure safe and reliable operations, make sure the fixture corresponds accroding to their classifications before beginning installation. In general, these instructions apply to “round” housings in most cases drawings of “round” housings have been used to illustrate installation procedures. Before attempting installation of any recessed lighting fixture, check your local electrical code. This code sets the wiring standards for your locality and should be carefully studied before starting work. IC T TYPE S TYPE Insulated Ceiling The insulated ceiling or IC approved recessed fixtures is one that can be installed indirect contact with insulation. TYPE Thermal Protected Suspended Ceiling This fixture is designed for installation where Fixture can be installed in suspended ceilings will not come in direct contact with insulation. that are not permanent or insulated. Thermal insulation must be kept 3” away from housing includes a thermal protector that deactivates the unit if an incorrect lamp is used or if insulation is too close to the fixture. NEW CONSTRUCTION INSTALLATION 1. FASTENING FIXTURE TO CEILING • Joist-type celing-extended bar hangers to fit between joists. • Position fixture temporarily by hammering “Nail” into joists. (Fig.1) Then secure permanently with nails. Hangers should be level with bottom of joists. • Suspended (T-bar) ceilings-extend bar hangers past T-bars, then rest fixture on T-bars. Secure fixture to T-bars with wire (Fig.2) 2. ELECTRICAL CONNECTION • Junction box contains two wires, black (hot+) and white (neutral-) which must be spliced to the house current feed wires. Make sure to splice white to white and colored or black to black. After splicing has been completedm tuck splices carefully into junction box and replace cover (Fig.3). • Grounding - For romex or 3 wire BX flexible Armour cable installations attach supply groundlead (green) to bare copper groundlead or ground screw in wiring box mounted on plaster frame. Local electrical codes should be consulted to determine acceptable installation-conduit Romex or flexibel Armour cable. 3. CUTTING A HOLE • Locate the center of proposed opening on your tile or ceiling material and mark it. Rounds: Use a compass to draw a circle shown below are the diameter around the center point. Cut along this circular lines (Fig.4). Fig. 4 4” Housing 5” Housing 6” Housing Fig. 1 Fig. 2 Fig. 3 2444 Hunter St. Los Angeles, CA 90021 Tel: 800-422-6000 ♦ Fax: 800-777-0365 ♦ International Tel: 213-624-0202 ♦ International Fax: 213-624-7150 info@ahlighting.com ♦ www.ahlighting.com
