week 12 servo control
advertisement

:5usec
OPERATING TRAVEL
:40�/ONE SIDE PULSE TRAVELING 400usec
DIRECTION
:CLOCK WISE/PULSE TRAVELING 1500 TO 1900usec
MOTOR TYPE
:CORED METAL BRUSH
POTENTIOMETER TYPE
:4 SLIDER/DIRECT DRIVE
AMPLIFIER TYPE
:ANALOG CONTROLLER & TRANSISTOR DRIVER
DIMENSIONS
:40x20x36.5mm(1.57x0.78x1.43in)
WEIGHT
:43g(1.51oz)
BALL BEARING
:TOP/RESIN BUSHING
MATERIAL
:RESIN
DEPARTMENTGEAR
OF MEDIA
STUDY / SUNY BUFFALO
HORN GEAR SPLINE
:24 SEGMENTS/�5.76
SPLINED HORNS
:SUPER/R-XA
CONNECTOR WIRE LENGTH
:300mm(11.81in)
CONNECTOR WIRE STRAND COUNTER :40EA
CONNECTOR WIRE GAUGE
WEEK 12
SERVO CONTROL
MEDIA ROBOTICS LAB /
26.5
36.5
16.6
OVERVIEW
40
52.8
47.8
3
10.2
1
20
4
2
2.FEATURES
LONG LIFE POTENTIOMETER, TOP RESIN BUSHING
3.APPLICATIONS
AIRCRAFT 20-40 SIZE,STEERING AND THROTTLE SERVO FOR CARS, TRUCK AND BOATS
4.ACCESSORY & OPTION
CASE SET/
HS322T:1EA
HS322M:1EA
HS322L:1EA
PH/T-2 2x30 NI:4EA
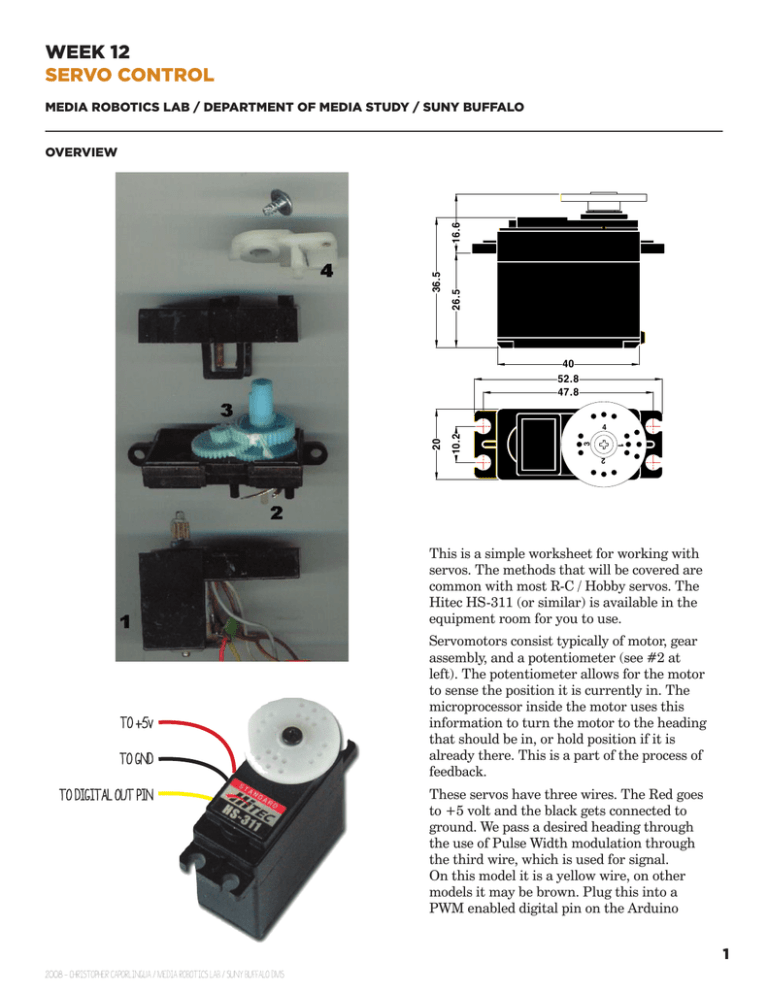
This is a simple worksheet for working with
servos.
beSET/
covered are
GEAR The
SET/ methods that will
HORN
HS322G1:1EA
R-XA:1EA
common
with most R-C / Hobby
servos. The
HS322G2:1EA
Hitec
HS-311 (or similar) is available in the
HS322G3:1EA
equipment
room for you to use.
HS322G4:1EA
HS300RB:1EA
TO +5v
TO GND
TO DIGITAL OUT PIN
Servomotors consist typically of motor, gear
assembly, and a potentiometer (see #2 at
left). The potentiometer allows for the motor
to sense the position it is currently in. The
microprocessor inside the motor uses this
HITEC
RCD
KOREA
INC.
information
to turn
the motor
to the heading
that should be in, or hold position if it is
already there. This is a part of the process of
feedback.
These servos have three wires. The Red goes
to +5 volt and the black gets connected to
ground. We pass a desired heading through
the use of Pulse Width modulation through
the third wire, which is used for signal.
On this model it is a yellow wire, on other
models it may be brown. Plug this into a
PWM enabled digital pin on the Arduino
1
2008 - CHRISTOPHER CAPORLINGUA / MEDIA ROBOTICS LAB / SUNY BUFFALO DMS
WEEK 12
SERVO CONTROL
MEDIA ROBOTICS LAB / DEPARTMENT OF MEDIA STUDY / SUNY BUFFALO
CODE
/* Servo Example
* Code based on AnalogInput by DojoDave <http://www.0j0.org>
*
*/
int potPin = 2;
// select the input pin for the potentiometer
int val = 0;
// variable to store the value coming from the sensor
int servoPin = 7;
// Control pin for servo motor
int pulseWidth = 0;
// Amount to pulse the servo
long lastPulse = 0;
// the time in millisecs of the last pulse
int refreshTime = 20;
// the time in millisecs needed in between pulses
int minPulse = 600;
// minimum pulse width
void setup() {
pinMode(servoPin, OUTPUT);
}
void loop() {
// read the value from the sensor
val = val * .175; // convert 10 bit val to derees (1024/180 = .175 )
pulseWidth = (val * 10) + minPulse;
updateServo();
Wire in a voltage divider
as we saw in the previous
worksheets, connect it to
analog pin 2.
The servo has its red wire in
+5v, its black in GND, and its
yellow in digital pin 7
Every time we call
updateServo();
The servo will seek to the
location calculated into
pulseWidth.
If the servo is already there it
will hold position with power;
if an outside force tries to
rotate it in a different direction
it will counteract until its is
oriented correctly.
pinMode(potPin, INPUT);
val = analogRead(potPin);
This code takes in an analog
value, coverts it to degrees and
turns the servo proportionately
to it.
// convert angle to microseconds
// update servo position
delay(10);
To take advantage of
this aspect, try to call
updateServo(); very often,
as we are doing by putting it
into the main loop.
}
void updateServo() {
// pulse the servo again if rhe refresh time (20 ms) have passed:
if (millis() - lastPulse >= refreshTime) {
digitalWrite(servoPin, HIGH);
// Turn the motor on
delayMicroseconds(pulseWidth);
// Length of the pulse sets the motor
position
digitalWrite(servoPin, LOW);
// Turn the motor off
lastPulse = millis();
// save the time of the last pulse
}
}
2
WEEK 12
SERVO CONTROL
MEDIA ROBOTICS LAB / DEPARTMENT OF MEDIA STUDY / SUNY BUFFALO
EXPLANATION
1500 Microseconds
90 degrees
1050 Microseconds
45 degrees
1950 Microseconds
135 degrees
600 Microseconds
0o degrees
(minimum pulse width)
2400 Microseconds
180 degrees
The servo receives a position through
a PWM signal sent through the signal
(yellow) wire from the micro controller.
Knowing this, we can abstract the
conversion from degrees to microseconds
to be:
The signal is pulsed high for an amount of
time that corresponds to the desired angle.
The minimum length of this pulse is 600
microseconds, which corresponds to its
counterclockwise limit. The clockwise
limit is approx 180 degrees from the
origin and corresponds to a pulse of 2400
microseconds.
The difference between the two positions
is 180 degrees, or 1800 microseconds.
(degrees x 10) + 600 = pulse width
Which is represented in our code by
In updateServo() we put all of these
numbers together to form a pulse. The pin
is written to HIGH and left that way while
the program delays for however many
microseconds the pulse width is. At that
point the pin is written low.
if (millis() - lastPulse >= refreshTime)
pulseWidth = (val * 10) + minPulse;
Where val is a number in degrees.
We need to pause in between pulses so
that the servo can distinguish them from
each other. This is known as a refresh
time and needs to be a minimum of 20
milliseconds for this application.
will make sure that this pulse will only
be written if the 20ms refresh time has
passed since the last pulse.
lastPulse = millis();
lets us use compare the time from this
current pulse to see if the 20 milliseconds
has passed the next time we evaluate
if (millis() - lastPulse >= refreshTime).
Example PWM Signal:
1500 Microseconds
for 90 o (center)
600 Microseconds
for 0 o ( full counterclockwise )
<---- 2 0 m i l l i s e c o n d r e f r e s h t i m e
---->
( refresh )
(signal held low)
3


