HEAD TUBE BASICS
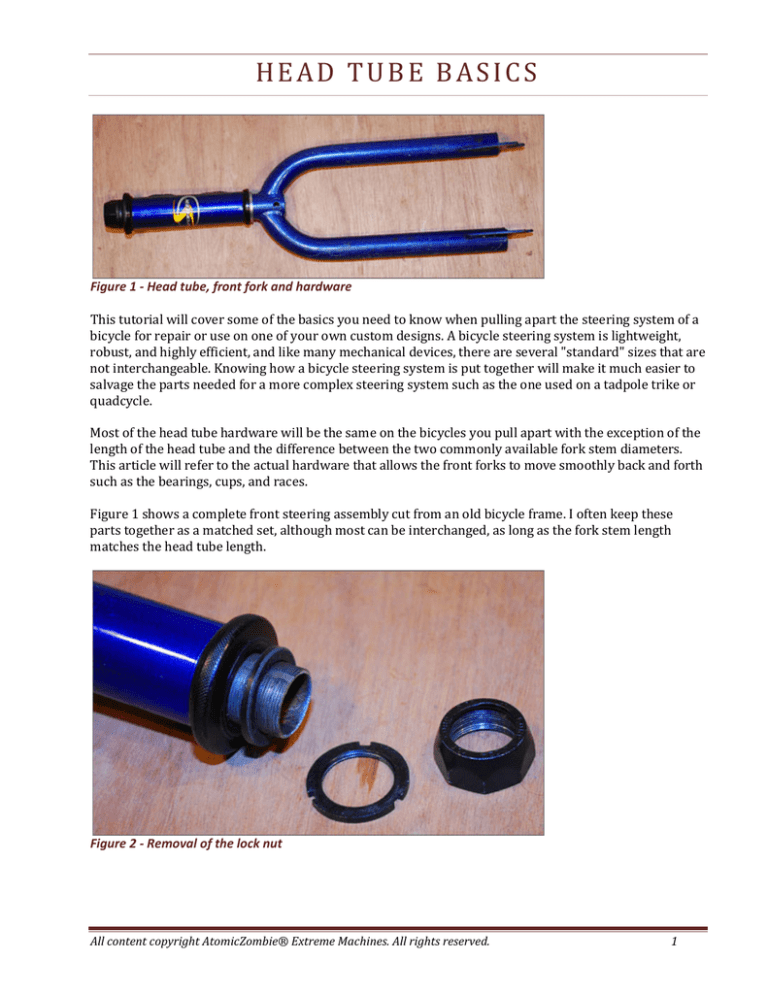
Figure 1 - Head tube, front fork and hardware
This tutorial will cover some of the basics you need to know when pulling apart the steering system of a
bicycle for repair or use on one of your own custom designs. A bicycle steering system is lightweight,
robust, and highly efficient, and like many mechanical devices, there are several "standard" sizes that are
not interchangeable. Knowing how a bicycle steering system is put together will make it much easier to
salvage the parts needed for a more complex steering system such as the one used on a tadpole trike or
quadcycle.
Most of the head tube hardware will be the same on the bicycles you pull apart with the exception of the
length of the head tube and the difference between the two commonly available fork stem diameters.
This article will refer to the actual hardware that allows the front forks to move smoothly back and forth
such as the bearings, cups, and races.
Figure 1 shows a complete front steering assembly cut from an old bicycle frame. I often keep these
parts together as a matched set, although most can be interchanged, as long as the fork stem length
matches the head tube length.
Figure 2 - Removal of the lock nut
All content copyright AtomicZombie® Extreme Machines. All rights reserved.
1
Head tube basics
To remove a fork from a head tube, you must first loosen the top locking nuts as shown in Figure 2.
There are usually two nuts, a large top finished nut (the larger one) and a thin locking nut that helps the
two lock together over the washer, which is still shown on the fork stem. All fork hardware is unscrewed
in the counter clock wise direction, since these are standard threads. A large adjustable wrench or a pipe
wrench can be used on most of the fork hardware, although the pipe wrench should not be necessary
unless the threads have rusted significantly.
Figure 3 - The washer fits on the slotted stem
Notice that the washer, which fits under the lock nut has a key that fits into the slotted section of the fork
stem. The purpose of this slot is to prevent the washer from turning along with the locking nut when you
tighten it. If the washer is allowed to turn, it would also force the adjustable race to turn and become
overly tight over the bearings.
All content copyright AtomicZombie® Extreme Machines. All rights reserved.
2
Head tube basics
Figure 4 - Removal of the adjustable bearing race
The largest nut in the head set hardware is the adjustable bearing race shown removed in Figure 4. This
part creates a bearing surface between the head tube cup to allow the forks to turn with minimal
friction, yet remain securely in place. Take note of the orientation of the bearings when you disassemble
the head set as it does matter which way they are put into the cups.
As you can see in Figure 4, this type of bearing includes a ball retainer and fits into the cups so that the
balls face the cup. Sometimes bearings simply fall right out, so in that case you just pack them all back in
when reassembling the head tube hardware. A cracked or badly rusted bearing or race needs to be
replaced.
Figure 5 - Bearing orientation is important
Once all of the top hardware has been removed from the fork stem, the forks will drop out along with the
lower bearing as shown in Figure 5. Again, take note of the orientation of the bearing if it has a cage or
body, as it must be put back the same way it came out. As a general rule, the balls should go into the cups
first, although there are always exceptions to the rule.
All content copyright AtomicZombie® Extreme Machines. All rights reserved.
3
Head tube basics
Figure 6 - A typical bicycle head set
The components of a typical bicycle headset are shown in Figure 6 after removing the top hardware and
cleaning the grease from all of the bearing parts. Some forks do not have threads and require the top
hardware to be held in place by the gooseneck, but the general operation and list of parts will be much
the same. It's also a good idea to completely clean the bearings, cups and races when collecting parts
because small hairline cracks can occur if the parts have been put through a lot of abuse.
Figure 7 - The bearing on the left is installed correctly
Although it might look like both bearings shown in Figure
7 would work correctly, only the image on the left side is
showing the bearings installed correctly. The bearings on
the right would induce a lot of friction into your steering
system because the metal retaining ring would be
scraping along the cup, not allowing the bearing to run
smoothly. Play around with the bearings and races to see
what happens when they are installed the wrong way.
All content copyright AtomicZombie® Extreme Machines. All rights reserved.
4
Head tube basics
Figure 8 - Testing the bearings and races
Like all things mechanical, several rival designers decided to fight over the "standards" and now you are
forced to work with various subtle sizes of fork stems, bearings, cups, and races. If you have a huge
bucket of random head set hardware, do a simple test by placing a bearing into a cup with a race overtop
as shown in Figure 8. No matter how hard you press, there should be almost no friction when you turn
the race.
The same test can be done by assembling the entire head set, giving the forks a quick spin to see if they
turn without much friction. When you have the wrong parts together, it will be obvious, as the forks will
seem stiff even before you tighten up the hardware. Hey, do you have those bearings installed the right
way around?
Figure 9 - Two different bearing cages
Head tube bearings will likely appear like the one shown on the right of Figure 9, having a cage with a
flat side. In this instance, the bearing is fed into the cup balls first. The bearing on the right is a slightly
less common style, and fits into the cups with the balls facing upwards. Again, you will know when they
are in the wrong way as the friction will be much higher than normal. Other head tube bearings are just
loose balls, so they need to be repacked using a ring of grease to hold them in place when installing
them.
All content copyright AtomicZombie® Extreme Machines. All rights reserved.
5
Head tube basics
Free ball bearings are popular with those who are referred to as "weight weenies", you know the type
who think an extra ounce of steel makes them faster! But guess what; the free ball bearings actually
weigh more because now more balls have to fill the ring, unlike the cage type! But seriously, it does not
make any difference, and the cage type is just so much more convenient to clean and install.
Figure 10 - Removing the lower bearing race
If you plan to modify the fork in some way, you may need to remove the bottom bearing race, which can
be done by tapping it upwards to liberate it from the larger ring it was seated on. Figure 10 shows the
lower race coming free from its seat after tapping around it from the underside using a hammer and
chisel. A welder's chipping hammer is great for removing and re-inserting the fork bearing race.
Figure 11 - Head tube cups removed
The head tube cups are also easy to remove by simply tapping them out using a long bolt or piece of
steel rod. I just use a 12 inch length of 3/4 inch rod and ram it into the head tube, working around the
inner ring until the head tube cups pop out. Re-installing the cups is a bit more work, and can be done
All content copyright AtomicZombie® Extreme Machines. All rights reserved.
6
Head tube basics
using several techniques. I just bang them in with a 12 inch length of 1/8" wall 1.5 inch diameter square
tubing.
The flat side of the tubing makes it easy to get the cups started so they seat properly. A hammer can be
used as well, but this can be difficult since one end will pop out as you tap on the other and you could
actually chip the brittle race as it is made from hardened steel. Others have made head tube tools using
some angle iron and threaded rod as a clamp as well, which makes alignment easy.
Figure 12 - Usually, the top cup is smaller
In many head tube sets, the top bearing cup will be slightly smaller as shown in Figure 12. This is not
always the case, and both have the same diameter, so you may need to have a close look at them. The
larger cup always installs at the bottom of the head tube as it has to keep dirt and moisture away from
the bearings. The top cup can be smaller due to being protected by the large adjustable race nut.
Free bike building tutorials:
Using a chain link tool
Basic fishmouth cutting
Arc welding
Cranks and pedals
Front derailleur
Cables
Coaster brakes
Free bike projects:
Kids electric trike
Choppers
Mountain bike tandem
Bicycle bearing basics
Lacing wheels
Frame chopping
Bike chains
Rear derailleur
Freewheel
Head tubes
Sidewinder stunt bike
Velomobile
World Record SkyCycle
Detachable tandem
Tall bikes
Spin Scooter
All content copyright AtomicZombie® Extreme Machines. All rights reserved.
Head tube bearings
Salvaging wheel parts
Bicycle autopsy
Rake and trail
Brakes
Gooseneck
Simple SWB recumbent
and more!
7


