A Finely Fitted Berth - Islander 36 Association
advertisement

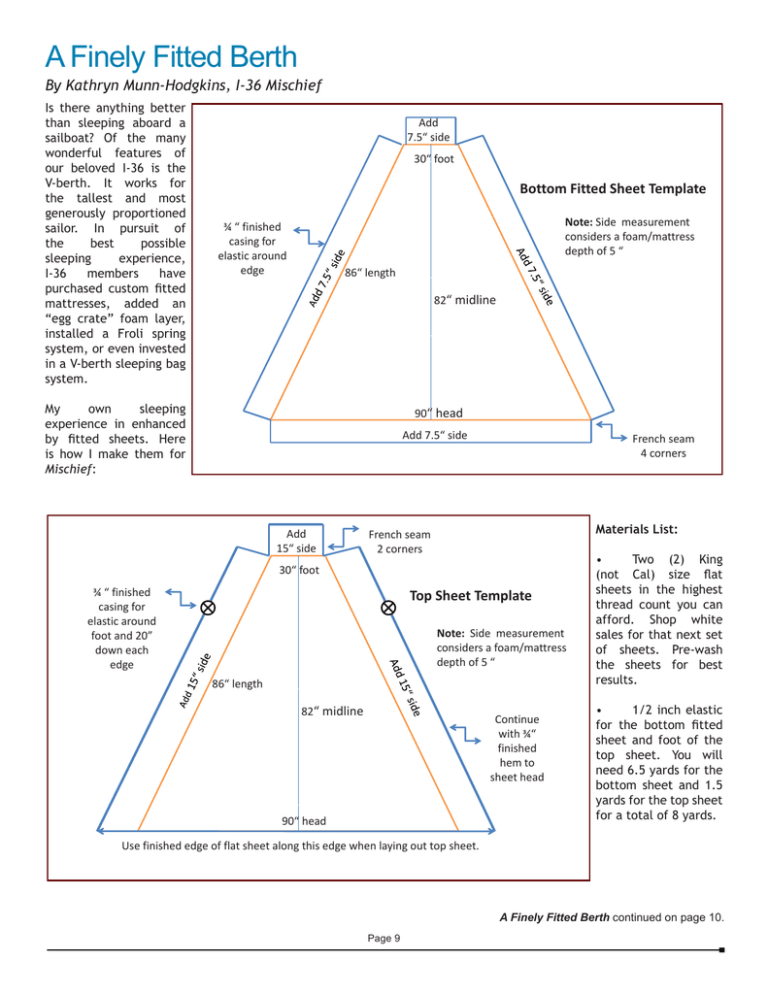
A Finely Fitted Berth By Kathryn Munn-Hodgkins, I-36 Mischief Is there anything better than sleeping aboard a sailboat? Of the many wonderful features of our beloved I-36 is the V-berth. It works for the tallest and most generously proportioned sailor. In pursuit of the best possible sleeping experience, I-36 members have purchased custom fitted mattresses, added an “egg crate” foam layer, installed a Froli spring system, or even invested in a V-berth sleeping bag system. Add 7.5“side 30“foot 30 foot BottomFittedSheetTemplate N t Sid Note:Sidemeasurement t considersafoam/mattress depthof5“ ¾“finished casingfor elasticaround edge 86“length g 82“midline My own sleeping experience in enhanced by fitted sheets. Here is how I make them for Mischief: 90“head Add7.5“side Add 15“side Frenchseam 4 corners 4corners Materials List: Frenchseam 2corners 30“foot 30 foot ¾“finished casingfor elasticaround f footand20” ” downeach edge TopSheetTemplate N t Sid Note:Sidemeasurement t considersafoam/mattress depthof5“ 86“length g 82“midline Continue with¾“ finished finished hemto sheethead 90“head • Two (2) King (not Cal) size flat sheets in the highest thread count you can afford. Shop white sales for that next set of sheets. Pre-wash the sheets for best results. • 1/2 inch elastic for the bottom fitted sheet and foot of the top sheet. You will need 6.5 yards for the bottom sheet and 1.5 yards for the top sheet for a total of 8 yards. Usefinishededgeofflatsheetalongthisedgewhenlayingouttopsheet. A Finely Fitted Berth continued on page 10. Page 9 A Finely Fitted Berth from page 9 Steps: 1. Measure your V-berth using the bottom and top sheet templates with this article. Mischief has a 1981 hull and the measurements in the templates are hers. 2. Transfer the measurements to the flat sheets using fabric marker and yardstick. Better yet, make a pattern you can reuse. Tip: Make a half pattern, fold the sheet in half and pin the pattern along the fold. 3. Cut out the bottom and top sheets from the flat sheets. Tip: For the top sheet, use the finished end of the flat sheet as the hem along the width (head) of the top sheet. 4. Sew French seams at the 4 corners of the bottom sheet and 2 corners of the top sheet. French seams means sewing the wrong sides of the fabric together, turning the seam inside out, and sewing another seam, trapping the raw edges inside. You can find detailed tutorials online if you are rusty. 5. Make a 3/4” casing for the elastic along the edge of the bottom sheet. Be sure to leave a 2” opening to insert the elastic. Make a 3/4” casing for the top sheet around the foot of the sheet and 20” inches up each side. 6. Insert the elastic in the bottom sheet casing using a safety pin to pull it through, sew the ends of the elastic together, and sew the casing closed. Tip: To more easily find the foot of the bottom sheet when you are making up the berth, sew a small button in the middle of the foot, close to the casing. 7. Insert the elastic in the top sheet casing, sew the ends of the elastic into the casing and then hem the sides of the top sheet by continuing the 3/4” casing along the edges up to the head of the sheet. Finishing Touches The artwork created by Pandora NashKarmer for the annual San Francisco All Islanders Rendezvous is wonderful. I really wanted to preserve the image printed on my Rendezvous T-shirts, so I made pillows for Mischief’s V-berth! Here are some tips: Page 10 • The neckline of the T-shirt will prevent centering the image if you make then all the same size. Mischief’s finished pillows are 15” square. • Use fusible (iron-on) interfacing to stabilize the T-shirt fabric and make it easier to handle when sewing. • Use a different fabric for the back of the pillow. • Had no luck using those preshaped pillow forms. Just stuff each pillow with fiber fill to desired shape.

