Q3305
Igniter-Flame Rod Assembly
INSTALLATION INSTRUCTIONS
APPLICATION
SPECIFICATIONS
The Q3305 Spark Igniter-Flame Rod assembly replaces
the original spark igniter-flame rod assembly in the Q3451
Pilot Burner Igniter-Sensor used with the S8600 Intermittent Pilot Ignition Systems. The assembly can be replaced
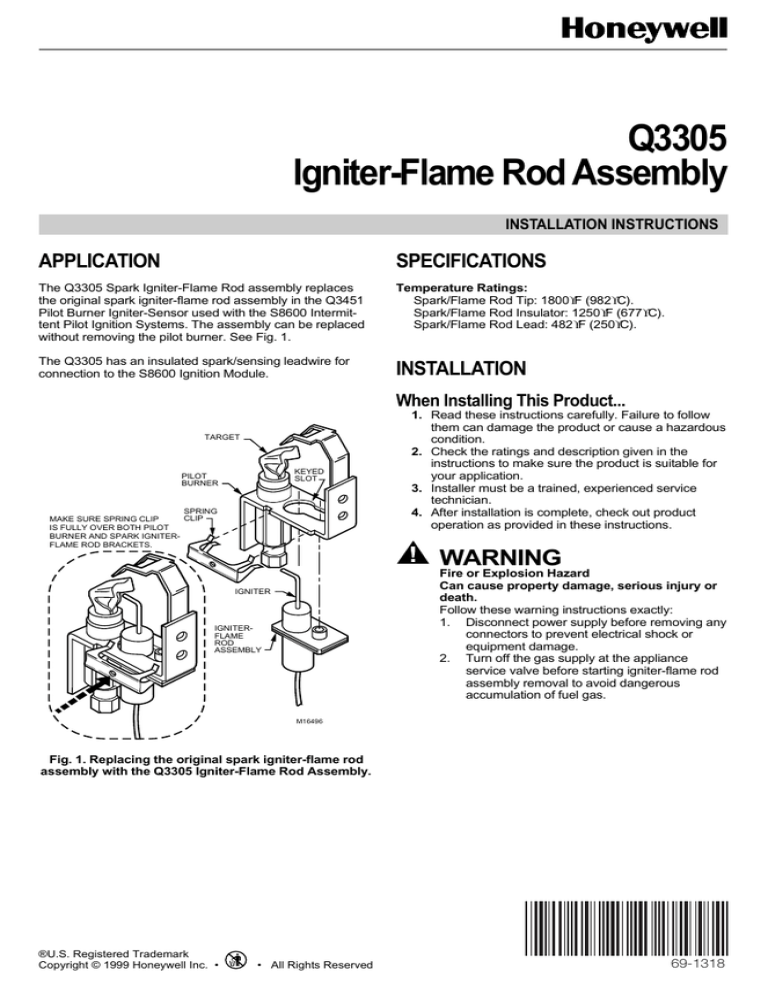
without removing the pilot burner. See Fig. 1.
Temperature Ratings:
Spark/Flame Rod Tip: 1800°F (982°C).
Spark/Flame Rod Insulator: 1250°F (677°C).
Spark/Flame Rod Lead: 482°F (250°C).
The Q3305 has an insulated spark/sensing leadwire for
connection to the S8600 Ignition Module.
INSTALLATION
When Installing This Product...
TARGET
KEYED
SLOT
PILOT
BURNER
SPRING
CLIP
MAKE SURE SPRING CLIP
IS FULLY OVER BOTH PILOT
BURNER AND SPARK IGNITERFLAME ROD BRACKETS.
1. Read these instructions carefully. Failure to follow
them can damage the product or cause a hazardous
condition.
2. Check the ratings and description given in the
instructions to make sure the product is suitable for
your application.
3. Installer must be a trained, experienced service
technician.
4. After installation is complete, check out product
operation as provided in these instructions.
WARNING
Fire or Explosion Hazard
Can cause property damage, serious injury or
death.
Follow these warning instructions exactly:
1. Disconnect power supply before removing any
connectors to prevent electrical shock or
equipment damage.
2. Turn off the gas supply at the appliance
service valve before starting igniter-flame rod
assembly removal to avoid dangerous
accumulation of fuel gas.
IGNITER
IGNITERFLAME
ROD
ASSEMBLY
M16496
Fig. 1. Replacing the original spark igniter-flame rod
assembly with the Q3305 Igniter-Flame Rod Assembly.
®U.S. Registered Trademark
Copyright © 1999 Honeywell Inc. •
• All Rights Reserved
X-XX UL
69-1318
Q3305 IGNITER-FLAME ROD ASSEMBLY
Remove Old Assembly
Mount Replacement Assembly
1. Turn off power at circuit breaker or fuse box.
2. Hold the bottom of the assembly with one hand; with
the other hand, remove the spring clip by pulling it
away from the pilot burner. See Fig. 1.
3. Remove the assembly from the pilot burner.
4. Disconnect the leadwires from the ignition system
control module.
5. Discard the old assembly and spring clip.
IMPORTANT
Make sure the assembly is oriented in the proper
direction for installation into the pilot burner.
1. Insert the assembly into the pilot burner until it is
flush with pilot burner bracket. Secure with new
spring clip provided. See Fig. 1.
2. Connect the leadwire (with black insulated .250 in.
quick connect) of the spark igniter rod to the spark
terminal of the S8600 Ignition Module. Do not allow
the leadwire of the spark igniter to touch grounded
metal surfaces because this reduces the voltage
available at the spark gap.
STARTUP AND CHECKOUT
1. Make sure that the spark gap of the spark igniter rod
to the target tip is between 0.080 and 0.140 in. If the
gap is outside this specification, use a needle-nosed
pliers and bend the rod to bring the gap within the
specification.
2. Check the system operation according to the
appliance manufacturer checkout procedure.
Home and Building Control
Honeywell Inc.
Honeywell Plaza
P.O. Box 524
Minneapolis, MN 55408-0524
69-1318 G.R. 6-99
Home and Building Control
Honeywell Limited-Honeywell Limitée
155 Gordon Baker Road
North York, Ontario
M2H 3N7
Printed in U.S.A. on recycled
paper containing at least 10%
post-consumer
2 paper fibers.
www.honeywell.com


