INSTRUCTIONS FOR
Propur™ PRODUCTS
1-2-3 Quick Start Guide
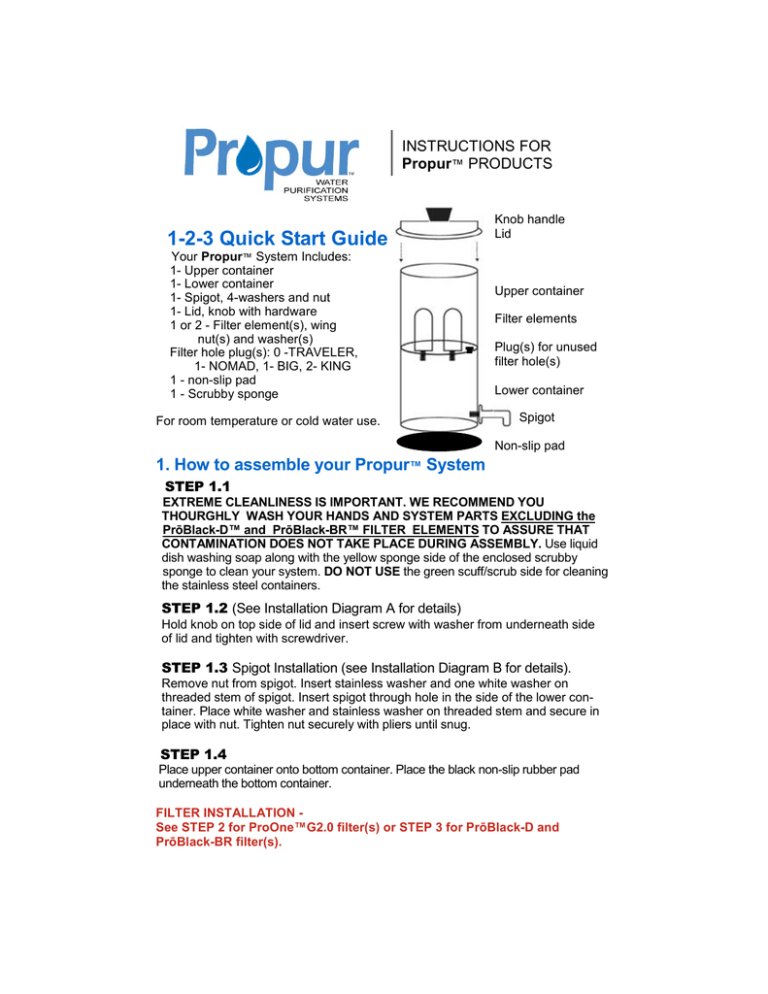
Your Propur™ System Includes:
1- Upper container
1- Lower container
1- Spigot, 4-washers and nut
1- Lid, knob with hardware
1 or 2 - Filter element(s), wing
nut(s) and washer(s)
Filter hole plug(s): 0 -TRAVELER,
1- NOMAD, 1- BIG, 2- KING
1 - non-slip pad
1 - Scrubby sponge
For room temperature or cold water use.
Knob handle
Lid
Upper container
Filter elements
Plug(s) for unused
filter hole(s)
Lower container
Spigot
Non-slip pad
1. How to assemble your Propur™ System
STEP 1.1
EXTREME CLEANLINESS IS IMPORTANT. WE RECOMMEND YOU
THOURGHLY WASH YOUR HANDS AND SYSTEM PARTS EXCLUDING the
PrōBlack-D™ and PrōBlack-BR™ FILTER ELEMENTS TO ASSURE THAT
CONTAMINATION DOES NOT TAKE PLACE DURING ASSEMBLY. Use liquid
dish washing soap along with the yellow sponge side of the enclosed scrubby
sponge to clean your system. DO NOT USE the green scuff/scrub side for cleaning
the stainless steel containers.
STEP 1.2 (See Installation Diagram A for details)
Hold knob on top side of lid and insert screw with washer from underneath side
of lid and tighten with screwdriver.
STEP 1.3 Spigot Installation (see Installation Diagram B for details).
Remove nut from spigot. Insert stainless washer and one white washer on
threaded stem of spigot. Insert spigot through hole in the side of the lower container. Place white washer and stainless washer on threaded stem and secure in
place with nut. Tighten nut securely with pliers until snug.
STEP 1.4
Place upper container onto bottom container. Place the black non-slip rubber pad
underneath the bottom container.
FILTER INSTALLATION See STEP 2 for ProOne™G2.0 filter(s) or STEP 3 for PrōBlack-D and
PrōBlack-BR filter(s).
ASSEMBLY AND FILTER INSTALLATION DIAGRAM A
KNOB HANDLE - Attach Screw with
washer from inside of LID
T
LID
UPPER CONTAINER
.
Plug(s) for unused filter hole(s)
Wing nuts - REMOVE WHEN ATTACHING
FLUORIDE FILTER(S). See STEP 3.
Does NOT apply to ProOne™ filters
Filter washer(s) mount on top side of
container
Propur™ systems are gravity feed and therefore water will migrate through
the filter elements and drip-drip-drip into the lower water storage container.
The first cycle of water generally takes longer but the flow rate will increase
with use.
NEW SOLID STAINLESS SPIGOT INSTALLATION DIAGRAM B
Container
NEW On/Off Spigot handle
On - 6 o’clock position
Off - 3 o’clock position
NEW “wide mouth” outlet
Stainless steel
washer on the
inside
One white washer
goes on the outside
and one on the inside
of the container.
Stainless steel
washer on the
outside
2. How to install ProOne™G2.0 Water & Fluoride filters
1. Remove filter(s) from packaging
2. Rinse under faucet – DO NOT PRIME
3. Install filter(s) with washer in upper container,
wing nut on bottom side of upper container
4. Cycle water 1 to 2 times and discard
before use
YOU ARE NOW READY TO USE-YOU MAY
EXPERIENCE A SLOWER FLOW RATE WITH YOUR
FIRST CYCLE - FLOW RATE WILL INCREASE WITH USE
We recommend you replace your filter(s) at least every year or up to 1,200
gallons per filter/2400 gallons per pair.
How to clean your ProOne™G2.0 filter(s).
Remove filters from the container. Use the dark green side of the scrubby sponge included with
your system and while holding the plastic base, scrub the entire white surface. Rinse off under
faucet and reinstall.
How can I check to make sure my ProOne™G2.0 filter(s) are working correctly?
You can run the “blue food coloring test” at any time to ensure your filters are working at optimum
performance. To initiate this test, you’ll just need regular red food coloring available at most grocery
stores. First empty any water from the upper and lower containers. Remove any fluoride filters you
may have attached. Place a glass under the stem of each water filter element in the lower container.
Place the upper container on top of the lower container and pour water into the upper container.
Place approx. 3 drops of blue food coloring in the water. After a short period of time, check the
glasses in the lower container. If the water in the glass(es) is clear, your filter(s) are working correctly. If you see any blue tint color water in either glass or both, that is an indication that one or both
filters may need to be replaced. You may notice some blue tint coloring on the ProOne™G2.0 filters
after performing the test. This is OK. Coloring will go away after a period of time or you may try
cleaning your filters.
How should I store my ProOne™G2.0 filters?
When NOT using your Propur™ system for more than several days, we recommend you leave
the top lid off and drain the water from the bottom container. For extended period of non-use, let
the filter(s) air dry, then roll in a terrycloth towel and store in a cool and dry place.
How do I know when to change my ProOne™G2.0 filters?
Should you notice a difference in the taste of your water and/or a slow down in the flow rate, it may
indicate your filter(s) need to be cleaned or if you’ve cleaned a few times, may indicate your filter(s)
need to be replaced.
3. How to install PrōBlack-D™& BR™ water filters
Prōpur™ TRAVELER is a single filter system
Prōpur™ NOMAD is a 1-2 filter system
Prōpur™ BIG is a 2-3 filter system
Prōpur™ KING is a 2-4 filter system
SEE FILTER INSTALLATION DIAGRAM A ON PAGE 2..
STEP 3.1
Remove wing nut and washer from filter elements. CONDITION THE
PrōBlack-D™ or PrōBlack-BR™ FILTER ELEMENTS BY HOLDING THE
THREADED STEM AND RINSE EACH ELEMENT UNDER RUNNING WATER
FOR APPROX. 1 MINUTE. DO NOT PRIME the water filter elements - by NOT
placing the stem of the filter element up to the faucet forcing water into the stem
as this may damage the filter element.
STEP 3.2
Place each filter element into the hole in the bottom of the upper container and then
place the black sealing washer over the threaded stem and secure element by hand
tightening the wing nut onto the threaded stem on the bottom side of the upper
container. DO NOT OVER TIGHTEN. Repeat until all filter elements have been
installed.
For systems having more filter holes than filter elements, press the black
block out plug(s) into the empty hole(s) so plug(s) extend down.
We recommend you replace your PrōBlack-D™ and PrōBlack-BR™ water
filter(s) at least every year or up to 3,000 gallons per filter/6,000 gallons per
pair.
STEP 3.3
You are now ready to start your Prōpur™ System.
Make sure the spigot is in the “OFF” position. Remove the lid and fill the upper
container fully with water. Allow all water to flow into the lower container.
The first cycle of water may flow at a slower rate as it’s conditioning the
filter elements. The flow rate will improve with the next cycle.
Open the spigot and discard the water in the lower container. Refill the
upper container and begin using or go to STEP 3 for installing the
PrōBlack+™ and PrōBlack+T™ Advanced Fluoride Filters.
PLEASE NOTE: The PrōBlack-D™ and PrōBlack-BR™ water filter
elements contain carbon and black particles may be seen in the water in the
bottom container. This is normal and will clear up.
FOR MAXIMUM FLOW RATE, WE RECOMMEND YOU FILL THE UPPER
CONTAINER FULLY WHENEVER REFILLING. ALSO, LOWER CONTAINER
SHOULD BE EMPTY BEFORE REFILLING UPPER CONTAINER.
IMPORTANT - Please make sure you have completed
STEP 3.3 above BEFORE Installing the PrōBlack+™
or PrōBlack+T™ Advanced Fluoride Filters.
4. How to install PrōBlack+™ & PrōBlack+T™ Advanced
Fluoride Filters
DID YOU COMPLETE STEP 3.3?
The PrōBlack+™ and PrōBlack+T™ Advanced Fluoride Filters mount
“piggy back” on the bottom side of the PrōBlack-D™ or PrōBlack-BR™
filter elements ONLY. See diagram below.
With the PrōBlack-D™ or PrōBlack-BR™ water filter elements installed, remove top container from bottom container and place on its side. Remove the
PrōBlack+™ or PrōBlack+T™ Advanced Fluoride Filters from packaging.
Flush the filter(s) BEFORE attaching to the PrōBlack-D™ or BR™ water filter
elements by holding the black plastic coupler end up to a faucet and allow water
to flow through for approx.30 seconds. Remove wing nut from filter and attach
fluoride filter onto the exposed threaded stem of the PrōBlack-D™ or BR™
water filter element. Hand tighten. Place the top container onto the bottom container. Fill the upper container fully and allow water to cycle thru to the bottom
container. Discard the first supply of filtered water. Once discarded, fill upper
container fully and use as instructed. These filters normally last up to 400
gallons per filter or up to 6 months with regular daily usage. With the
PrōBlack+™ or PrōBlack+T™ Advanced Fluoride Filters installed, flow rate
may drop when water in the lower container reaches the half-way point on the
PrōBlack filters.
Upper container
Lower container
Black plastic coupler
OR
Please see SERVICE KIT/BACK WASH INSTRUCTIONS
to restore maximum flow rate to your fluoride filters.
SERVICE KIT / BACK WASH INSTRUCTIONS FOR
New service kit designed to
restore maximum flow rate to
your Propur™ fluoride filters
Foam
spacer
Remove fluoride filter from primary filter.
Turn upside down. Place foam spacer on
black plastic grille and hold up to faucet
water outlet Apply moderate water pressure. Flush until you see a steady stream of
water coming out the black coupler end.
Fluoride filter is now ready to be re-attached
to primary filter.
Faucet
Black coupler
Water stream
RECOMMENDED Propur™ SYSTEM USE AND MAINTENANCE
1.
2.
Wash the upper and lower containers once every several months with liquid dish washing soap
by hand. DO NOT USE DISHWASHER MACHINE SOAP.
If NOT using your Propur™ system for any period of time, we suggest you remove the lid, drain
any water that is left in the lower container and remove the filter elements from your system and
allow to air dry. Wrap your filter elements in a terrycloth towel and store in a dry and cool
place. Until first activated, you filter elements can be stored indefinitely. Do not allow wet water
filter elements to freeze. Do not place water filter elements or fluoride filters in a dishwasher or
microwave oven. When you restart your system, simply discard the first supply of water from the
lower container.
FREQUENTLY ASKED QUESTIONS
How do I know when to change my PrōBlack-D™ or PrōBlack-BR™ filters?
Should you notice a difference in the taste of your water and/or a slow down in the flow rate,
may be an indication your filters need to be cleaned or if you’ve cleaned a few times, may
indicate your filters need to be replaced.
How do I know how much water is in the bottom container?
You can either lift the upper container to see the water level or use a sight glass spigot which
shows the water level in the lower container. Please remember you must use water from the bottom
container before refilling the upper container.
How long can I store water in the bottom container?
We recommend you cycle water from the bottom container on a regular basis. Should you need
to store water, please store water in an appropriate water storage container.
What if I use a water softener?
We recommend you source your water before it goes thru the water softener.
FREQUENTLY ASKED QUESTIONS (continued)
How do I clean my PrōBlack-D™, PrōBlack-BR™ filter elements?
If using fluoride filters, remove from the water filter elements. Remove the elements from the top
container by removing the wing nuts and rubber washers on the bottom side. While holding the
threaded stem, place the element under running water or in a bowl of water and scrub the surface
using the dark green side of the scrubby sponge included. Always scrub away from the threaded
end of the element. Rinse and re-assemble the elements as detailed in assembly instructions
above. Never wash the elements with cleaning detergents or soap. PrōBlack-D™ and
PrōBlack-BR™ water filter elements should be replaced about every 3,000 gallons per filter or
6,000 gallons per pair, depending on the condition of your source water.
How can I check to make sure my PrōBlack-D™ or ProBlack-BR™ filters are working
correctly?
You can run the “blue food coloring test” at any time to ensure your filters are working at optimum
performance. The initiate this test, you’ll just need regular red food coloring available at most
grocery stores. First empty any water from the upper and lower containers. Remove any fluoride
filters you may have attached. Place a glass under the stem of each water filter element in the
lower container. Place the upper container on top of the lower container and pour water into the
upper container. Place approx. 3 drops of blue food coloring in the water. After 15 minutes, check
the glasses in the lower container. If the water in the glass(es) is clear, your filter(s) are working
correctly. If you see any red or pinkish color water in either glass or both, that is an indication that
one or both filters need to be replaced.
Since the PrōBlack-D™ and PrōBlack-BR™ are designed to allow beneficial minerals to pass
through the filters, we use blue food coloring because blue does NOT contain minerals that would
be allowed to pass through the filters.
What should I do if my PrōBlack-D™ and PrōBlack-BR™ filters are taking too long to filter?
Clean your water filter elements as described above.
What if I see a “white” ring in the bottom container?
May be an indication that you have calcium in your water supply. You can clean using a 50-50%
A word about TDS and PPM…
From Wikipedia, the free encyclopedia
“A TDS Meter indicates the Total Dissolved Solids (TDS) of a solution, i.e. the concentration of dissolved solids in it. Since dissolved ionized solids such as salts and minerals
increase the conductivity of a solution, a TDS meter measures the conductivity of the
solution and estimates the TDS from that. A TDS meter typically displays the TDS in
parts per million (ppm). For example, a TDS reading of 1 ppm would indicate there is 1
milligram of dissolved solids in each kilogram of water.” TDS is a measure of total
dissolved solids and NOT dissolved contaminants. A higher TDS can simply be high
calcium or mineral content. As Propur™ filters are made from minerals, TDS may be
higher after the water has been treated. This does not mean the filter isn’t working, it
means the TDS meter is picking up the minerals that are naturally released by the filter.
A PPM meter is the same as a TDS meter, it is simply measures dissolved solids in water. A TDS meter is not generally recognized in the industry as a proper means of testing
water for contaminants. They were created years ago by the manufacturers of reverse
osmosis systems as a means of demonstrating the effectiveness of RO which removes
most if not all minerals.
BRANDS OF Propur™
Propur™ Systems are made from imported and domestic components
manufactured to Propur™ specifications and standards and assembled
in Walled Lake, Michigan USA. For the latest information and
instructions on assembling and maintaining Propur™ products, please
visit www.propurusa.com.
FOR TECHNICAL SUPPORT PLEASE CALL 1-800-544-3533 OR
email: customerservice@propurusa.com
Propur™ LIMITED WARRANTY
PROPUR (“PP”) SELLS ITS PRODUCTS WITH THE INTENT THAT THEY ARE FREE FROM DEFECTS IN
MATERIALS AND WORKMANSHIP FOR A PERIOD OF 2 YEARS FOR PROPUR SYSTEMS, 1 YEAR FOR PROONE
G2.0 FILTERS AND 90 DAYS FOR PROPUR PITCHER FROM DATE OF PURCHASE. “PP” WARRANTS TO THE
ORIGINAL RETAIL PURCHASER/CONSUMER THAT ITS PRODUCTS WILL BE FREE OF DEFECTS IN MATERIAL
AND WORKMANSHIP UNDER NORMAL USE AND WILL REPLACE OR REPAIR ANY PRODUCT AT ITS SOLE
DISCRETION DURING THE STATED WARRANTY PERIOD. THIS WARRANTY DOES NOT COVER DAMAGE
CAUSED BY MISUSE OR ABUSE; ACCIDENT; IMPROPER INSTALLATION; DROPPED PRODUCT; FAILURE TO
PROVIDE RECOMMENDED MAINTENANCE; TRANSPORTATION DAMAGE; NEGLECT; ENVIRONMENTAL CONDITIONS; OR ANY OTHER CONDITIONS WHATSOEVER THAT ARE BEYOND THE CONTROL OF “PP”. THIS
WARRANTY SHALL BE THE SOLE AND EXCLUSIVE WARRANTY. THERE SHALL BE NO OTHER WARRANTIES
EXPRESS OR IMPLIED INCLUDING ANY IMPLIED WARRANTY OF MERCHANTABILITY OR FITNESS OR ANY
OTHER OBLIGATION ON THE PART OF “PP” WITH RESPECT TO PRODUCTS COVERED BY THIS WARRANTY.
“PP” SHALL NOT BE HELD LIABLE FOR ANY INCIDENTAL, CONSEQUENTIAL OR SPECIAL DAMAGES TO PERSONAL PROPERTY FROM, BUT NOT LIMITED TO, A DEFECTIVE UNIT, IMPROPER USE, ABUSE, ACCIDENT, OR
NEGLECT. IN NO EVENT SHALL THIS WARRANTY REQUIRE MORE THAN THE REPAIR OR REPLACEMENT OF
ANY PART OR PARTS WHICH ARE FOUND TO BE DEFECTIVE WITHIN THE EFFECTIVE PERIOD OF THE WARRANTY. NO REFUNDS WILL BE GIVEN. TO OBTAIN WARRANTY SERVICE ON YOUR PROPUR™ PRODUCT,
MAIL THE PRODUCT WITH YOUR DATED SALES RECEIPT AS PROOF OF PURCHASE, POSTPAID, TO THE
FOLLOWING ADDRESS:
PROPUR, 2078 WINNER ST., WALLED LAKE, MI 48390. NO C.O.D.’S.
THIS WARRANTY PROVIDES YOU WITH SPECIFIC LEGAL RIGHTS. YOU MAY HAVE ADDITIONAL RIGHTS
WHICH MAY VARY FROM COUNTRY TO COUNTRY. BECAUSE OF INDIVIDUAL COUNTRY REGULATIONS, SOME
OF THE ABOVE LIMITATIONS AND EXCLUSIONS MAY NOT APPLY TO YOU.
© Propur™ 2012-2014. ALL RIGHTS RESERVED.
V13114


