Scrolling Tutorial
advertisement

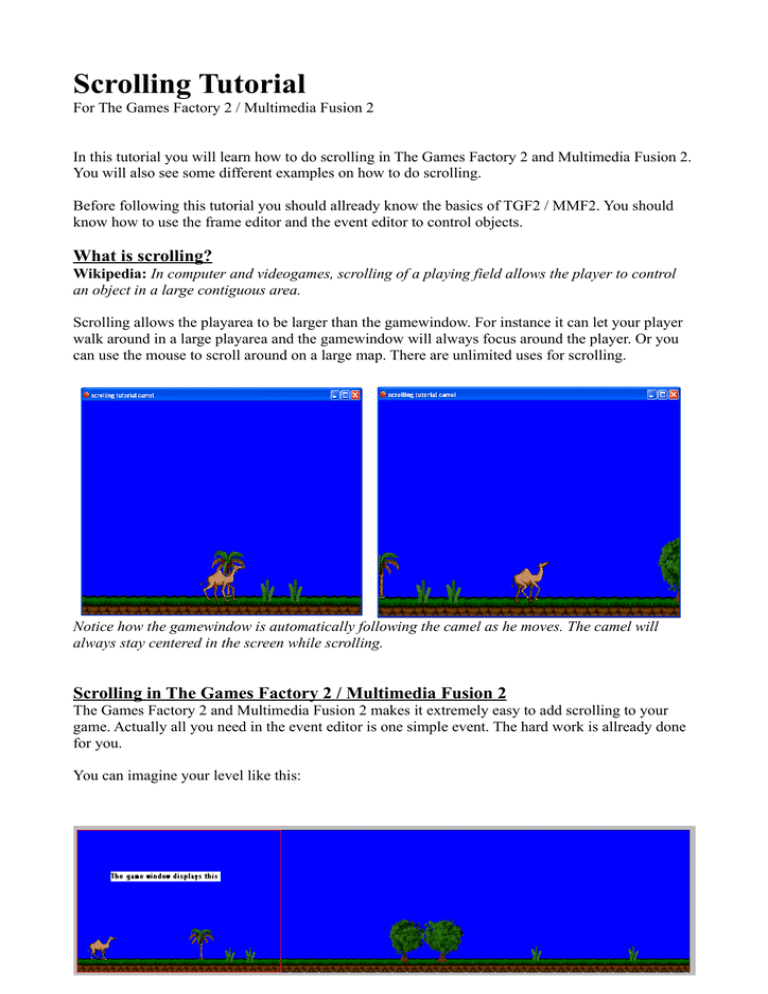
Scrolling Tutorial For The Games Factory 2 / Multimedia Fusion 2 In this tutorial you will learn how to do scrolling in The Games Factory 2 and Multimedia Fusion 2. You will also see some different examples on how to do scrolling. Before following this tutorial you should allready know the basics of TGF2 / MMF2. You should know how to use the frame editor and the event editor to control objects. What is scrolling? Wikipedia: In computer and videogames, scrolling of a playing field allows the player to control an object in a large contiguous area. Scrolling allows the playarea to be larger than the gamewindow. For instance it can let your player walk around in a large playarea and the gamewindow will always focus around the player. Or you can use the mouse to scroll around on a large map. There are unlimited uses for scrolling. Notice how the gamewindow is automatically following the camel as he moves. The camel will always stay centered in the screen while scrolling. Scrolling in The Games Factory 2 / Multimedia Fusion 2 The Games Factory 2 and Multimedia Fusion 2 makes it extremely easy to add scrolling to your game. Actually all you need in the event editor is one simple event. The hard work is allready done for you. You can imagine your level like this: The red square shows what the gamewindow will display. Do you see how the gamewindow follow the camel as he walks? This is because we have set the screen to always scroll at the camel. Note: For scrolling to work, the playarea must be larger than the gamewindow. As you can see on the pictures above, the playarea is about 3 times wider than the gamewindow. Center the screen at the player The easiest way to do scrolling in TGF2 / MMF2 is to let the screen follow an object. Make sure the playarea is larger than the gamewindow. Then make an Active object and place a large quickbackdrop that fills the entire frame. Give the Active Object the 8-direction movement. The entire frame in the picture is 1200 * 1000 pixels. The gamewindow is 640*480. Now go to the event editor, make an always condition and add this action from the Storyboard controls: Click on Relative to and select your Active Object. As the X and Y value, type 0. You'll see a square placed upon the Active Object. You can move this around to choose where to center the screen acording to the Active Object. When you are satisfied, click OK. This is how the event will look in the Event List Editor: Test the game. When you move around in your level, the screen should always be focusing at the Active Object. Autoscroll It is also possible to let the screen scroll automatically in one direction. This can be useful in many situations, and it is quite simple to do. In an always condition, add this action: Since the frame is 640 pixels wide, the center of the screen is left edge of game window + 320. We want to move the center of the screen 1 pixel to the right. So we need to get the X coordinate of left visible edge and add 321 to it. That equals center + 1. So type X Left Frame + 321 or click the Retrieve data from an object button, and do as in the picture below and add +321: Test the game. The screen will now scroll slowly to the right. Use the mouse to move the screen. You have probably played games that make the screen scroll while you place the mouse near the edge of the screen. This is quite easy to accomplish in TGF2 / MMF2. There are different ways to get the same effect. I will show you the one I would use myself. First we need conditions to check if the mouse is near the edge of the gamewindow. The screen should scroll while the mouse is within the yellow zones. We will have one event for each of the four «zones». Of course you don't need to draw the zones in your game. All is done with calculations within the event editor. We will use Compare two general values to check that the mouse is within the zone we want. First we test if the mouse is within the zone to the right. ______________________590____________________50_ First we need to translate this zone into the event editor. The yellow zone is 50 pixels wide. Do you see that this zone is equal to everything greater than the X position of the window's right edge minus 50? So there we have our condition! To do this in the event editor, make a new condition and select Compare two general values from the Storyboard controls. As the first value, type XMouse, or click the Retrieve data from an object button and select Current X position of the mouse from the mousepointer and keyboard icon. As comparison choose Greater or equal to. As the second value type X Right Frame - 50 , or click the Retrieve data from an object button and select X coordinate of the right visible edge from the Frame section of the Storyboard Controls icon, and subtract 50 from the value. Now we have our condition. It tests for the X position of the mouse beeing within the «right zone» of the game window. Now we need the action to scroll the screen to the right. From the Storyboard Controls select Scrollings / Center horizontal position of window in frame. Since the frame is 640 pixels wide, the center of the screen is left edge of game window + 320. We want to move the center of the screen 5 pixels to the right. So we need to get the X coordinate of left visible edge and add 325 to it. That equals center + 5. So type X Left Frame + 325 or click the Retrieve data from an object button, and do as in the picture below and add +325: The expression should look like this: Press OK and you shall now have a fully working scrolling event. Test the application and check if it works! Now you need to do the same thing for moving left, up and down. I will not explain them in detail, as you should now get the hang of it. Here are how the events will look in the Event List Editor for scrolling right and left. You see we add 315 to the Left visible edge when moving left. This is because 315 is 5 pixels less than the center of the screen, while 325 was 5 pixels more. This moves the center of the screen 5 pixels to the left. You see when you test the game that you first need to scroll to the right before you can scroll to the left. This is because the default position of the gamewindow is at the top left of the playarea. To move the screen up and down you should compare according to the top or bottom visible edge, instead of the left or right, and scroll the vertical position of the screen instead of the horizontal. The height of the screen is 480, so the vertical center is 240. Well done! The screen should now scroll while the mouse is near the edges. Parallaxing All of the above will work in older versions of Multimedia fusion all back to The Games Factory 1. When it comes to parallaxing, TGF2 / MMF2 has a new feature that makes this very easy to do. In older versions parallaxing could be a real pain to accomplish. So what is parallaxing? Parallaxing is when parts of the screen scroll faster than other parts. Imagine your character running in a forest. When he run the screen will follow him, but you'll also see trees in the background scrolling in a slightly slower speed, and behind the trees you might see a mountain scroll in an even slower speed. Perhaps there are also trees in the front of the character scrolling even faster than him. This way you give a deeper feeling to the terrain and makes it look more real. As the player moves to the right, the layers in the back scrolls slower than the ones in the front. The trick to accomplish this in TGF2 / MMF2 is by placing the different kind of backdrops in different layers. You can then assign a scrollingspeed to the layer, and all the objects in each layer will scroll at the same speed. Layers are great in the way that they allow backdrops to be shown in front of Active Objects that are in layers behind them. If you activate the Wrap Horizontally setting on a layer, objects will automatically reposition to the correct spot when leaving the gamewindow at either side. For wrapping to work, you should need to extend the virtual framesize. The frame doesn't need to be larger than the gamewindow. Instead set the virtual framesize to the wanted size of the playarea. To create a new layer, press ctrl + K. You can now drag objects into the new layer. The first layer will be the one in the back, so put the backdrops with the slowest scrollingspeed into this layer. To give a layer a slower scrollingspeed, click on it and change its X coefficient from 1.0 to 0.6 or to another value of your choice lower than 1. In this game the screen only scrolls horizontally, so I have only adjusted the X coefficient of the layers. It is fully possible to have both horizontal and vertical parallaxing in the same frame. Congratulations! You have completed the scrolling tutorial. For comments and questions, please send e-mail to ilikepopcorn@hotmail.com. Written by Kjetil Nossum (Popcorn)


