STRUCTURAL IMPERFECTIONS IN QUARTZ CRYSTALS W. L. Bor
advertisement

STRUCTURAL
IMPERFECTIONS
IN QUARTZ CRYSTALS
W. L. Bor.roaNo T. Arqonus. Bell TelebhoneLaboralories.
iurroy HiIl, I{ew Jrriry.
Assrnecr
A method for examining the topography of atomic planes is developed and applied to
quartz cryrstals. It is thought to have higher resolution than the method of Wooster and
Wooster (Natwe, 155, 786 (1945)), or that of Ramachandran (Proc. Ind Acad.. Sei.,
l9A, 280 (1944)). Because of the higher resolution it gives more detailed information. A
fair percentage of ostensibiy perfect quartz is shown to have slight irregularities.
Quartz crystals that seem to be perfect by the ordinary tests such as
etching and single crystal r-ray double reflection, can be shown to be
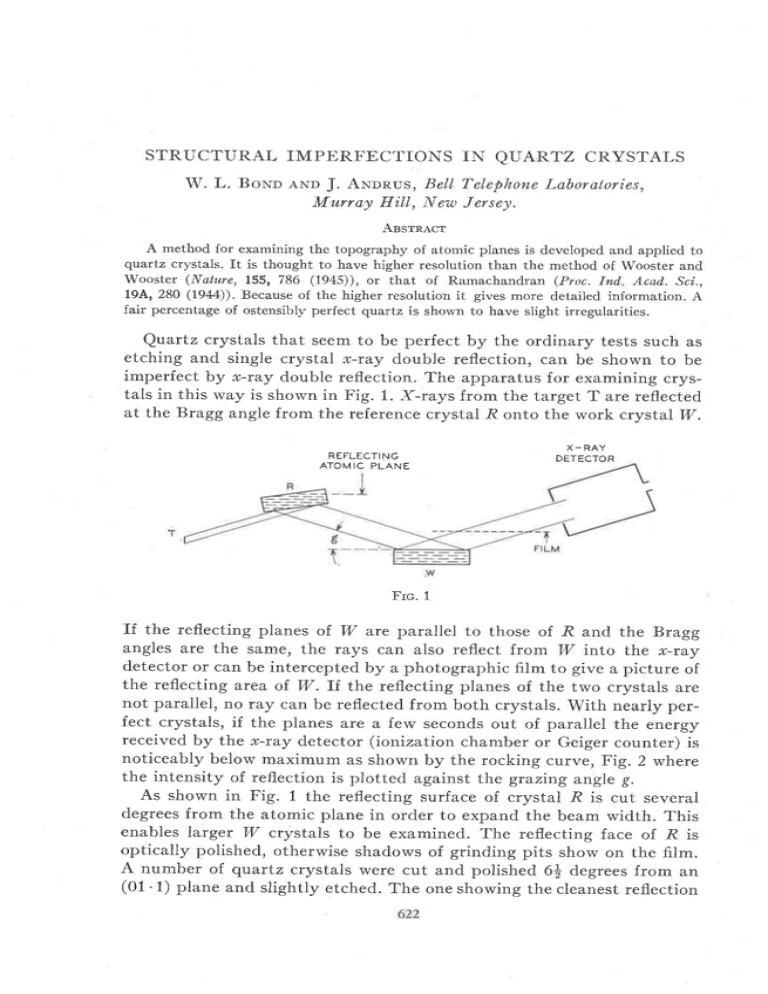
imperfect by r-ray double reflection. The apparatus for examining crystals in this way is shown in Fig. 1. X-rays from the target T are reflected
at the Bragg angle from the referencecrystal R onto the work crystaIW.
R E F L E C T IN G
ATOI\,'llC PLANE
X-RAY
DETECTOR
Frc. 1
If the reflecting planes of W are parallel to those of R and the Bragg
angles are the same, the rays can also reflect from W into the r-ray
detector or can be intercepted by a photographic film to give a picture of
the reflecting arca of W. ft the reflecting planes of the two crystals are
not parallel, no ray can be reflected from both crystals. With nearly perfect crystals, if the planes are a few secondsout of parallel the energy
received by the o-ray detector (ionization chamber or Geiger counter) is
noticeably below maximum as shown by the rocking curve, Fig. 2 where
the intensity of reflection is plotted against the grazing angle g.
As shown in Fig. 1 the reflecting surface of crystal R is cut several
degreesfrom the atomic plane in order to expand the beam width. This
enables larget W crystals to be examined. The reflecting face of R is
optically polished, otherwise shadows of grinding pits show on the film.
A number of quaftz crystals were cut and polished 6f degreesfrom an
(01.1) plane and slightly etched.The one showing the cleanestreflection
STRUCTURALIMPERFECTIONSIN QUARTZCRYSTALS
623
was chosen as R. A slight etch after polishing narrows the width of the
rocking curve. Rough ground crystals may have a peak width at half
max. of 3 minutes. Polished and etched crystals may have a width of less
than 10 seconds.
The film is placed as closeto W a"spossiblebecausethe copper radiation
used has two wave lengths Kar and Kaz both of which reflect but at
slightly difierent angles. Hence two overlapping pictures are given, but
if the film is closeto W the offset can be kept to a few thousandths of an
i n c h . T h e ( d ) s p a c i n go f .q t a r L z f o r t h e ( 0 1 ' 1 ) p l a n e i s 3 . 3 4 3 2A a t 2 6 " C .
z
o
F
O4
)
E
o
F
a2
z
U
F
z
1
o
ANGLEg lN MTNUTES
Frc.2
Ka1 (which is twice as strong as Kap) has a wave length 1.54050A.
Hence, from Bragg's law: tr:2d sin 0 we see that the d's for at and az
d i f f e r b y 2 . 0 3m i n u t e s .
If a minor part of crystal trZ is slightly misoriented, this part will not
reflect most strongly at the same angle setting as does the major part of
the crystal. It W is rotated to make the minor part reflect most strongly,
then the major part reflects less strongly. The photographic film will
show in each casefrom where the strong reflection came. Figure 3 illustrates such a case. The two pictures are of a natural (01 1) face of a
small quartz crystal found in Herkimer County, New York-a so called
Herkimer County Diamond. The crystal was turned through 50 seconds
between pictures a and b. The rocking curve indicates where interesting
features may be found. Picture a was made with the crystal set at the
peak as indicated by the letter (o) over the taller peak of the rocking
curve. Picture 6 was made at the crystal setting indicated by the letter
624
W. 1,. BOND AND J. ANDRUS
b on the lower peak of the rocking curve. The bright area of picture a
shows that about a third of the face was reflecting at this setting. Picture
D shows that the larger part of this face is about 50 secondsin orientation
away from the smaller part, but is curved so that only a small part
reflects at any one setting. The sketch above the rocking curve shows the
direction in which the r-rays approach and leave the crystal. This is important becausethe resolving power is highest if the plane containing the
incident beam direction and the reflected beam direction is perpendicular
to the line in which the atomic planes of the two crystal parts intersect.
For this reason in investigating a surface, rocking curves are made for
Frc. 3
two directions at 90o to each other. The poorer reflection is then investigated photographically.
The intensity axis of the rocking curve, Fig. 3, is marked 1/. In this
figure and subsequentones meter readings are plotted and.I:0 corresponds to a reading of 20. The meter is non-linear so that if Fig. 3 were
corrected for this, as was done in Fig. 2, the peaks would appear somewhat sharper.
Figure 4 shows a crystal from Hot Springs, Arkansas. The crystal was
cut in two in a plane parallel to (01 .1). It is seenthat the crystal is quite
imperfect. The fine parallel lines along two nearly perpendicular edges
are probably "growth lines." Picture b shows that below the major part
is a smaller region turned about 50 secondsfrom the major part about a
vertical axis. The small peak at the left of the rocking curve was photographed but not included here. It is due to a very small area of the face
below 6 and also reflection from the prism face which does not lie in the
plane of the cut face.-Sincethe largest part of this reflection is from an
area not parallel to the photographic plate it appears as a long streak
going to the right of the film. The pictures are without distortion only
when the film is parallel to the reflecting face.
STRUCTURALIMPERFECTIONSIN QUARTZCRYSTALS
625
Figure 5 shows six pictures from a plate made by the W. E. Co' at
Kearny to be used as a referencecrystal R. Although it is unsuitable for
a reference crystal it should make a perfect.ly good oscillator plate. The
diagonal stripes are parallel to a rhombohedral edge, the vertical stripes
are parallel to an a axis. The six pictures were made to determine
Frc.5
626
.W.
L, BONDAND T. ANDRUS
whether the stripes were due to different orientations, or could possibly
be interpreted as showing regions of different atomic spacing d (which
would necessitatedifierent d's). If a plate has a small part in which the d
constant is slightly larger than that of the major part but whose atomic
planes are parallel to those of the major part, the best reflection for the
minor part occurs at a slightly smaller angle regardless of direction of
w-ray beam. Hence turning the plate 180oin its plane doesnot reversethe
positions of the reflection, that is, the minor part always appears at a
lower angle than does the major. On the other hand, if the minor part
has the same d constant but its atomic planes are not quite parallel to
those of the major part, turning the plate 180odoes reverse the order of
occurrenceof reflection. By choosing a point on the crystal that can be
identified, f or instance the tip of an inverte d V that terminates a group of
lines one can study the relative intensities of adjacent lines throughout
the six pictures. Two lines thus checked showed that the line order does
reverseon reversing the crystal. Hence it is concluded that it is primarily
an orientation difference(of about 5 seconds),not a d spacing difference.
If impurities can change the d spacing by, say, one part in 106,then
roughly every half millimeter the fit of the old material on the new is out
by one cell. We may be able to find here a mechanism whereby a slight
d spacing difference caused by changing impurity content can, by an
accumulative effect, causeregions to be misoriented by amounts such as
are observedeven if the d spacing difierence is too small to detect by this
method.
The narrownessof the pictures of the secondseries,Fig. 5, is causedby
the plate in this reversedposition being more nearly perpendicular to the
x-ray beam, hence the beam covers less of the crystal width. The curved
edgesof the pictures A, B, C show the conical nature of a reflection. The
locus of all lines from a point (on the x-ray target) making a constant
angle d with a plane is a cone. The slight curvature of some of the diagonal
Iines is caused by the f,lm not lying perfectly flat. With the x-ray beam
coming onto the film at only 73"20'a slight curvature of the film gives
an exaggeratedcurve to what would otherwise be a straight line.
The large qtartz piece Fig. 6A was seen to be clear to the left of the
Iine 1-1 but smoky to the right. This boundary proved to be (10.1)
plane. The piece was sawed on the lines 1-1 and 2-2, the piece between
these lines proved to be also part clear and part smoky with a (11 1)
plane boundary as shown in Fig. 68. The surface 2-2 oI this piece was
investigated. A pair of light scratcheswere made on the surface to mark
the ends of the clear-smoky boundary (seearrows, Fig. 6b). At maximum
reflection, picture o shows only the edgesof the piece are reflecting. If we
turn to smaller angles, picture 6 shows that we have poorer reflections
IMPERFECTIONSIN QUARTZCRYSTALS
STRL/CTURAL
627
everywhere. Going to larger grazing angles,picture c shows two zonesof
reflettion separatedby a narrow dark band. Picture d, which is 24 seconds
away from picture o, has only a narrow band of reflection. This indicates
that the atomic layers at the surface are warped into an (s) curve, Fig.
6E. With the atomic planes warped in this way regions such as m and n
have the sameorientation and give a picture such as Fig. 6c. A maximum
slope occurs at 1, which gives Fig. 6d. If we turn the crystal further we
get no picture.
If the unit cell of smoky quartz is Iarger than the nuit cell of clear
'l't)
lot4/"r
Frc.6
quartz and the atomic layers are continuous (i.e. no dislocations), the
Iayers would warp to such a continuous curve. In Iaying on a thickness
z (Fig. 6E) the accumulated difference is za.If we assumethe transition
is a sine curve of length u height w and with a maximum slope of 24
secondsit is easily shown that (trwt/Z/ u)=116X10-6. Onpictute a, u
was found to be about 1.5 cms.
Whence
w= 70 X 10-6
If the difference za is accumulated in a thickness 0.9 cm. (the thickness
of the plate, since the lower face borders on clear material)'then the cell
dimensions of clear and smoky qaartz would difier by one part in afu ot
1 part in 13,000which seemsnot unreasonable.H. D. Keith (Proc. Phys.
628
W. L. BOND AND T. ANDRUS
Soc.,863, 208) says "Quartz parameters vary from sample to sample by
amounts as large as .01/6 accordingto impurity content.',
The "smoke" was cleared by heating the specimen to 300o C. pictures
taken after cooling were the same as before.
Figure 7 is a study of vicinal faces on a quartz crystal found at ,,Crystal Hill," Pennsylvania (near stroudsburg). The obvious vertical line in
the pictures divides the face into two nearly equal areas. These areas
Frc. 7
form a low "roof" of angle eleven minutes as determined by opticar reflection (two very sharp images are seen in the optical goniometer). The
r-ray rocking curve shows a quadruple peak with a total spread of less
than a minute-and no other reflections within 30 minutes to either side.
The eleven minute roof angle does not appear in the r-ray data. Hence
we conclude that the apparent faces are ones of very high indices, not
two crystals joined at eleven minutes. A hint of the causeof vicinal faces
is given by this crystal and a few others examined. A thin sheet of flawed
material comesup from the base of the crystal and points directly at the
ridge of the roof. This probably puts the material in a state of stress,the
stress reversing sense at the end of the flawed sheet. rf the speed of
growth is altered by stress this might cause the growing face to have
STRUCTURALIMPERFECTIONSIN QUARTZCRYSTALS
629
indiceshlLt h*Az, lfA3 on one side of the flawed region and h-A1,
h-A2, l-A,s on the other side-the A's being very much smaller than
unity.
The pictures, Fig. 7, show many scratches. The crystal (from the
private collection of Mr. George Shoemaker of Summit, New Jersey)
was in a box with many other quartz crystals. They probably scratched
one another slightly but it is not apparent to the naked eye. Experiments
with ammonium dihydrogen phosphate show that when a metal point
is pressed against a polished face there is a misoriented region much
larger than the obviously damaged region. Probably minute fissuresare
Frc. 8
made, and broken ofi material is forced into these, wedging them open
thus causing strain over an extended area. This is possibly the main
mechanism of disorientation of ground surfaces of non-plastic crystals.
The material actually broken ofi and trapped in the fissuresis of very
small amount and is probably misoriented to a much greater extent. If
it were randomly oriented the probability that any one particle would
have a plane (01 1) within a minute of the reflecting position is one
chancein four million. Hence it seemsprobable that the slight misorientations are in the still attached material put under strain by the impacted
material.
Figure 8 shows the best face of a Bell Laboratories synthetic quartz
crystal. The crystal, which is 32 millimeters long is shown in Fig. 9c, the
face pictured in Fig. 8 being the lower right major rhombohedral face of
Fig. 9c. There is a low pimple shaped mound near an edge of this face.
There is local strain around this pimple but the rest of the face is nearly
perfect.
Figures 9a and 6 show the upper rhombohedral face of Fig. 9c. This
face is far from perfect. There is a central mound much more prominent
than the mound of Fig. 8, no inclusions can be seenunder either mound
630
W. L. BONDAND T, ANDRUS
at 360 magnification. Fifty minutes away from the main peak is a secondary peak that is due to ring shaped regions, picture 9b. It would be
interesting to put this crystal back in the bomb and grow more quartz
onto it to see if the face would become more perfect.
Figure 10 shows several views of a slice of a synthetic quartz crystal
grown at the Bell Laboratories. A seed plate about $ inch thick and 1]
inches square parallel to (01 .1), was grown to about $ inches thick. A
slice was cut out of the center and since it was too long to cover in one
picture it was sawed in two. In cutting the slice the cuts were made along
Frc.9
r(01 .1) planeswhich are 76"26'from z(01'1), giving a surfacenearly perpendicular to the growing face (see Fig. 104) so the process of growth
could be studied. The original seed was Brazilian quartz and shows
diagonal stripes which are growth lines on prism faces.The new material
showsstripesover the large face edges,growth on (01'1) faces.The joint
between the old and new qtartz shows a fair amount of misorientation.
Under the microscope, one sees many fine radial crystal aggregatesin
the new material near the boundary with the old material. The aggregates are about 10 microns in diameter. They are much more numerous
on one side of the seed than on the other. The side with the greatest
number was probably uppermost during growth. They may be recrystallized material from the bomb wall. If, as is likely, the upper side of the
seedwas least dissolved back at the beginning of the growth run, it may
STRUCTURAL IMPERFECTIONS IN OUARTZ CRYSTALS
631
,/,
trv,j
k
Frc
'from
have kept a region strained
grinding. This region could cause a
pimple.
In the old material near the boundary there were three small voids,
about 20p,in diameter, 60p long, perhaps 40p apart and parallel to each
632
W. L. BONDAND J. ANDRUS
other. Exactly opposite, near the other boundary were three more quite
similar, also in the old material. Each was full of liquid except for a gas
bubble. Probably there were three submicroscopicholes through the seed
or three submicroscopicrutile needles.These etched out a short distance
at the beginning of the growth run, then sealedover. No line connecting
each with its opposite could be seen at 100 magnification of the microscope. Pictures,j,k, I taken with the r-ray beam traveling along the
length of the slice shows a slight rumpling in the new material above the
seed. Better "joins" of old to new material are now being made, at least
better by the criterion of joint visibility but these newer crystals have
not been tested by this r-ray test.
H. D. Keith (op. cit.) finds that the cell size of synthetic quartz varies
with the temperature at which it was grown. Crystals grown at 390o C.
have smaller cells than crystals grown at 280" C., smaller by 1 part in
10,000along the (o) axes, by 1 part in 17,000along the (c) axis. This is
probably due to the efiect of temperature on impurity content. The
growth lines could be due to such a temperature effect.
Five AT quartz blanks were examined. One was found to have a I/
shaped twinned portion. This twinned portion showed perfect alinement
with the rest of the plate. There was no strain at the boundary. Since
(01 0) reflects more strongly than (01 1) this part merely reflected more
strongly than the rest of the plate at all orientations near the peak. One
of the five blanks showed strioes like those of Fis. 5 acrossa corner of the
plate.
Martuscript receited Oet. 211,1951


