Broadspeed OfficeSuite
Quick Start Guide for Users
®
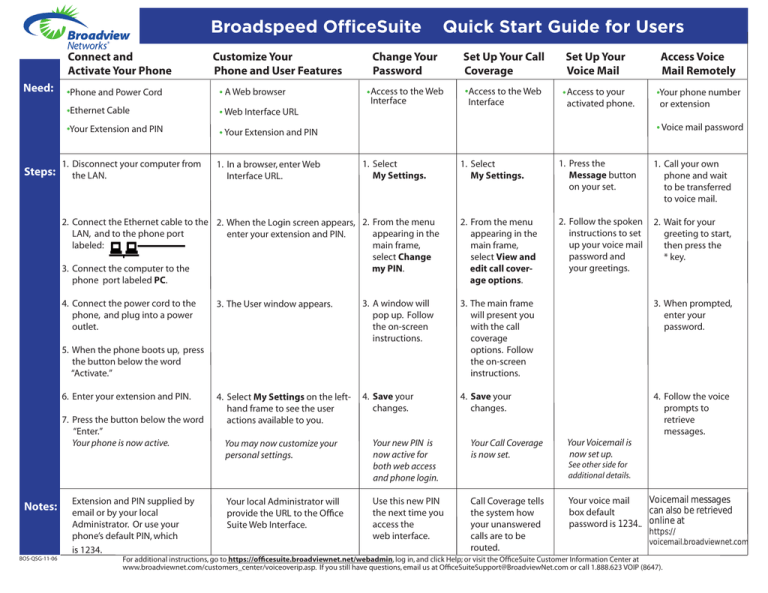
Connect and
Activate Your Phone
Need:
Steps:
.Phone and Power Cord
.Ethernet Cable
.Your Extension and PIN
Customize Your
Phone and User Features
. A Web browser
.Web Interface URL
.Your Extension and PIN
Change Your
Password
activated phone.
Access Voice
Mail Remotely
.Your phone number
or extension
.Voice mail password
1. Select
My Settings.
1. Press the
Message button
on your set.
1. Call your own
phone and wait
to be transferred
to voice mail.
2. Connect the Ethernet cable to the 2. When the Login screen appears, 2. From the menu
LAN, and to the phone port
appearing in the
enter your extension and PIN.
labeled:
main frame,
select Change
3. Connect the computer to the
my PIN.
phone port labeled PC.
2. From the menu
appearing in the
main frame,
select View and
edit call coverage options.
2. Follow the spoken
instructions to set
up your voice mail
password and
your greetings.
2. Wait for your
greeting to start,
then press the
* key.
4. Connect the power cord to the
phone, and plug into a power
outlet.
1. Disconnect your computer from
the LAN.
6. Enter your extension and PIN.
7. Press the button below the word
“Enter.”
Your phone is now active.
BOS-QSG-11-06
Set Up Your
Voice Mail
.Access to the Web .Access to your
.Access
to the Web
Interface
Interface
1. In a browser, enter Web
Interface URL.
1. Select
My Settings.
3. The User window appears.
3. A window will
pop up. Follow
the on-screen
instructions.
3. The main frame
will present you
with the call
coverage
options. Follow
the on-screen
instructions.
3. When prompted,
enter your
password.
4. Select My Settings on the lefthand frame to see the user
actions available to you.
4. Save your
changes.
4. Save your
changes.
4. Follow the voice
prompts to
retrieve
messages.
5. When the phone boots up, press
the button below the word
“Activate.”
Notes:
Set Up Your Call
Coverage
Extension and PIN supplied by
email or by your local
Administrator. Or use your
phone’s default PIN, which
is 1234.
You may now customize your
personal settings.
Your new PIN is
now active for
both web access
and phone login.
Your Call Coverage
is now set.
Your local Administrator will
provide the URL to the Office
Suite Web Interface.
Use this new PIN
the next time you
access the
web interface.
Call Coverage tells
the system how
your unanswered
calls are to be
routed.
Your Voicemail is
now set up.
See other side for
additional details.
Voicemail messages
Your voice mail
can also be retrieved
box default
password is 1234.. online at
https://
voicemail.broadviewnet.com
For additional instructions, go to https://officesuite.broadviewnet.net/webadmin, log in, and click Help; or visit the OfficeSuite Customer Information Center at
www.broadviewnet.com/customers_center/voiceoverip.asp. If you still have questions, email us at OfficeSuiteSupport@BroadviewNet.com or call 1.888.623 VOIP (8647).
OfficeSuiteTM Voicemail Quick Reference Guide
To Initialize Your Voice Mailbox
Mailbox Options
1. Dial your own telephone number. (OfficeSuite users
press the message button on the phone.)
2. At the prompt, enter your passcode, optionally
terminated by #.
1. From the Main Menu, press 9.
2. You can then select one of these options:
To Access Your Voicemail Remotely*
1. Dial your own telephone number and wait for the call to
cover to voicemail.
2. Interrupt the voicemail greeting with "*".
3. At the prompt, enter your pass code, optionally
terminated by #.
For First Time Users Who Need to Initialize their
Voice Mailbox
1. Access your voicemail as described above.
2. The default pass code is 1234 and should be changed
immediately.
3. The voice prompts guide you through setting up your
mailbox and changing your pass code.
4. Terminate the recording of your name and your
greetings using #.
Voicemail Menu
After calling into your Voicemail you will be presented
with the following options:
Press
Review and Record Your Name and Greetings
Press
Change Your Pass Code or Login Options
Press
Change What Information is Played at the Start of Each Message
Press
Change Call Answering Options and Select Active Greeting
Press
Main Menu
Press
Help
Listening to Messages
1. From the Main Menu, press 1.
2. You can then select one of these options:
Press
Replay Current Message
Press
Save Current Message
Press
Delete Current Message
Press
Reply to Current Message
Press
Forward a Copy of Current Message
Press
Message Information
Press
Play Previous Message
Press
Play Next Message
Press
Listen to Messages
Press
Message Menu
Press
Send a Message
Press
Main Menu
Press
Place a Call
Press
Help
Press
User Options
Press
Disconnect/Hang-up
Press
Help
Message Navigation
1. From the Main Menu, press 2.
2. At the prompt, dial an extension or a Voicemail group
number, or dial by name.
3. Press # after each destination number. Add as many
destinations as you wish. After the last destination
number and #, Press # again to begin recording your
message.
4. When you have finished recording your message, press #.
Press
Send Message
Press
Re-Record Message
Press
Review Message
Press
Mark Message Urgent
Press
Add Recipients
Press
Mark Message Private
Press
Send
Press
Cancel, Return to Main Menu
Press
Help
Forwarding a Message
1. While listening to messages, press 5 to forward to
another recipient.
2. At the prompt, dial the extension number of the
message recipient(s) terminated by #.
3. After the tone, record an introductory message. When
you are finished, press #.
4. Press #1 and the message will be forwarded to the
recipients.
To be used while a message is playing.
Press
Rewind
Press
Pause
Press
Fast Forward
Press
Message Menu
*Once your OfficeSuite voice mailbox is set up for the first time, messages can also be listened to and managed online at
https://voicemail.broadviewnet.com.
©2011 Broadview Networks Inc. All rights reserved.
Send a Message
Customer Service 1.800.BROADVIEW

