Application Guidelines
Effective: April 14, 2009
Vikuiti ™ Transmissive Right Angle Film (TRAF) II
G ro o v e Dire c tio n :
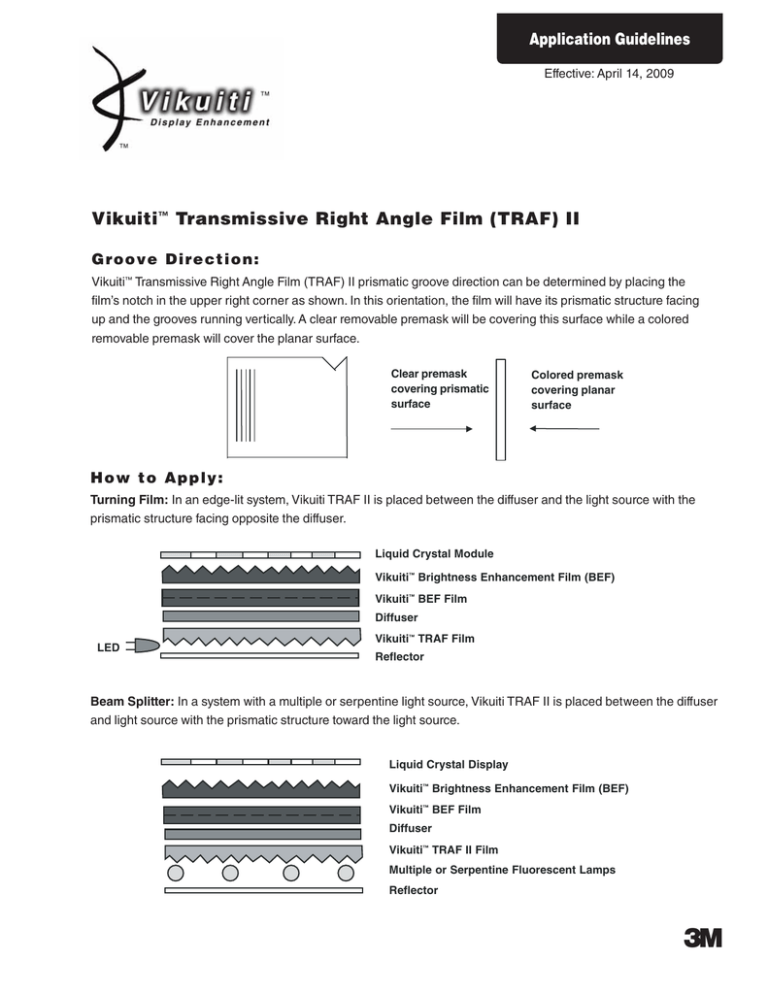
Vikuiti™ Transmissive Right Angle Film (TRAF) II prismatic groove direction can be determined by placing the
film’s notch in the upper right corner as shown. In this orientation, the film will have its prismatic structure facing
up and the grooves running vertically. A clear removable premask will be covering this surface while a colored
removable premask will cover the planar surface.
Clear premask
covering prismatic
surface
Colored premask
covering planar
surface
H o w t o Ap p ly :
Turning Film: In an edge-lit system, Vikuiti TRAF II is placed between the diffuser and the light source with the
prismatic structure facing opposite the diffuser.
Liquid Crystal Module
Vikuiti™ Brightness Enhancement Film (BEF)
Vikuiti™ BEF Film
Diffuser
LED
Vikuiti™ TRAF Film
Reflector
Beam Splitter: In a system with a multiple or serpentine light source, Vikuiti TRAF II is placed between the diffuser
and light source with the prismatic structure toward the light source.
Liquid Crystal Display
Vikuiti™ Brightness Enhancement Film (BEF)
Vikuiti™ BEF Film
Diffuser
Vikuiti™ TRAF II Film
Multiple or Serpentine Fluorescent Lamps
Reflector
3
The following steps are a guideline for incorporating Vikuiti™ TRAF II into your liquid crystal display. Clean room
gloves should be worn during the application process to avoid fingerprints, scratches, and debris.
1. Convert the film to the desired part size. The premask should remain on the film during this stage.
• Die cutting is the recommended form of converting, resulting in the cleanest edges.
• Shear cutting is also an option for converting, but may result in rough edges.
2. Remove colored premask from the planar side of the film.
• Place the film on a clean flat surface.
• Use Scotch® Magic™ Tape #810.
• Apply a piece of tape 1/2" from a corner of the film, leaving a 1/2" tab.
• Using the tape, peel back the premask at approximately 180°.
• Peel the premask toward the opposite corner of the film.
• Discard the premask.
3. Remove the clear premask from the prismatic side of the film using the same steps as in #2.
4. Remove any loose debris from the film by using compressed air.
5. Place the film with the prism structure away from the LCD.
• A pressure sensitive tape (such as Scotch® Double Coated Film Tape #415) may be applied along one edge
or two adjacent corners.
• A pressure sensitive tape may not be necessary if you can capture the film in the frame of the display.
Important Notice to Purchaser
The following is made in lieu of all warranties, express or implied, including any implied warranties of merchantability
or fitness for a particular purpose.
3M warrants that, at the time of shipment, product will meet 3M’s published specification or that specification agreed in
writing between 3M and purchaser. Should product not meet specifications at time of shipment, 3M will replace or refund the
purchase price of such quantity of the product found not to meet specifications. Purchaser shall determine the suitability of the
3M product for purchaser's application. 3M shall not be liable under any legal theory, including in contract or in tort, for
any injury, loss, or damage, whether direct, indirect, incidental, special or consequential, arising out of the use of or
the inability to use the product.
The warranties and remedies set forth herein are purchaser's sole and exclusive warranties and remedies.
3
Optical Systems Division
3M Center, Building 235-1E-54
St. Paul, MN 55144-1000
1-800-553-9215
Vikuiti and the Vikuiti “Eye” symbol and Magic are
trademarks of 3M.
Scotch is a registered trademark of 3M.
Please recycle. Printed in U.S.A.
Minimum 10% Post-Consumer Fiber
© 3M 2009. All rights reserved.
75-0500-2281-5

